
Freelance Notion Template | Expense Tracker, Invoices, & Tools
This blog post series deconstructs my most popular Notion template: the Automated Freelancer Dashboard. This template has evolved significantly over the years, incorporating new Notion features. As a freelancer myself, I understand the struggles we all face and have found ways to address them in Notion.
In part 1, we explored everything related to project management, task management, & client CRM. In part 2, we will explore how to build your finance tracker system, how to create and send invoices and proposals from Notion, and we will also take a look at a few third-party tools that can enhance your financing experience in Notion.
While all of this is quite simple, it may take some time to recreate and can be challenging for Notion beginners. But don't worry, if you want an all-in-one dashboard that includes everything we discuss here and more features like project and task management, client CRM, content planning, OKRs, and more, I have a template for you.
Purchase the template
Notion Finance Tracker
I've been managing my business finances in Notion for over a year now, and I love it. It works great, it's easy, and I love having everything in one place. Keep in mind that I run a one-person business, so this system doesn't need to be complicated.
My Finances page contains four databases:
- Income
- Expenses
- Months
- Years
The only databases I need to fill up are Income & Expenses. Then the data is automatically aggregated into Months and Years (I still have to create a new database item in Months every month and in Years every year).
Income Tracker
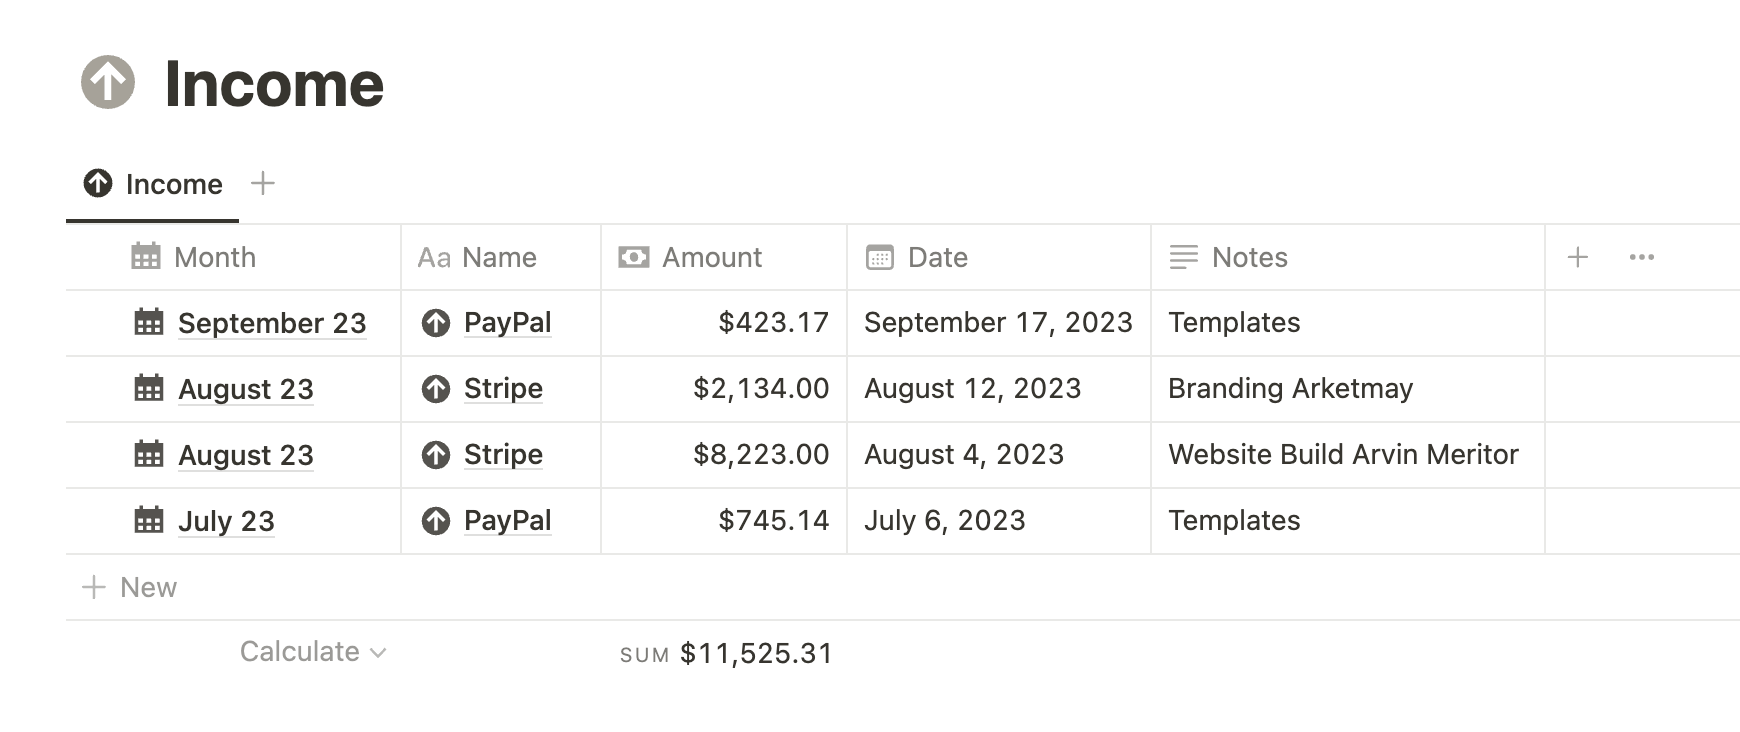
Income is a simple table database with the following properties:
- Name (title): I enter the name from which I received the money (e.g., Stripe)
- Amount (number): The amount I received. I set up this property to display results in euros, but you can use your currency of choice
- Date (date): The date the money arrived in my bank account
- Notes (text): Any information I wish to remember for that transaction (e.g., client name)
- Month (relation): Relation to the Months database
So my process is quite simple: at the end of each month, I go through my bank operations and add all my business-related income to this database. This Income database is set up as a table, and I've created a database template that is enabled by default so that each new income entry comes with an up arrow icon.
Pro tip: You can also add a Tag (select) property to your database to better differentiate items. In my personal Income database, I have a tag where the options are "Templates", "Freelancing", and "Other". This allows me to know exactly how much I earned from templates or freelancing for any given month.
Expense Tracker
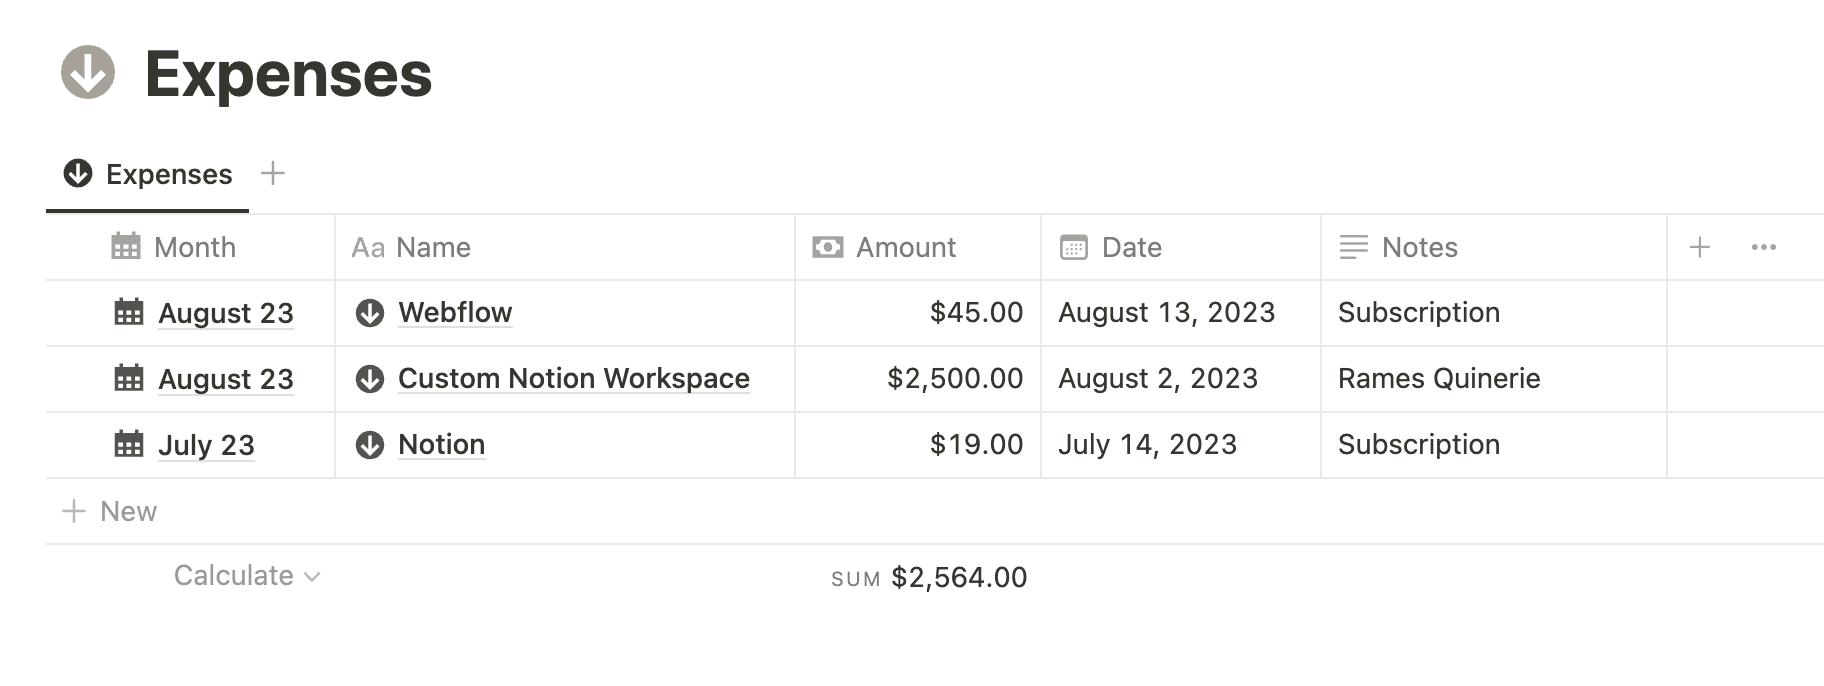
The Expenses database is the same database. You will find the same properties and can also add a Tag property to categorize your expenses (subscriptions, contractors, etc.). The only difference is the icon you add in the default template (instead of an up arrow, we want a down arrow).
The process is also the same: when I go through my bank transactions, I add all my business expenses to this database.
For these two databases, I only have a table view. It has never felt necessary to add more. Keeping things simple 😎
Monthly Reports
Months are where things start to come together. Basically, you want this database to show you what you earned, what you spent, and your balance for any given month. As we've seen before, the Income and Expenses databases are linked to the Months database. This enables us to retrieve all the information we need to calculate these totals.
Setting up the properties
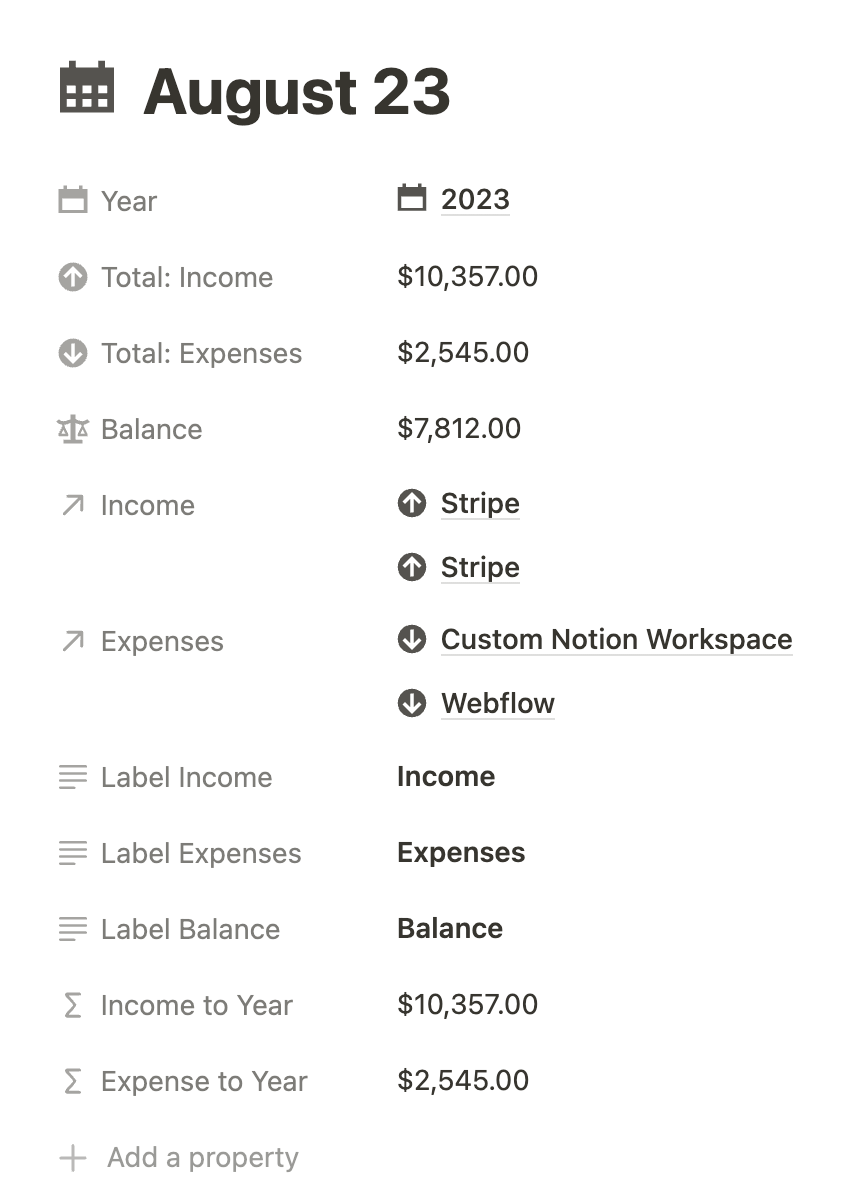
- If it's not already the case, add a new database, name it "Months," and add a relation properties with "Income” & “Expenses."
- Then, you want to add a rollup property. Call it "Total Income" and set it up as follows: Relation → Income, Property → Amount, Calculate → Sum. This will calculate the sum of all your income for each month. Now do the same for Expenses: Relation → Expenses, Property → Amount, Calculate → Sum.
- For the balance, you can use a simple formula: prop("Total Income") - prop("Total Expenses").
- Because of the type of display we're going to use, you also need to add three text properties to act as labels. So create "Label income," "Label expenses," and "Label balance" as text properties.
- Finally, because you want to retrieve all this data into the Years database, you also need to add two formulas that simply retrieve the amount from the rollups (you can't do rollups of rollups, but you can do rollups of formulas). So add two properties called "Income to Year" & "Expenses to Year" with the following formulas: prop("Total Income") & prop("Total Expenses").
Display
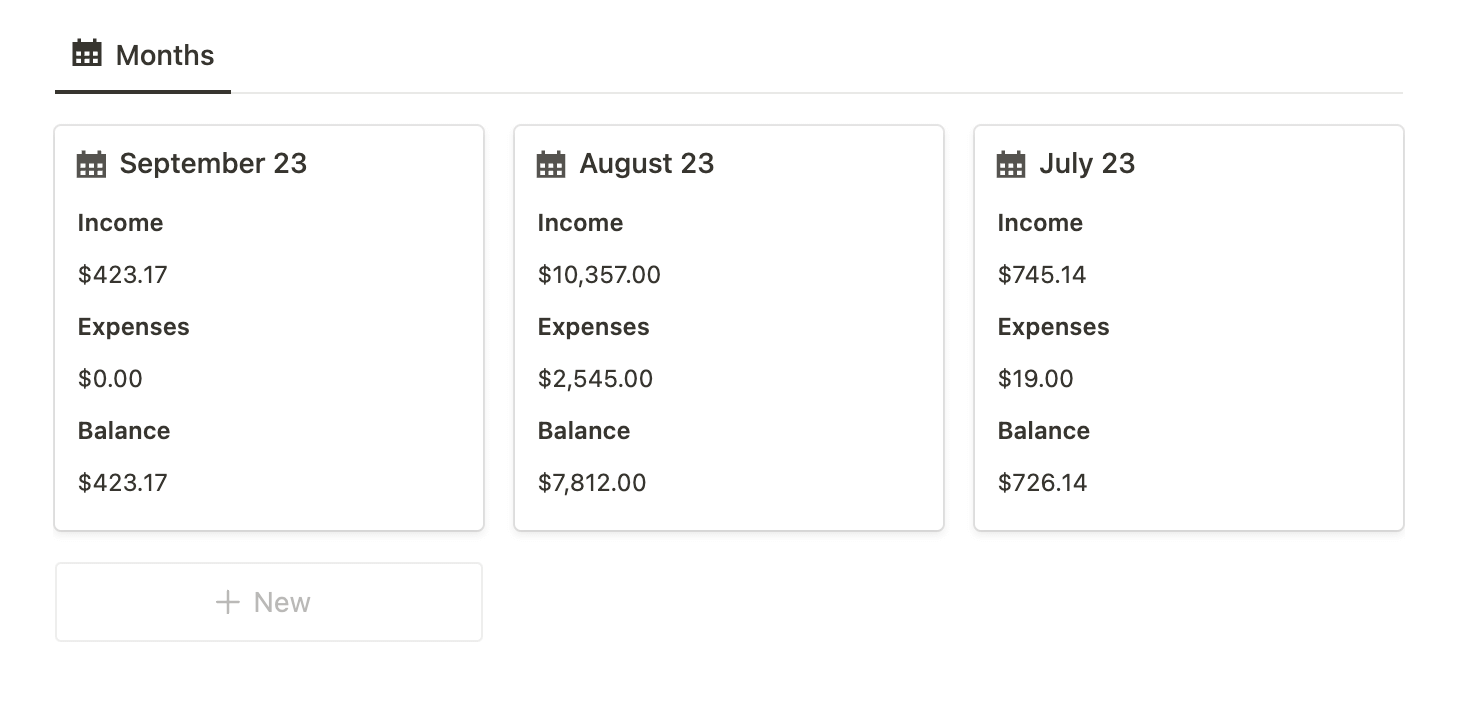
Now that you have all your properties, you want to visualize the data in a nice way. Here's what you can do:
- Change the database view to Gallery, with "Card preview" set up as "None" and "Open pages in" set up as "Side peek."
- Show the following properties in that order: Name, Label income, Total Income, Label expenses, Total Expenses, Label balance, Balance.
- Click on any item in your database and make sure to show only the "Year," "Total Income," "Total Expenses," and "Balance" properties.
- Don't forget to set up all the number properties to the desired currency.
- Finally, create a template that you'll enable by default where you input "Income," "Expenses," and "Balance" in the corresponding label properties. You can also set them up in bold if you prefer.
Pro tip: when you create new months, write "January 23" or "January 2023" instead of just "January." This will help you retrieve the correct month once you've been using the system for multiple years.
Expert tip: you can add self-referentially filtered linked views of the Income & Expenses databases inside the Month database template to see all the related income & expenses for each given month. See this post for more information.
Yearly Reports

For years, you need to repeat the same steps as for the Months database, with a few changes:
- Your database is only linked to the Months database.
- Your "Total Income" property rolls up the data from the "Income to Year" properties.
- Your "Total Expenses" property rolls up the data from the "Expenses to Year" properties.
- You don't need the "Income to Year" and "Expenses to Year" properties because you won't be aggregating this data into another database.
But for the rest, it's all the same, even the layout!
Final layout
There are multiple ways to build your layout, but here is the method I used in the template, which I found to be the most useful:
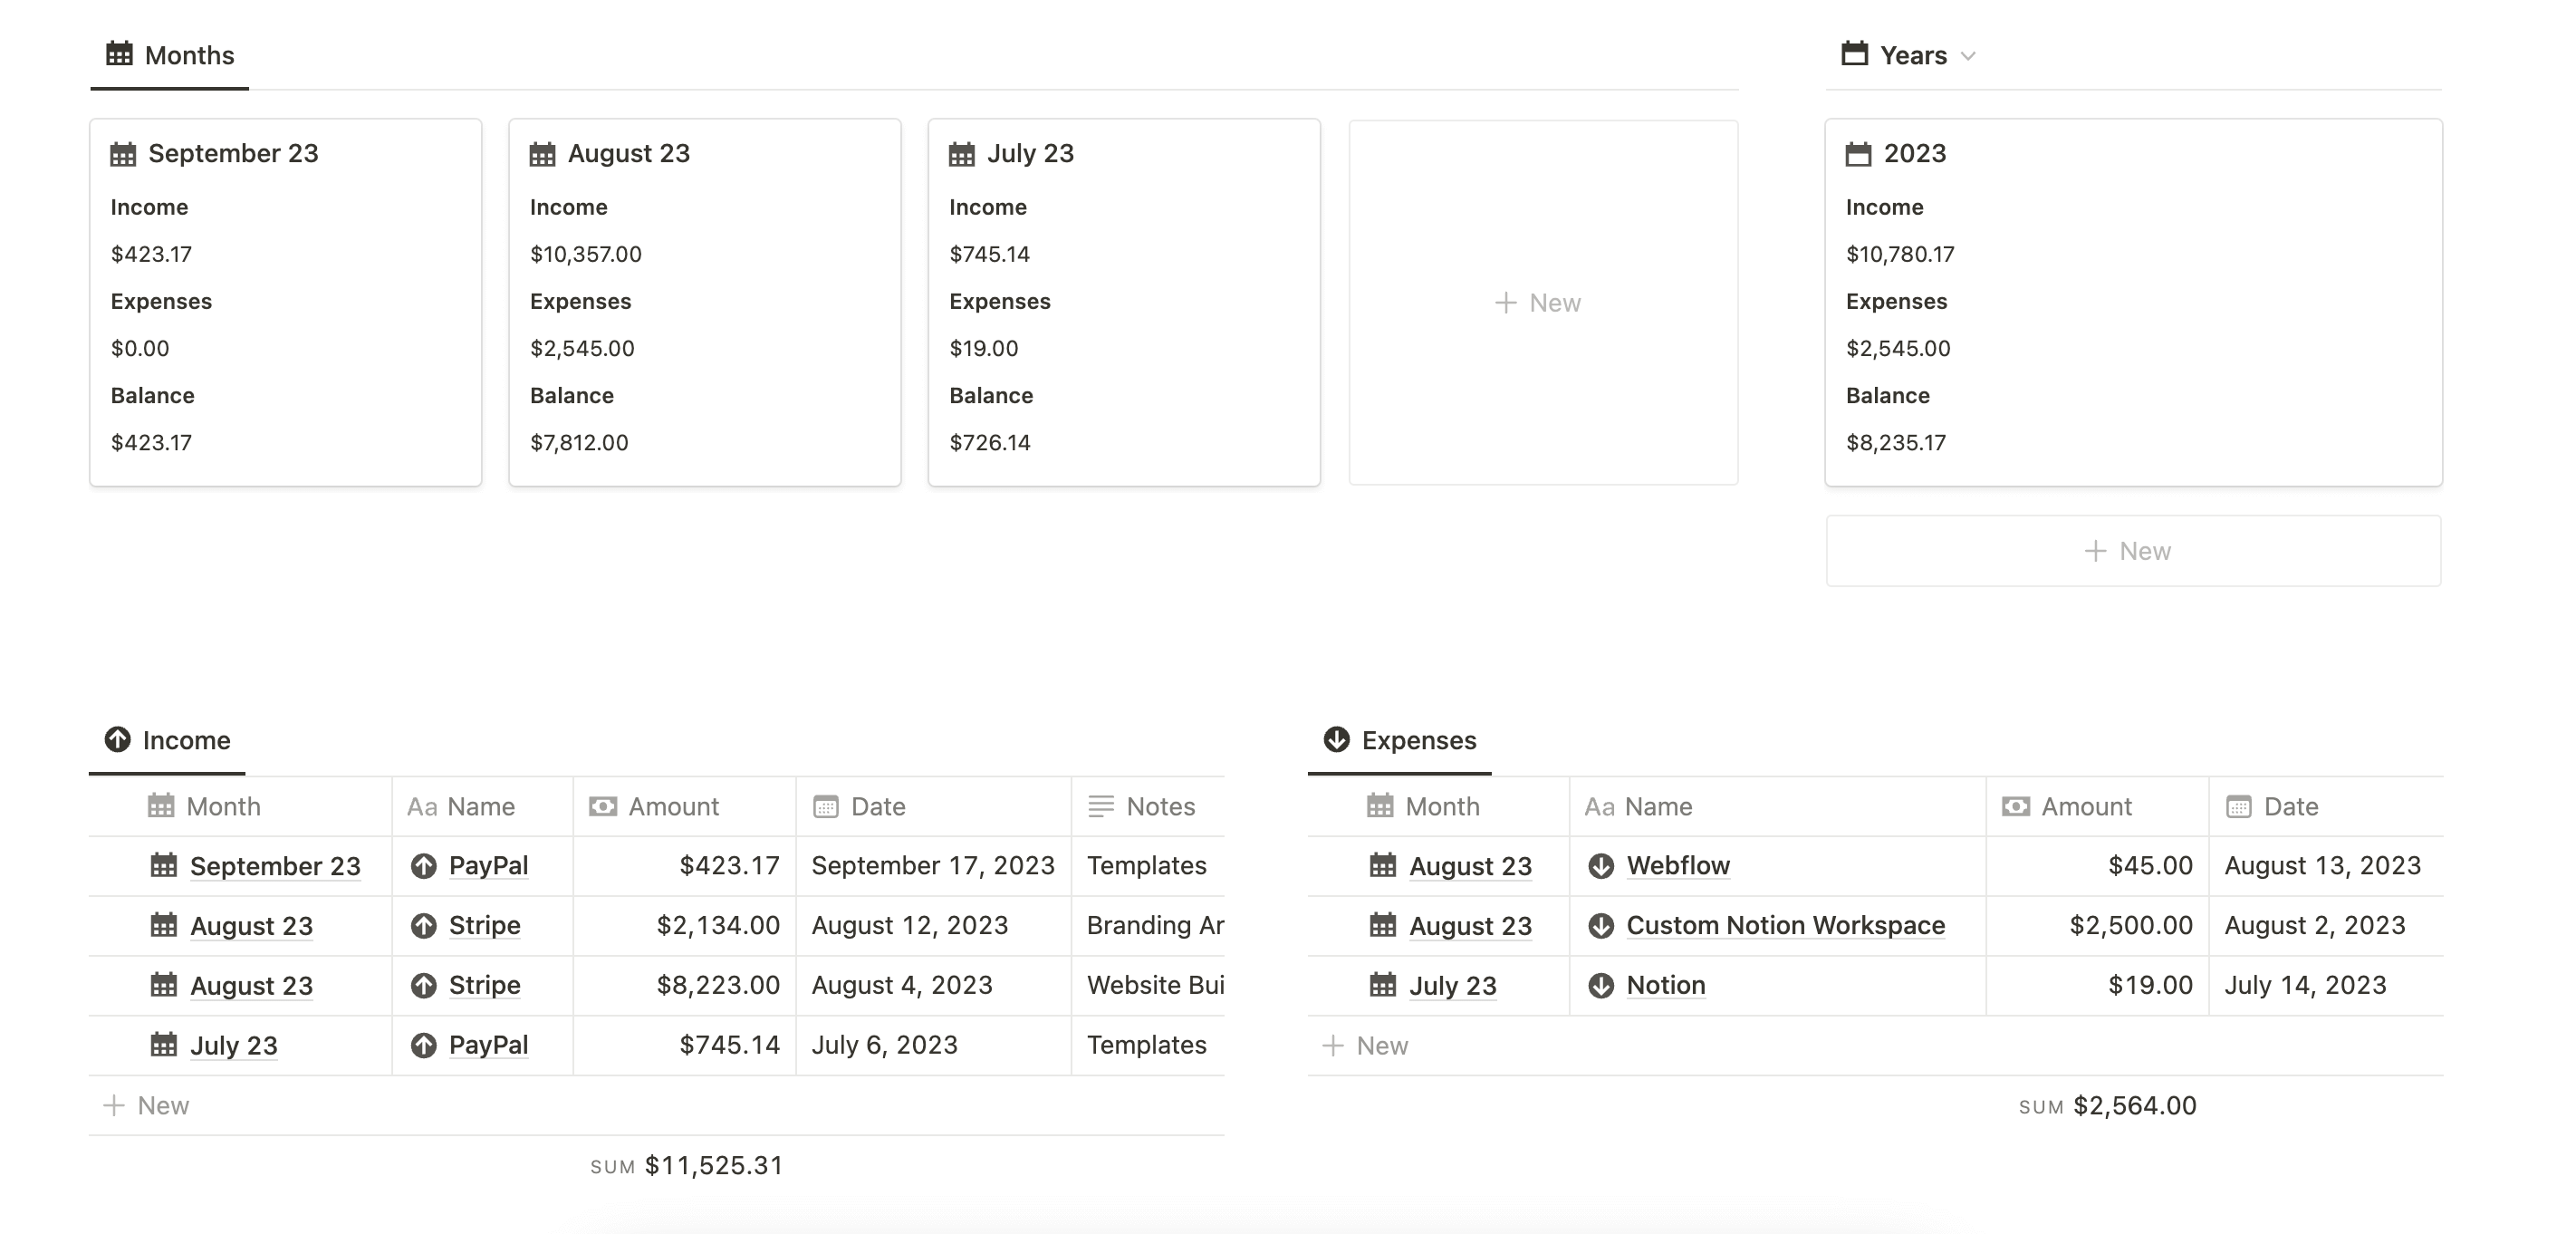
It is minimalistic, visually appealing, and functions effectively. I have hidden the database titles and used view names to display the different databases.
Purchase the template
Notion Invoices & Proposals
Notion Invoice Template
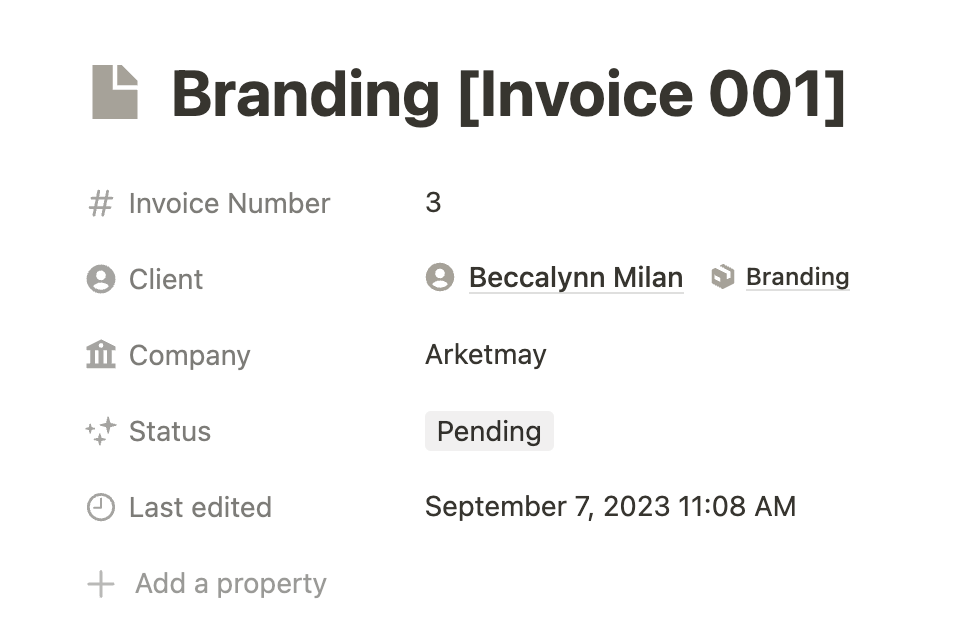
In addition to tracking your finances, the Automated Freelancer Dashboard includes a database for creating and managing invoices. These are real invoices that you can send to your clients, which is pretty awesome!
While the invoice itself is displayed on a Notion page, using a database allows you to keep track of important data points such as invoice number, status (pending, half-paid, paid, rejected), and last edited time. In the template, I have also linked the Invoice database to the Client CRM, making it easy to find any invoice related to a specific client from their client page.
Now, let's talk about setting up your Invoice template. You have the freedom to customize it as you wish, but make sure to include the following information:
- Invoice Number
- Date
- Client name and information
- Your name and information
- Items, quantities, and prices
- Payment options (Stripe/PayPal payment link, bank details, etc.)
Below is an example of how my template is set up, but feel free to customize it according to your preferences.

As you can see, I used a database to display the items. There are two reasons for that:
- It allows you to use a formula to retrieve the subtotal prices (Price * Quantity) and the SUM function below the table for the total price.
- It enables you to include more information on each item page in the database. For example, if a client clicks on "Logo design," they can access the additional information I've included.
Don’t forget to enable your template to be used by default, and ta-da!
Notion Proposal Template
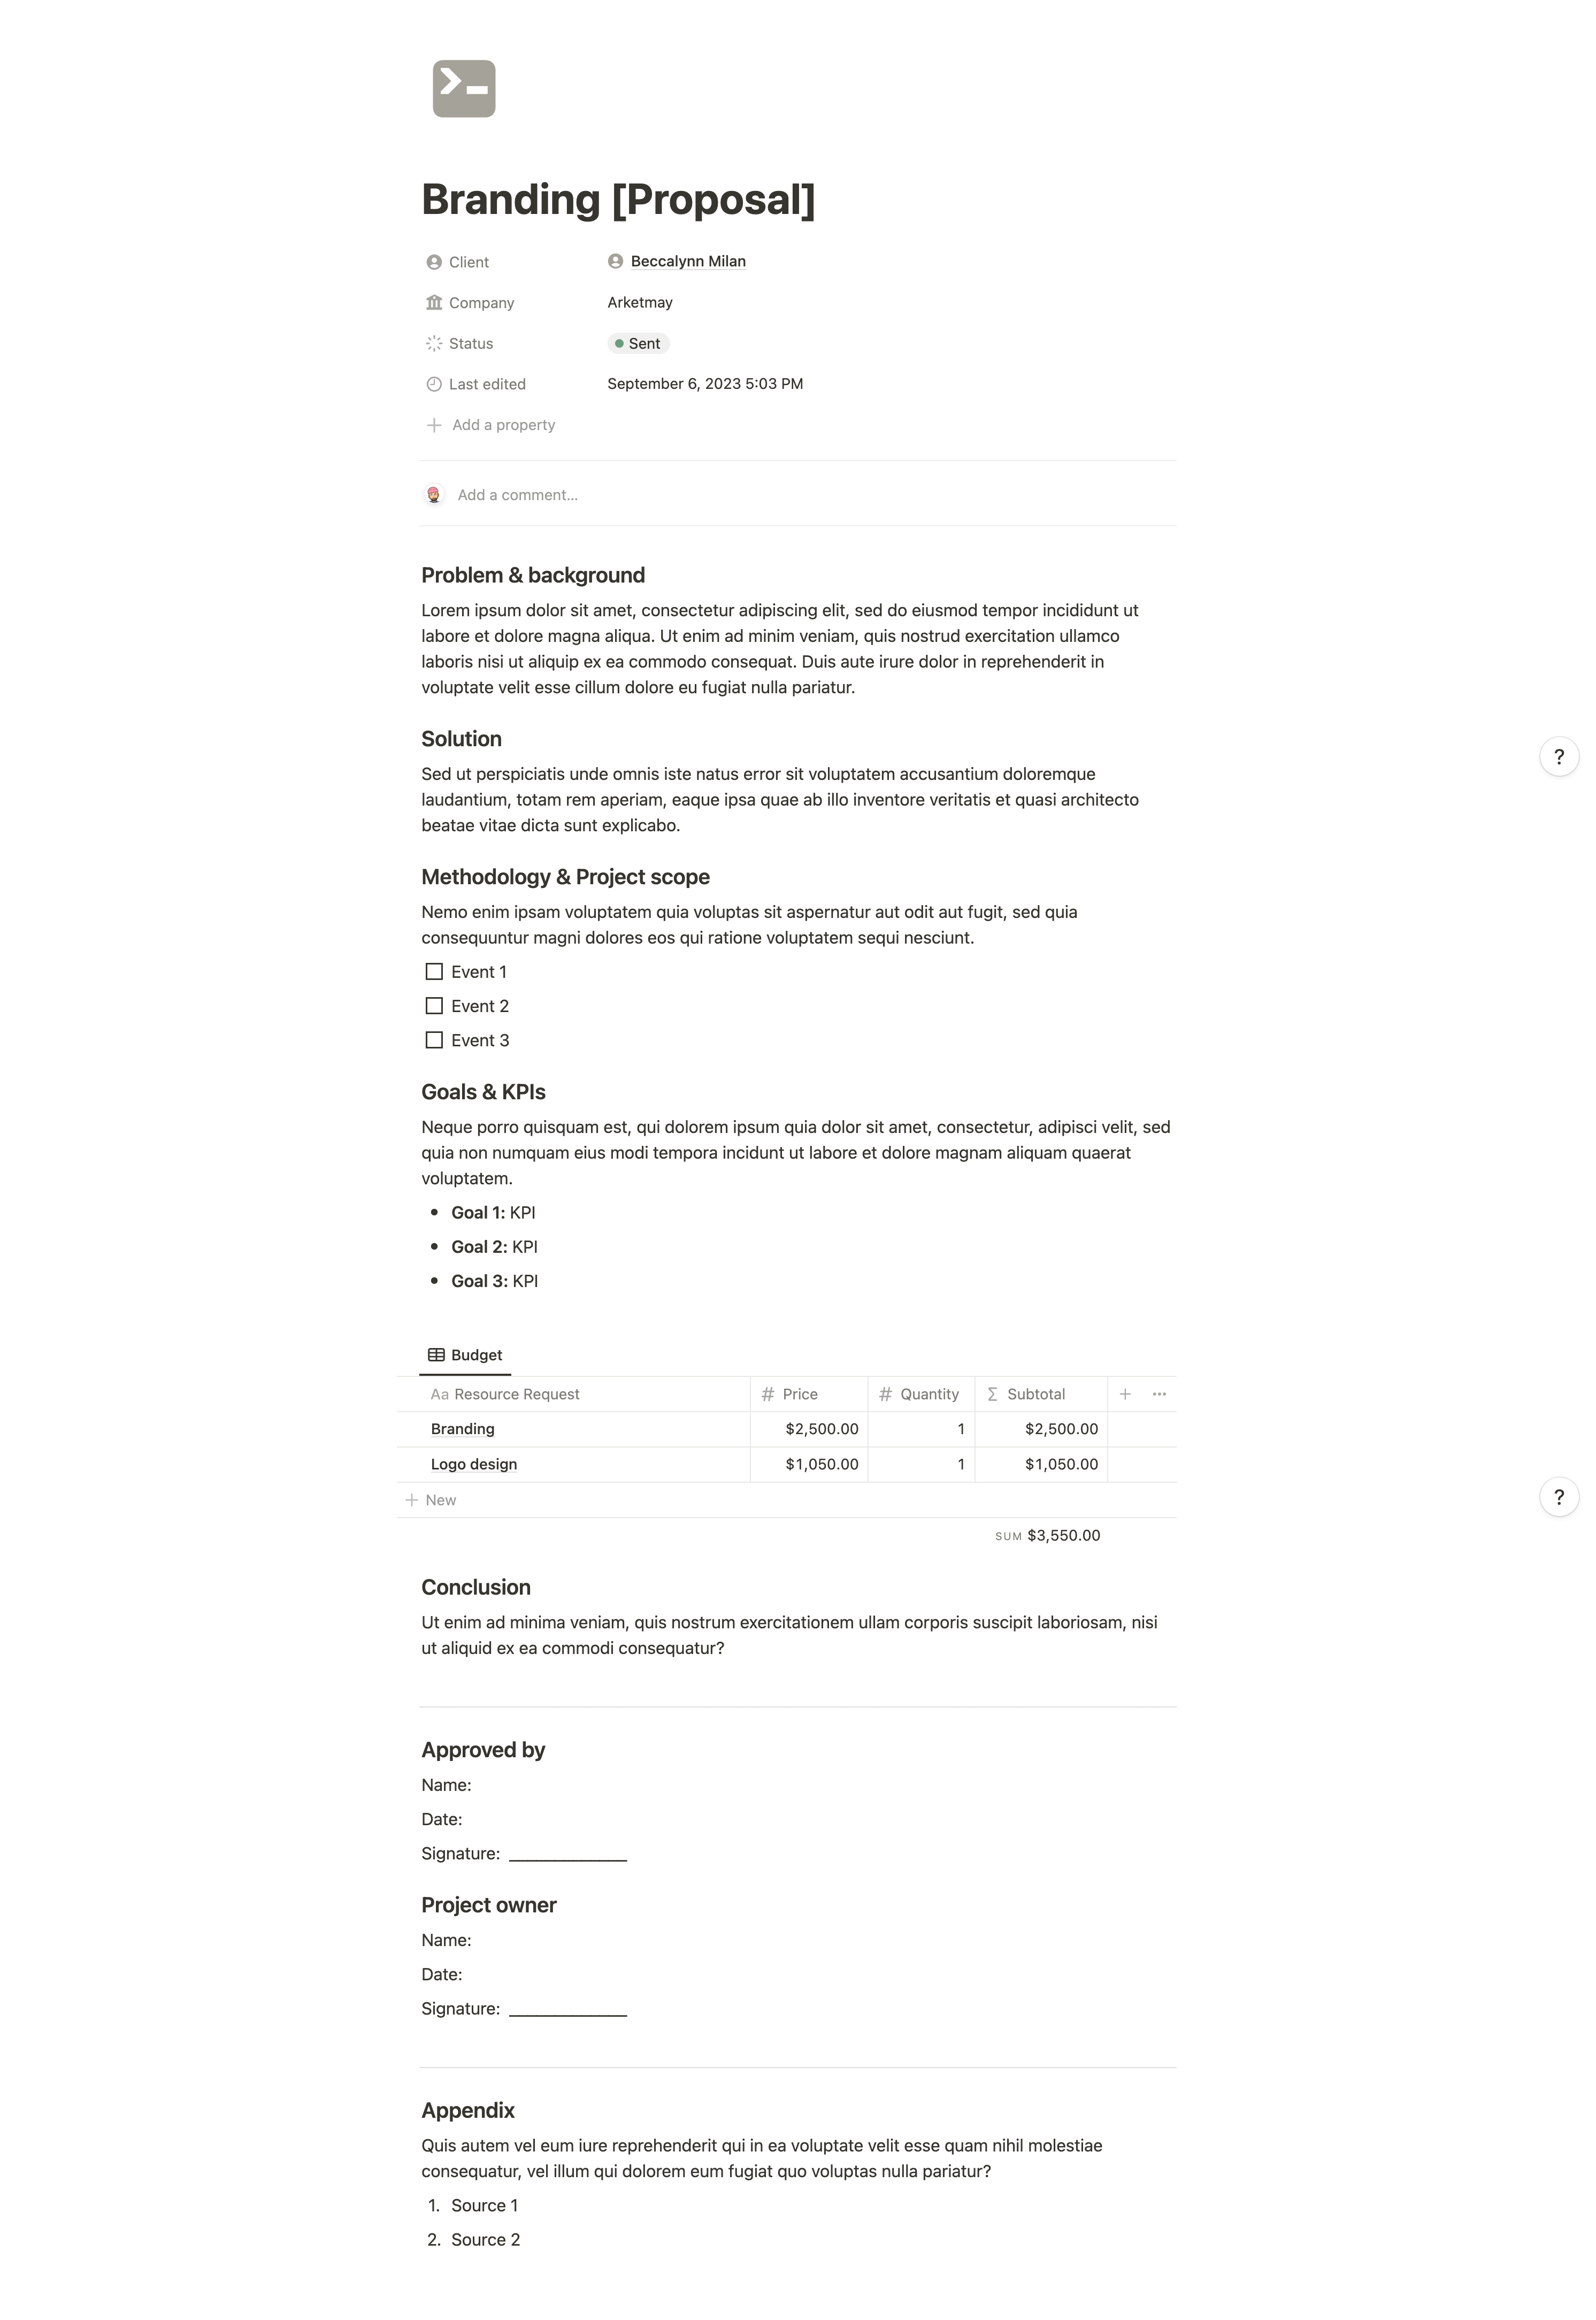
Using the same system, you can create a database for your proposals. If you need inspiration for the proposal template, have a look at mine:
Sharing Settings
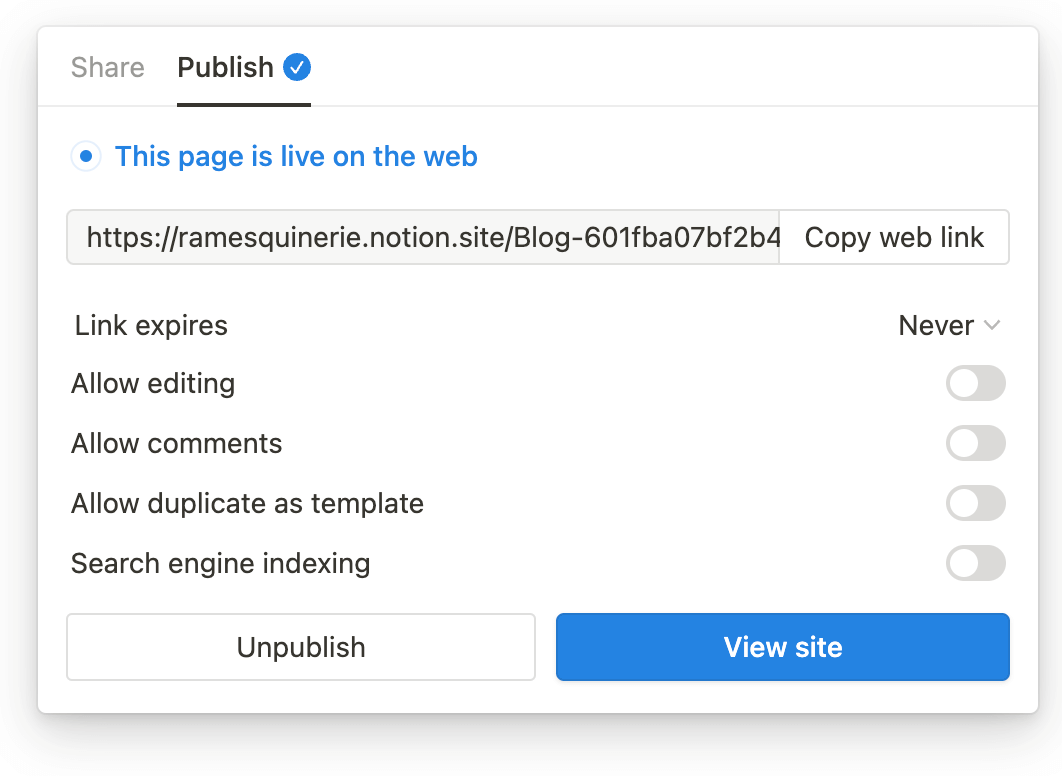
Now, let's move on to the best part: sharing these documents with your clients. You have two options, but option 2 is definitely my favorite (although some clients will ask for option 1).
- Option 1: Export your page as a PDF. You can export any Notion page as a PDF by following these steps: Go to the Page settings (3 dots at the top right of your page) → Export → Export format: PDF → Export.
- Option 2: Publish to the web. You can share your invoice or proposal as a "mini-website". To do this, click the Share button at the top of your page → Publish → Publish to web → Copy web link. Make sure to disable "Allow duplicate as template". Then all you have to do is send a message or email to your client with the link you just copied. And don't worry about the relation property to your CRM, it won't be visible on the publicly shared page.
Pro tip: by using option 2, you can also set an expiration date for the link. After this date, the client will no longer be able to access the link.
Notion Finance Tools
There are a few third-party tools that you can use to get even more out of Notion when it comes to managing finances & invoices.
Magicbeans
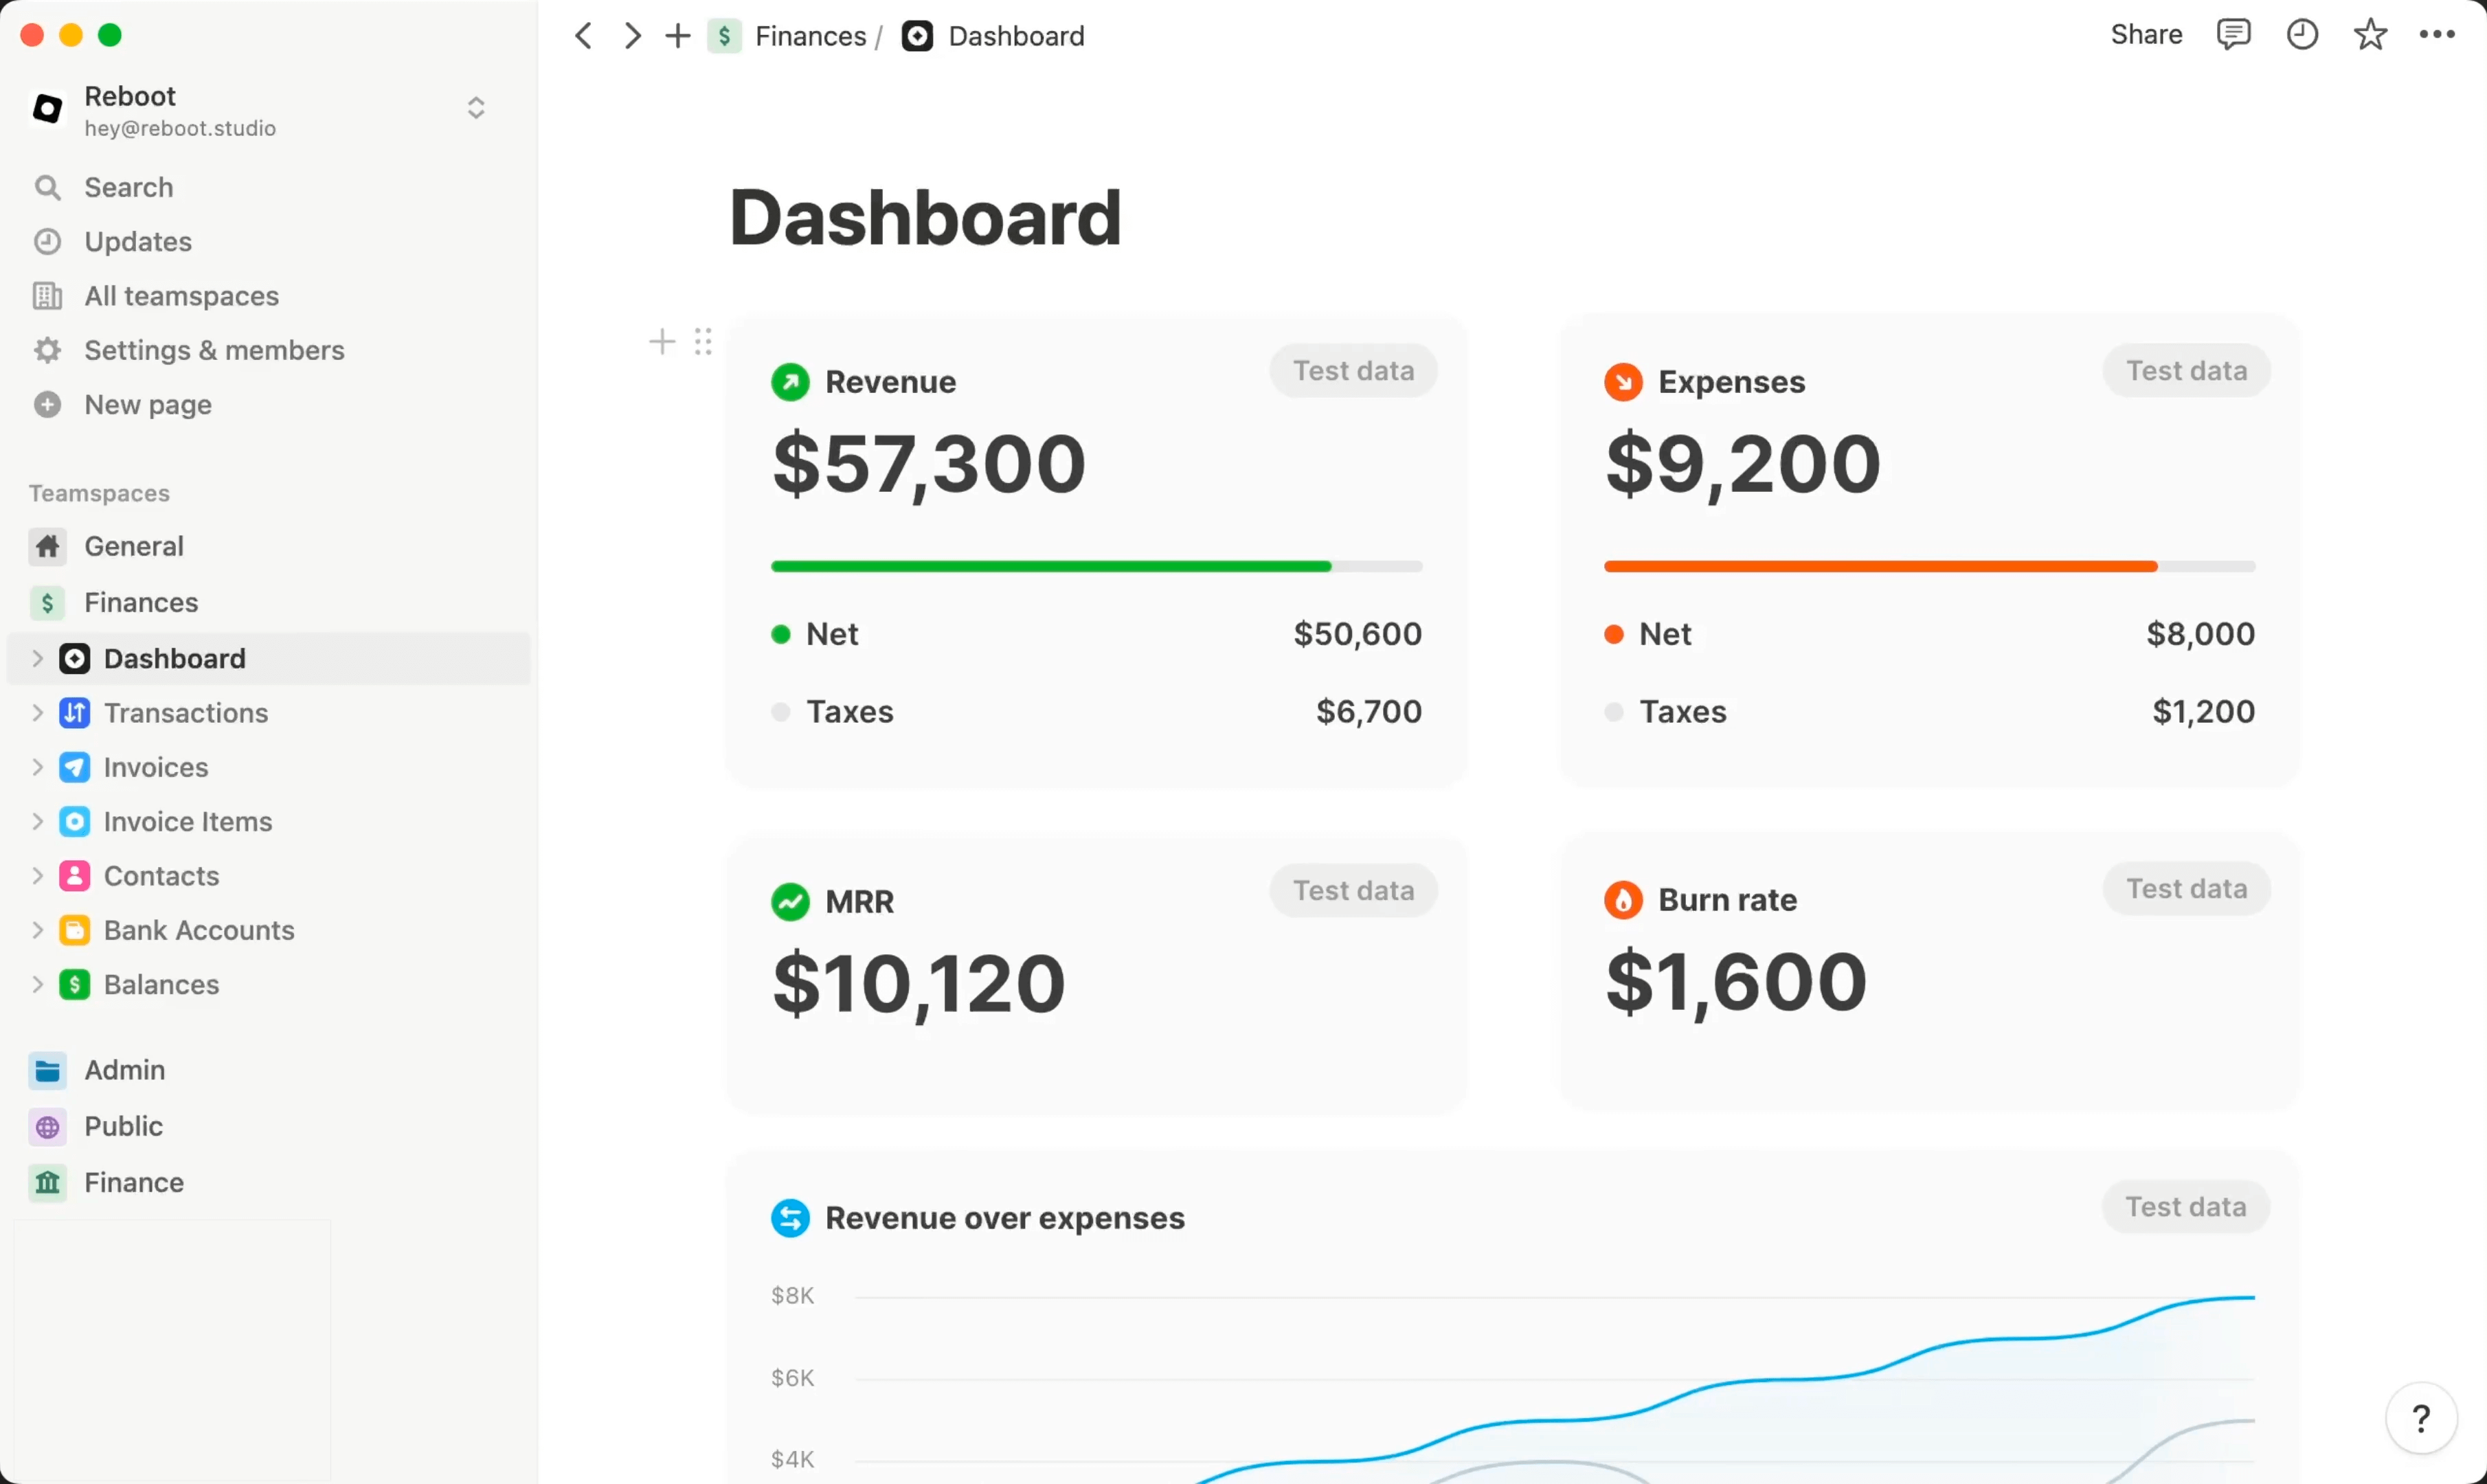
MagicBeans is a toolkit for businesses that operate on Notion. It offers two main features: beautiful invoice generation and simple finance management. With MagicBeans, you can transform your existing projects and client data in Notion into professionally designed invoices. You can customize templates to match your brand identity, export invoices as PDF files, and create a custom workflow to organize your invoices.
In terms of finance management, MagicBeans provides auto-generated reports and essential information to help you understand your business. You can connect your bank account to retrieve balance and transaction data, track your revenues and expenses with human-readable charts, and get daily balance updates. MagicBeans ensures privacy by not storing any personal or financial information about you. It utilizes the Notion API to fetch your data, and your data and credentials are never shared with third parties.
Overall, MagicBeans simplifies the process of invoicing and offers finance management tools for businesses using Notion.
Try MagicBeans
Finta
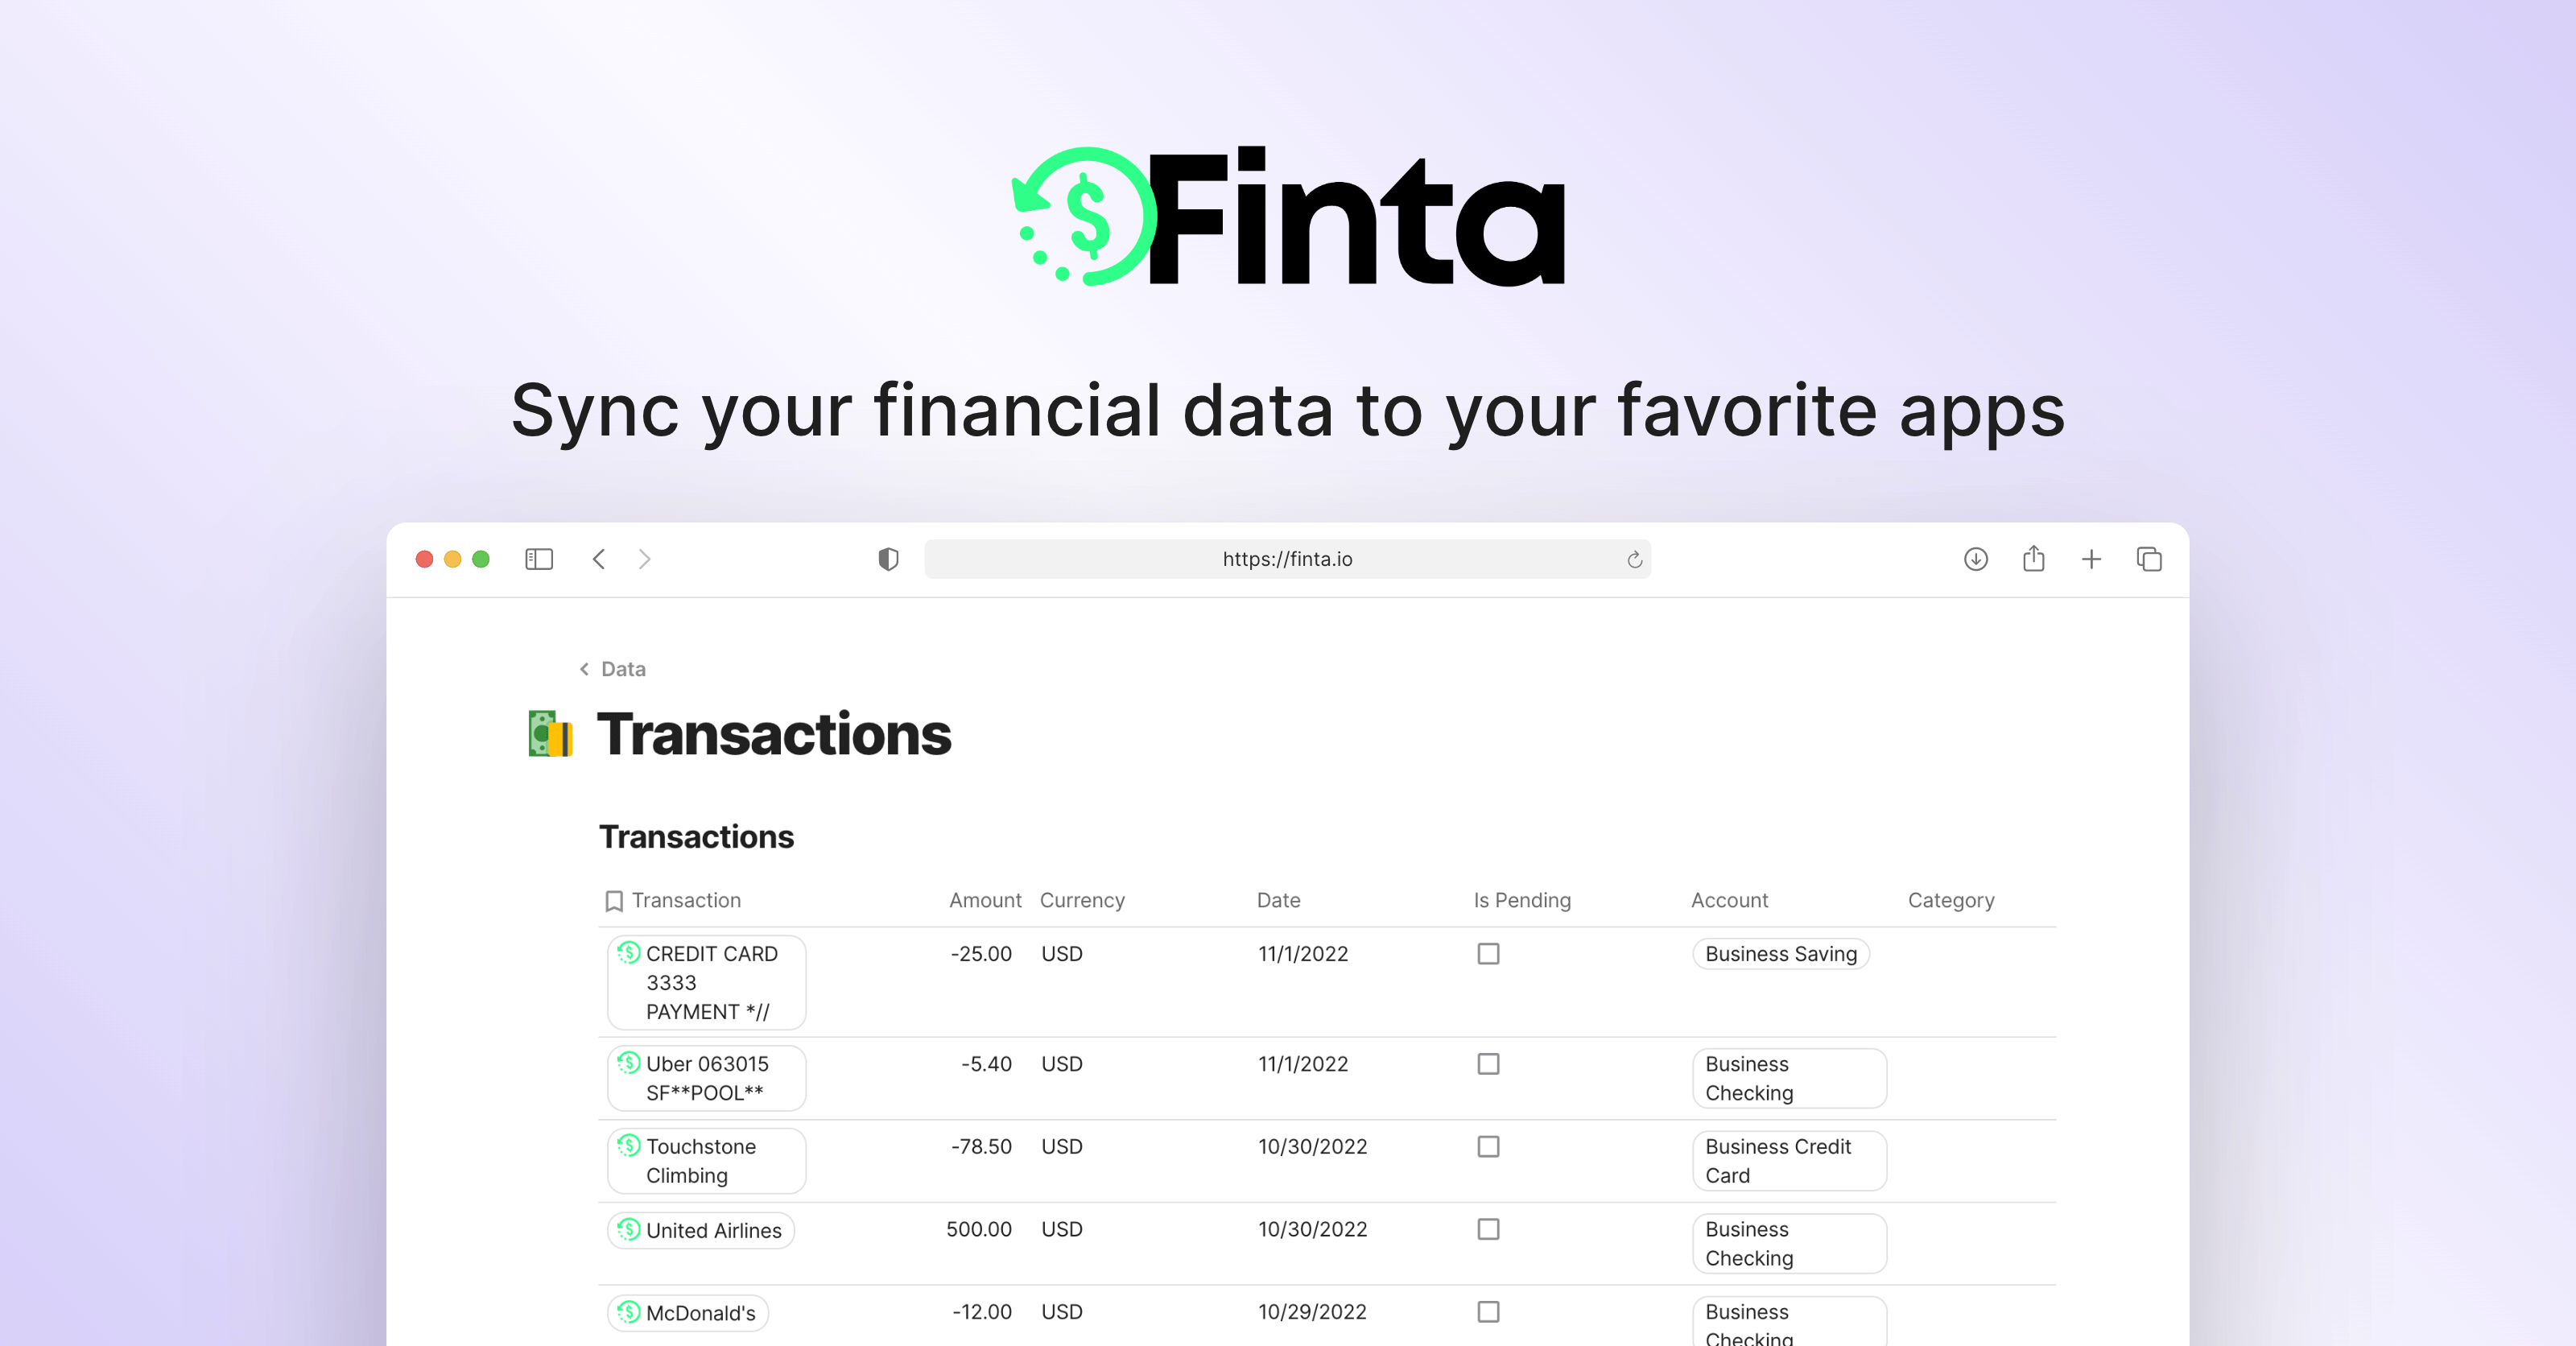
Finta is a financial tool that allows you to sync your account balances, transactions, and investments into your favorite tools like Airtable, Coda, Google Sheets, or (what we want) Notion. It aims to provide you with access to your own financial data and the flexibility to manage your finances according to your own preferences.
Finta integrates with thousands of US and Canadian banks and offers unlimited connections for syncing banking accounts to destinations. The platform promises not to sell your data or use it for advertising.
With Finta, you can leverage Notion and these other tools for managing and automating your financial routines. Finta has garnered positive reviews from users who appreciate its functionality, seamless syncing, and the ability to customize and track their finances efficiently.
Try Finta
ChartBase
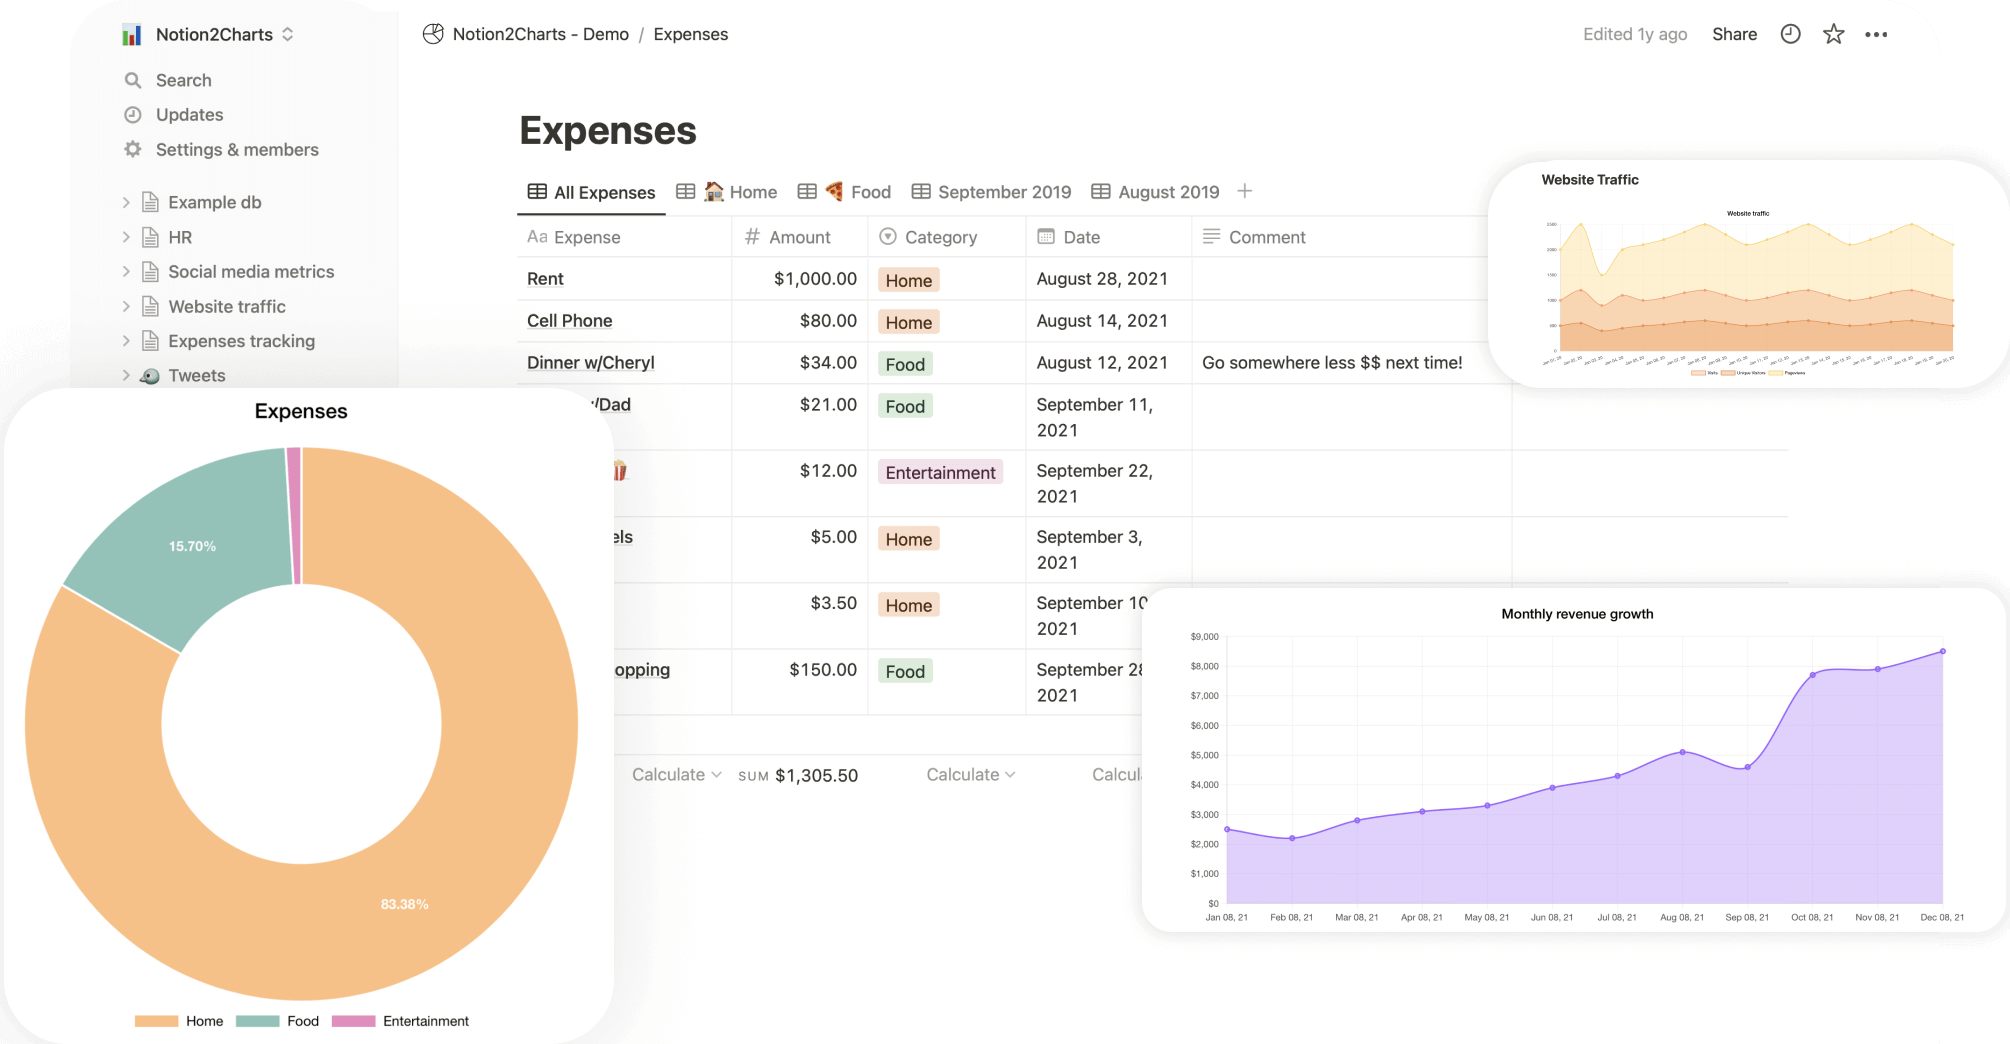
ChartBase is a powerful tool that allows you to turn your Notion databases into insightful charts without any coding required. With ChartBase, you can create live-updating charts from your Notion tables and databases in just a few seconds. The intuitive and easy-to-use interface makes it simple to create beautiful charts that automatically update whenever you make changes in Notion.
You have complete control over the customization of your charts, including choosing from multiple chart types, customizing the branding and color scheme, and adding axis labels and legends. ChartBase also offers easy sharing and exporting options, allowing you to embed your charts directly into your Notion pages or websites, share them with your team or clients, or export them as high-quality images or PDFs.
ChartBase is designed to help you get the most out of your data and make better decisions. Whether you want to track sales, monitor marketing campaigns, analyze market trends, or track your personal finances, ChartBase is the perfect tool for businesses of all sizes and industries.
The safety of your data and your privacy is a top priority for ChartBase. They don't store any of your data and only have access to the tables you choose to share with them. The charts created with ChartBase are also responsive and adapt to any screen size, ensuring they look great on desktop, tablet, and mobile devices.
Try ChartBase
Conclusion
Managing your freelance business finances, invoices, and proposals can be a daunting task, but with the power of Notion, you can streamline your processes and stay organized. In this blog post, we explored how to use Notion to manage your finances, create professional invoices, and craft winning proposals all in one place.
Say goodbye to the hassle of spreadsheets and embrace the power of Notion to level up your freelance game. Start implementing these strategies today and watch as your freelance business becomes more efficient and organized.
If you're feeling discouraged by the process, don't worry! You can download the template here.
And if you want to learn about Notion content planning and knowledge management, hop on here for part 3 of the series.
Start now & create your Notion account 🙃
(#NotionPartner)
The Automated Freelancer Dashboard in Notion is a comprehensive and evolving template that is designed to address the various tasks and challenges that freelancers face. This includes project management, task management, client CRM and finance tracking. It also provides features for creating and sending invoices and proposals and integrates with third-party finance tools for further functionality.
The finance tracking system in the Notion Freelancer Dashboard involves creating four databases: Income, Expenses, Months, and Years. Income and Expenses are the only databases that need to be manually filled. The data from these databases is then automatically aggregated into Months and Years. Totals for income, expenses and balance for each month can be visualized in the dashboard, providing a concise overview of one's financial status.
The Notion Freelancer Dashboard has a feature for creating and managing invoices. This is done via a Notion Invoice Template, which allows users to track important data points such as invoice number, status and last edited time and even link the invoice database to the Client CRM. The invoice template can be customized to include details such as invoice number, date, client info, your info, items and prices, and payment options. Invoices can be shared with clients by exporting the page as a PDF or publishing it to the web.


