
Notion Bank Account Tracker | Automate Your Finances With Live Bank Data
Keeping track of your finances can be a hassle, especially when you’re juggling multiple tools and platforms. Notion is great for organizing and managing your data, but getting real-time bank transactions in there? That’s where it gets tricky.
This is where Rows comes into play—a modern, user-friendly spreadsheet tool that acts as the perfect bridge between your bank and Notion. In this guide, I’ll show you how to connect your bank to Rows, automate transaction imports, and send that data straight to Notion with ease.
This tutorial also comes with a free Notion Finance Tracker template so that you can get started right away.
Key Takeaways
- Connect Your Bank to Rows: Set up a Rows account, create a spreadsheet, and use the built-in integration to securely connect your bank via Plaid.
- Import Transactions into Rows: Choose your connected bank account, select the date range, and import your transactions into Rows for easy tracking and data management.
- Automate Data Updates: Enable scheduled data refreshes in Rows to ensure your bank transactions are updated automatically, maintaining real-time accuracy.
- Send Transactions to Notion: Use Rows formulas to map your data to Notion’s database properties and send it over with a click.
Bank Transactions to Notion
Connect Your Bank to Rows
1/ Create an account on Rows
2/ Create a new spreadsheet or use the default Untitled 1
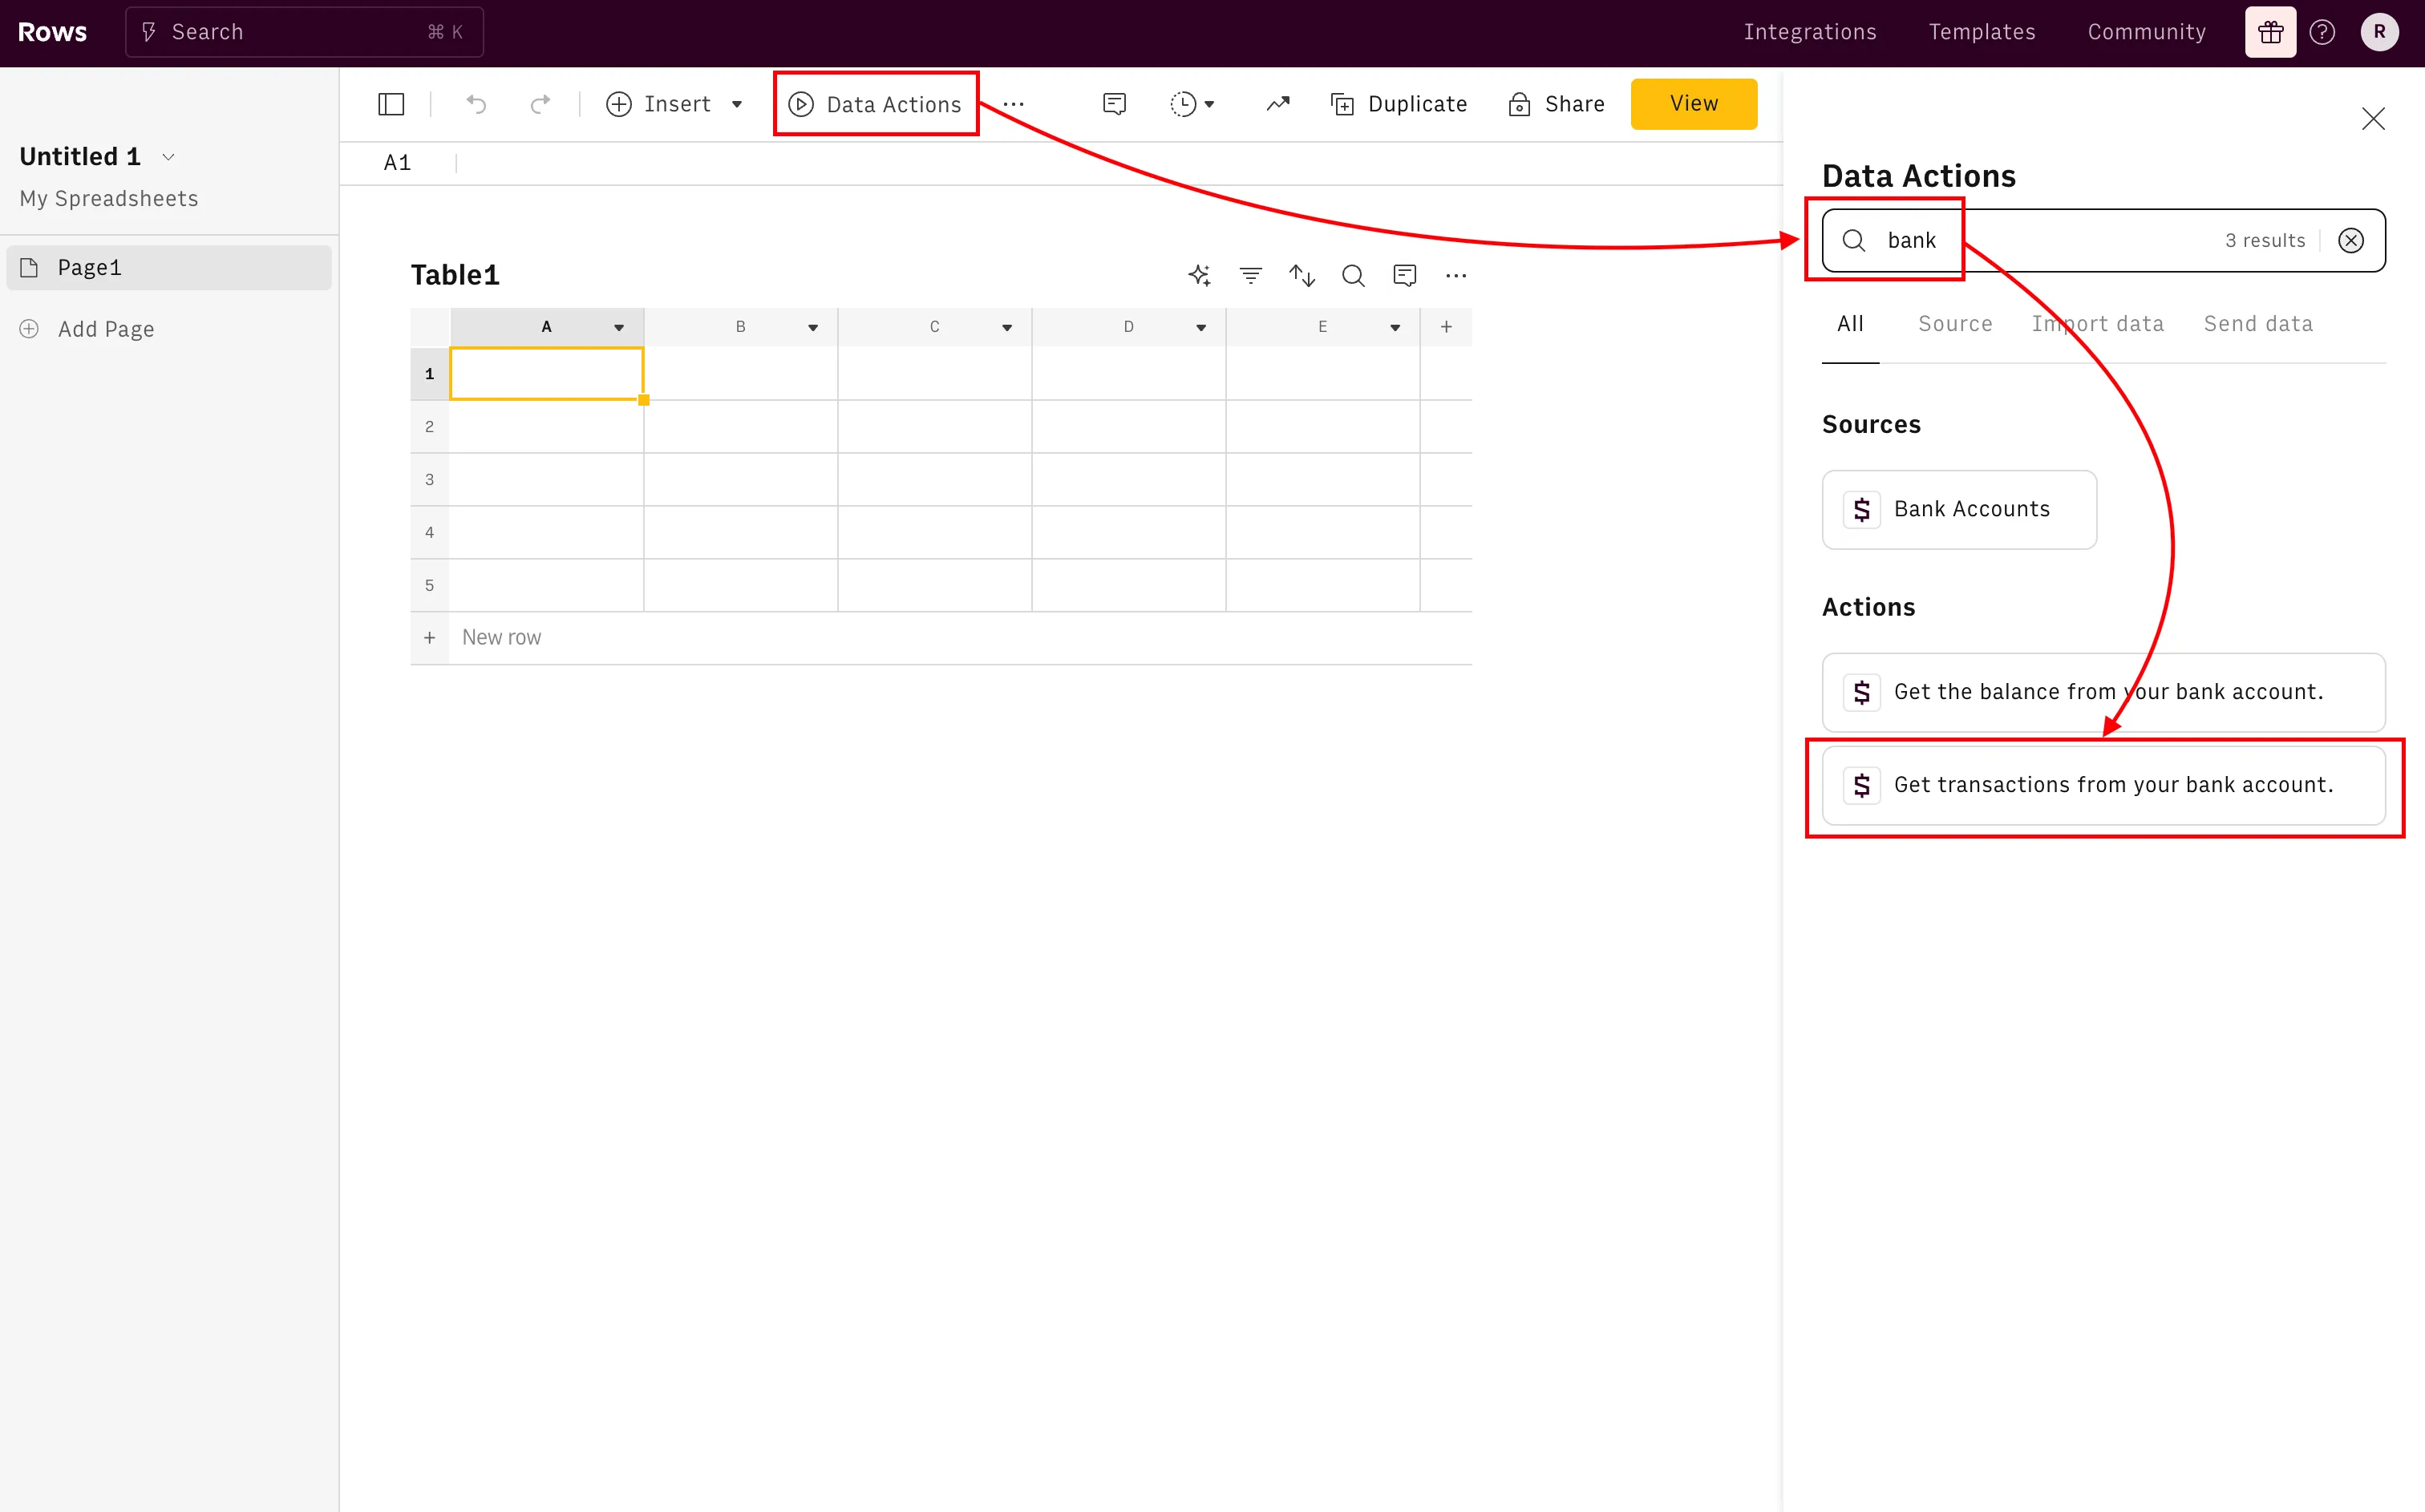
3/ Once your spreadsheet is open, click Data Actions
4/ In the sidebar, type ‘bank’ → Get transactions from your bank account (under Actions)
5/ Click the yellow Connect button under Connect Bank Accounts then click Connect again in the pop-up
6/ Rows uses third-party tool Plaid to safely connect to all banks. Click Continue
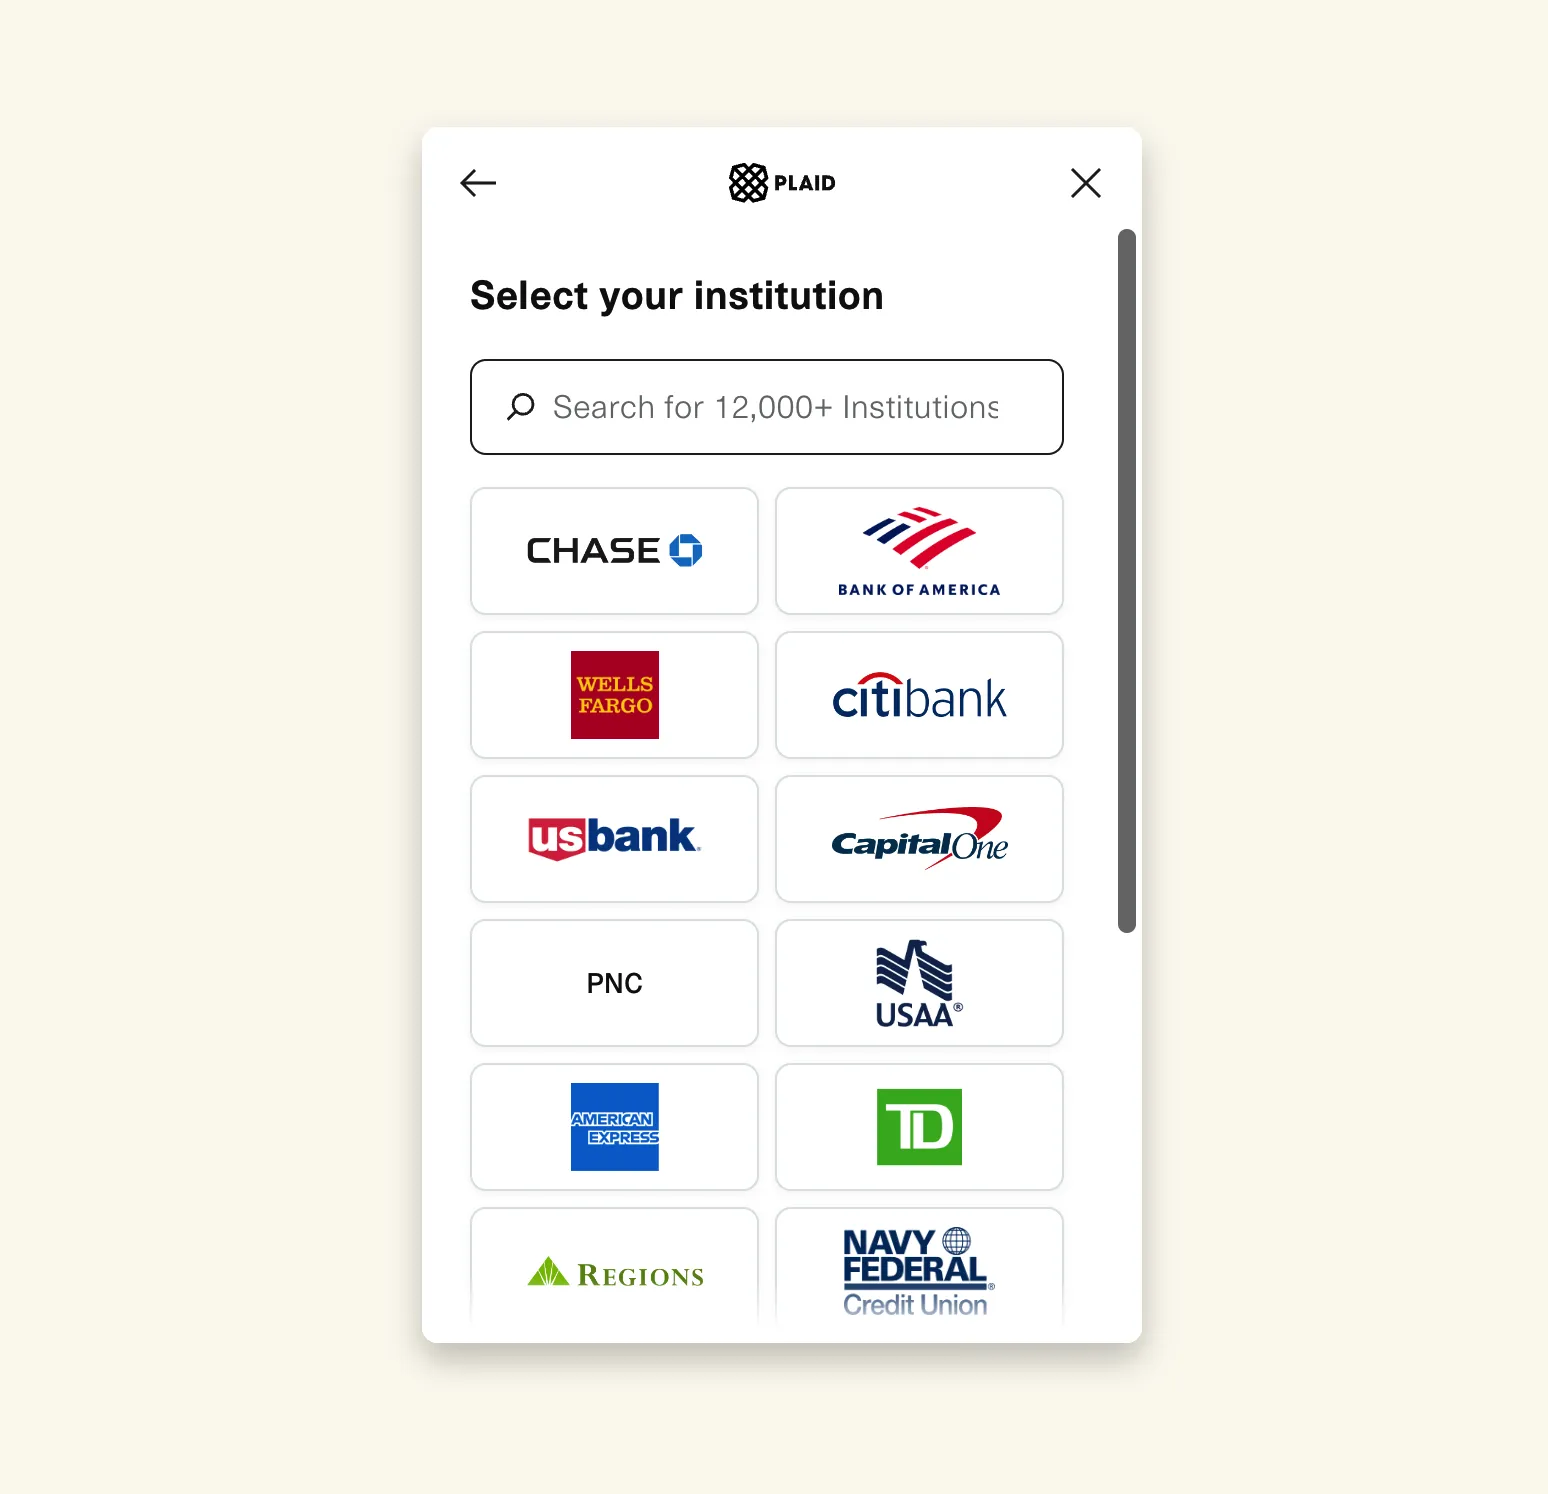
7/ Search for your bank, then log in
Import & Automate Transactions to Rows
Now that your bank is connected, you can start importing your transactions:
1/ You should see this panel in your sidebar
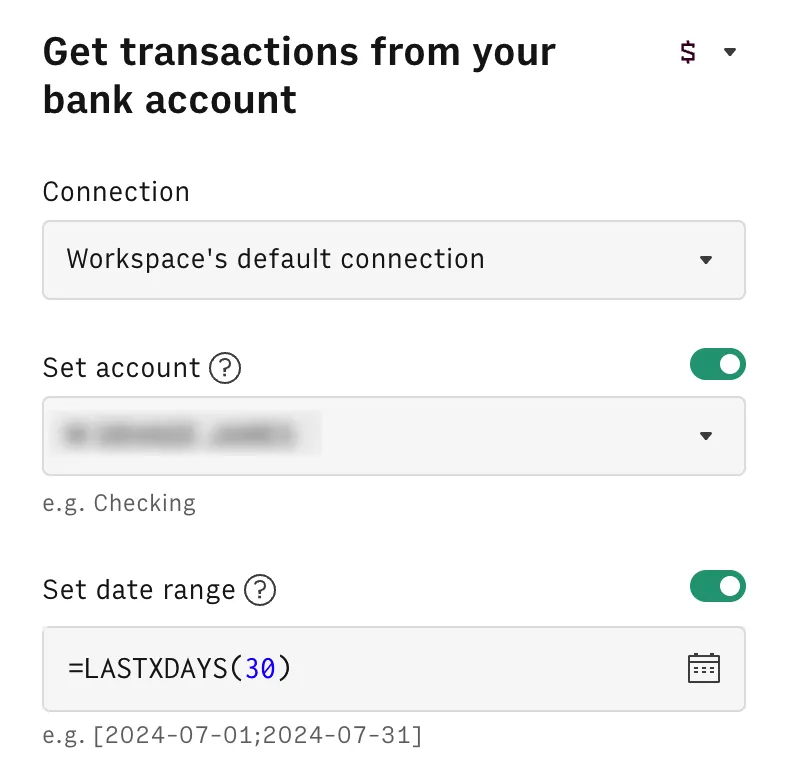
2/ If you connected multiple banks, select which one to import from in the Connection tab.
3/ Choose the specific account and define the date range—either by using a formula (e.g., =LASTXDAYS(days)) or the date picker on the right.
4/ When you're satisfied with your selections, click the Create Data Table button at the bottom.
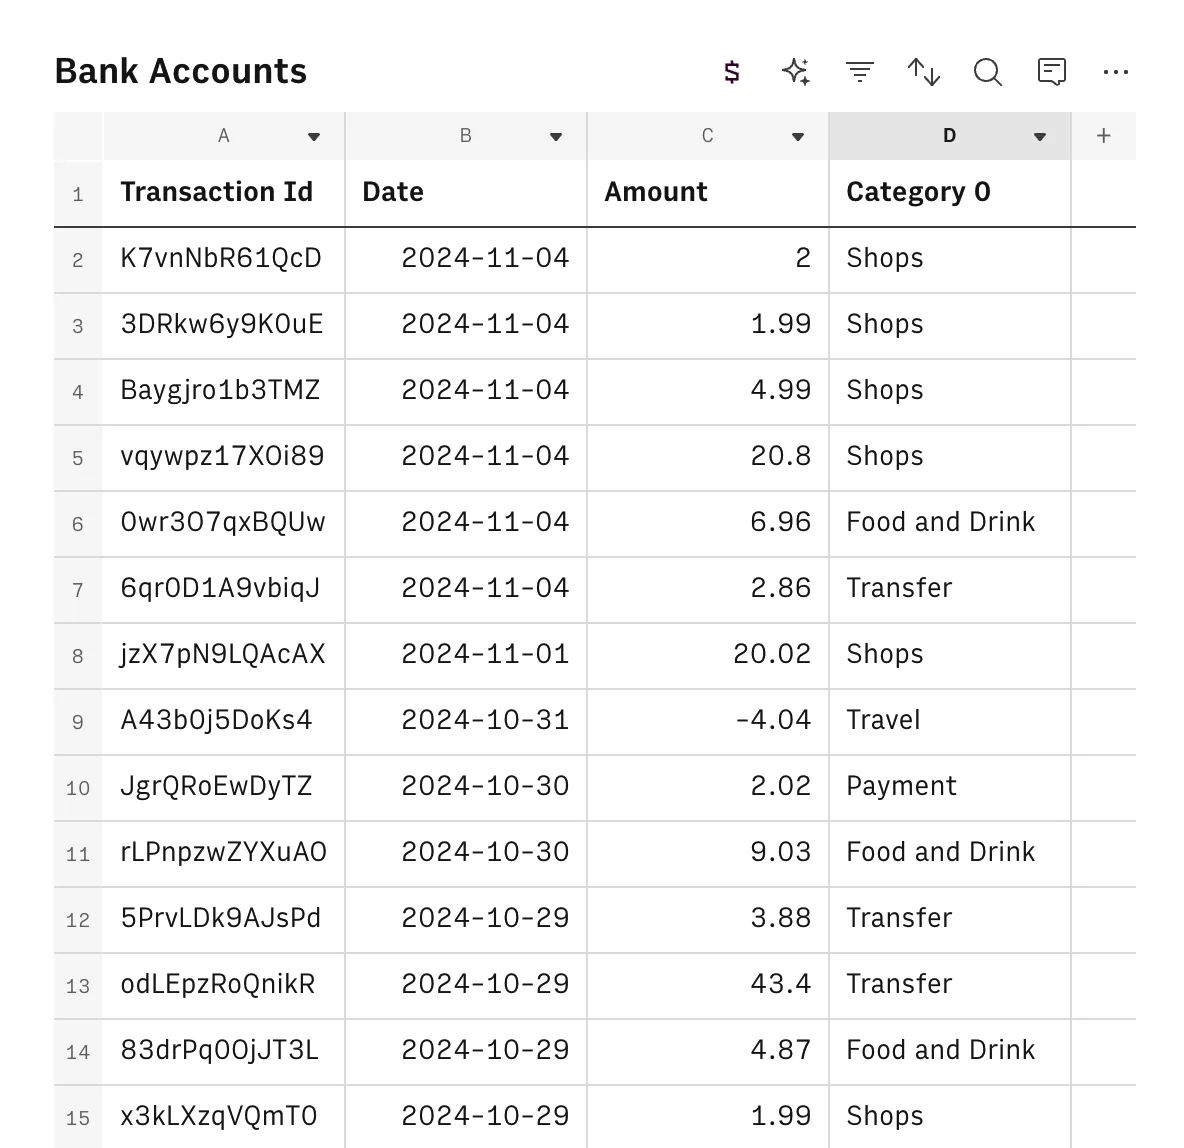
5/ Note that your data's organization may vary depending on your bank.
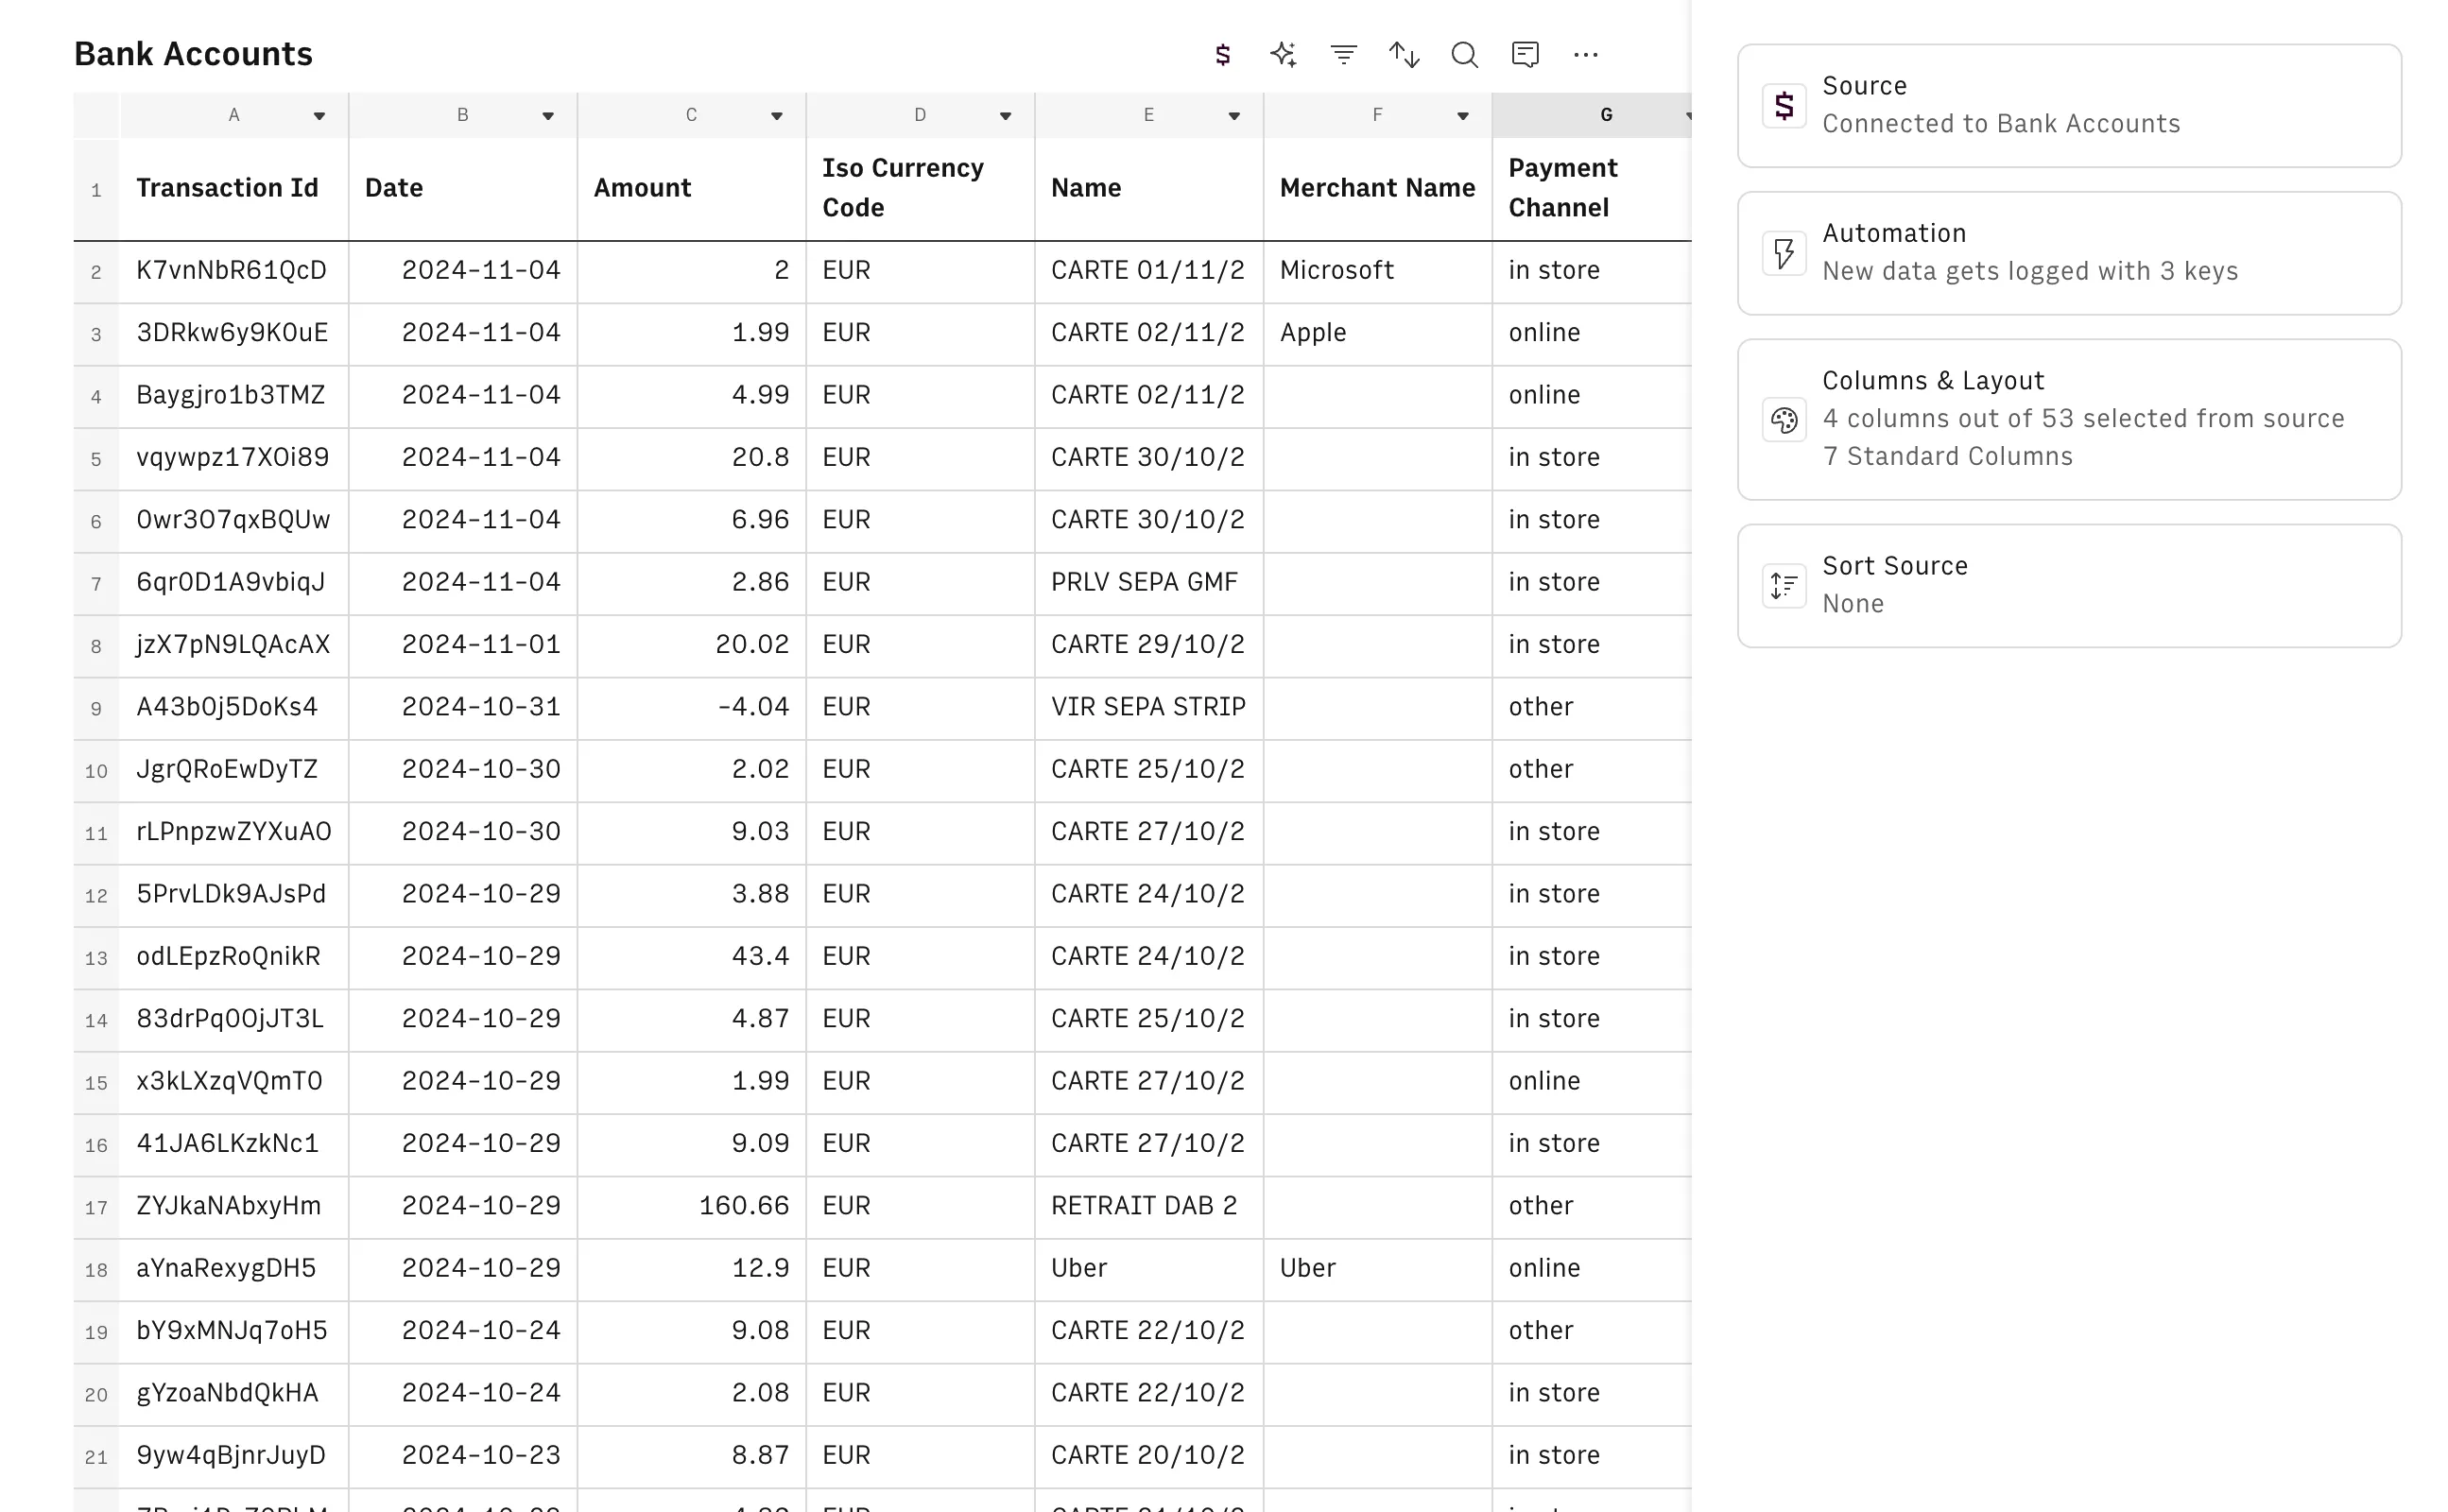
6/ Keep the essential properties: Transaction Id, Date, Name, and Amount. Consider retaining Category if you already categorize transactions in your bank app or trust the auto-categorization. You can hide or delete any unwanted columns.
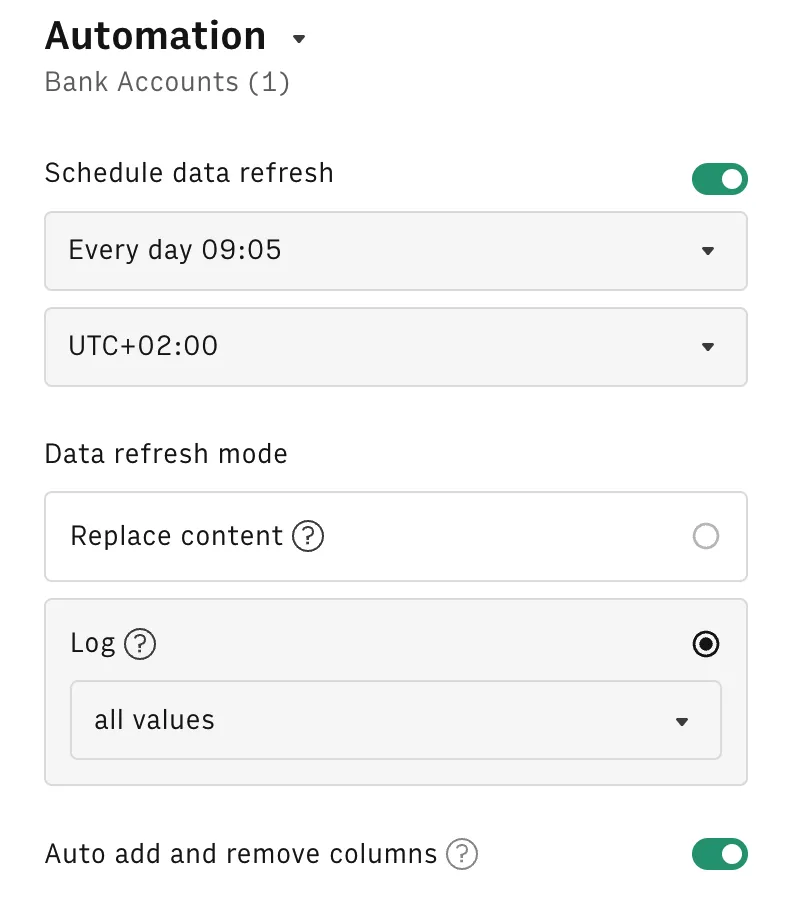
7/ In the right sidebar, navigate to Automations
8/ Enable Schedule data refresh and set the frequency for the automation. I personally opt for Every day to ensure regular updates. If you choose a custom value, be sure to review Rows' formatting guidelines.
9/ Just below, under Data refresh mode, choose between Replace content (new transactions overwrite previous ones) or Log (new transactions are added without replacing existing ones). Both options work for our purposes, but I recommend Log to preserve all data. If you select Log, ensure you choose all required values in the dropdown menu below.
Send Transactions to Notion
1/ Download the free Notion template accompanying this tutorial—it provides all the databases and properties pre-formatted for you.
2/ Return to your Rows spreadsheet.
3/ Click to add a new column → select Formula.
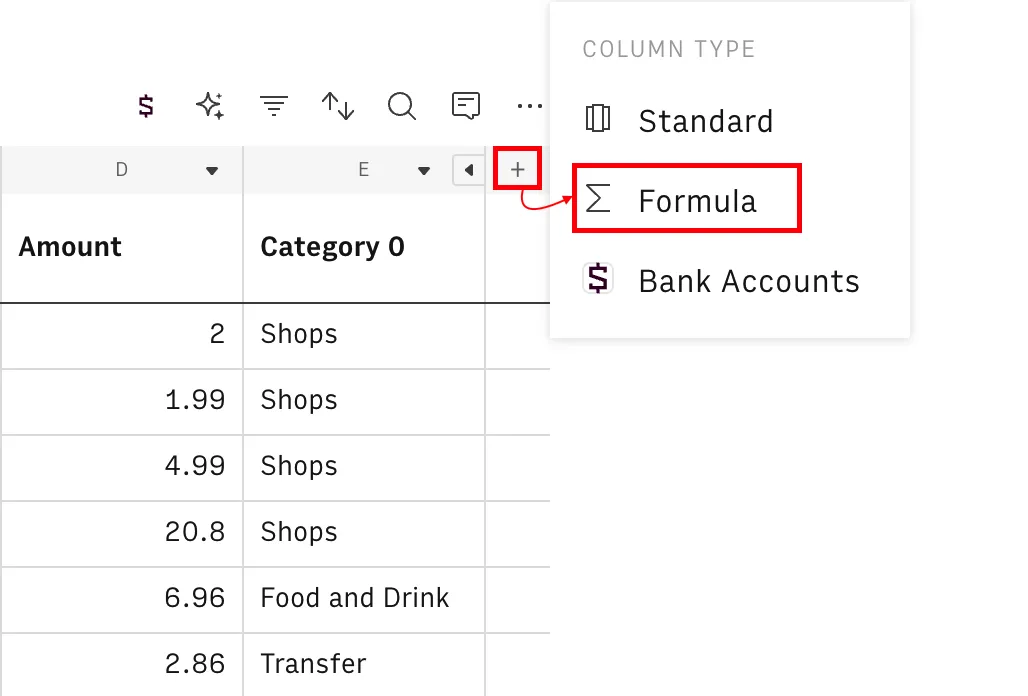
4/ Name the column "Send data to Notion"
5/ In the formula field, type 'Notion'. Under ADD_DATABASE_PAGE_NOTION, click Connect an account → Connect
6/ This is a standard Notion integration. Select your workspace and choose (at minimum) the page containing your Notion template (finance tracker). For convenience, you can select all your pages, ensuring future Rows x Notion integrations have access to your databases.
7/ Return to the formula field, type 'Notion' again, and select ADD_DATABASE_PAGE_NOTION
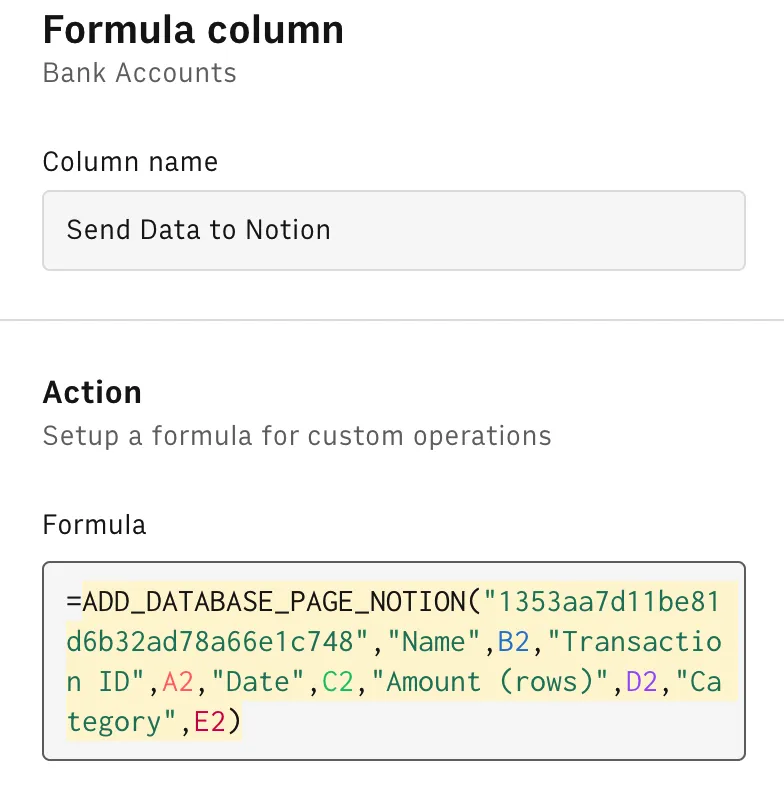
8/ The formula's first argument is the Transactions Database ID or URL (use the source database URL, not the page where it's nested, and enclose it in double quotes). Then, alternate between "Notion Property Name" (in double quotes) and the corresponding Rows property, separated by commas.
ADD_DATABASE_PAGE_NOTION("[YOUR DATABASE ID / URL]","Name",B2,"Transaction ID",A2,"Date",C2,"Amount (rows)",D2,"Category (rows)",E2)
*ensure your Rows spreadsheet columns match the order in the formula: A: Transaction ID, B: Name, C: Date, D: Amount (rows), E: Category (rows)
⚠️ Rows free plan has a limit on the number of Tasks you can perform (25/month). As it’s quite low, I strongly recommend you subscribe to their Plus plan at $8/mo (or $6 if paid annually).
How to Setup the Notion Template
If everything was set up correctly, you should see the Notion log and "page" in each cell of the Send Data to Notion column in Rows. Now, check your Notion database—it should be populated with all your bank transactions.
You can either go two ways from here. If you want to push the automation a bit further, head up the “Advanced” section below. If you prefer to keep things manual, check out the instructions below.
Manual Assigning of Months & Categories
For months, manually set the relation at the start of each month. For transactions, since they are sorted chronologically, assign the correct month to the first transaction, then drag the cell down to apply it to all transactions within that month. Repeat this process for subsequent months.
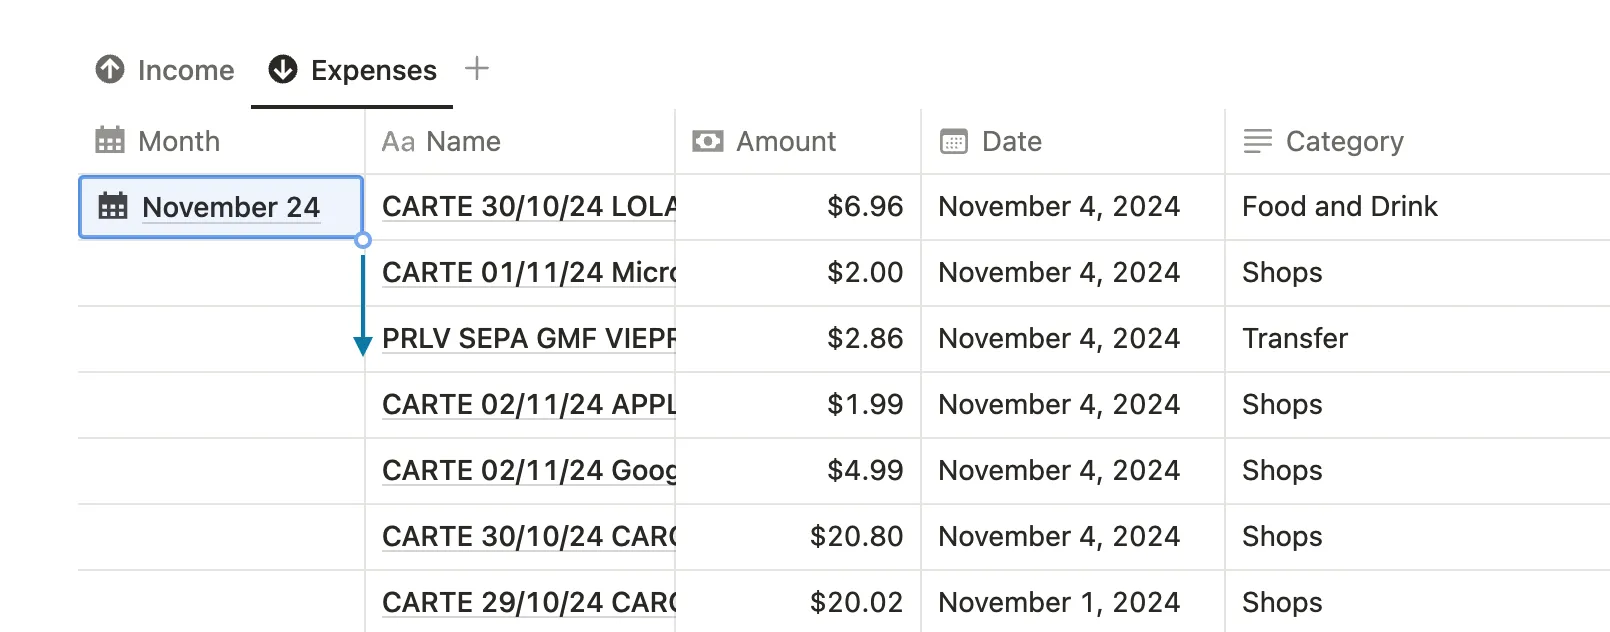
Repeat the same process for the Category (relation) property. Assign the correct category based on what is displayed in the Category (rows) property.
Advanced: Auto-Categorization
For those looking to enhance automation, we can take it a step further by auto-categorizing transactions using a relation property instead of a simple text field. This approach enables the creation of detailed Expense Tracker charts, offering deeper insights into your finances.
- In the Categories database at the bottom of the template, add your categories in the Name (title) property. These must match exactly with the ones from your bank statements.
- In Rows, on the same page, click the + button to the right of Page 1 in your left sidebar.
- Select Data Table → Select Source.
- Type 'Notion', click on it, then select Import a Notion database.
- Choose your Categories database from the list in the Database field.
- Click the Create Data Table button.
- Rename the table to Categories (Notion).
You've now imported your Notion database, and it's synced to Rows. To manually update the table, click the ••• button to access the Rows table settings, then select Refresh Data Table.
Now, in your Bank Accounts table, you need to:
1/ Add a new column and name it "Category ID"
2/ In the second row of this new column, use the following VLOOKUP formula to retrieve the corresponding category ID for the transaction:
=VLOOKUP(E2,'Categories (Notion)'!$B$2:$D,3,FALSE)
→ E2 refers to the category from the transaction
→ 'Categories (Notion)'!$B$2:$D is the range from the new Notion table containing "Name" & "ID" (don't forget to add the $ to lock the range)
→ 3 is the index of the column where ID is located (in our case, the columns are Name | Notion Url | ID, so ID is column N°3)
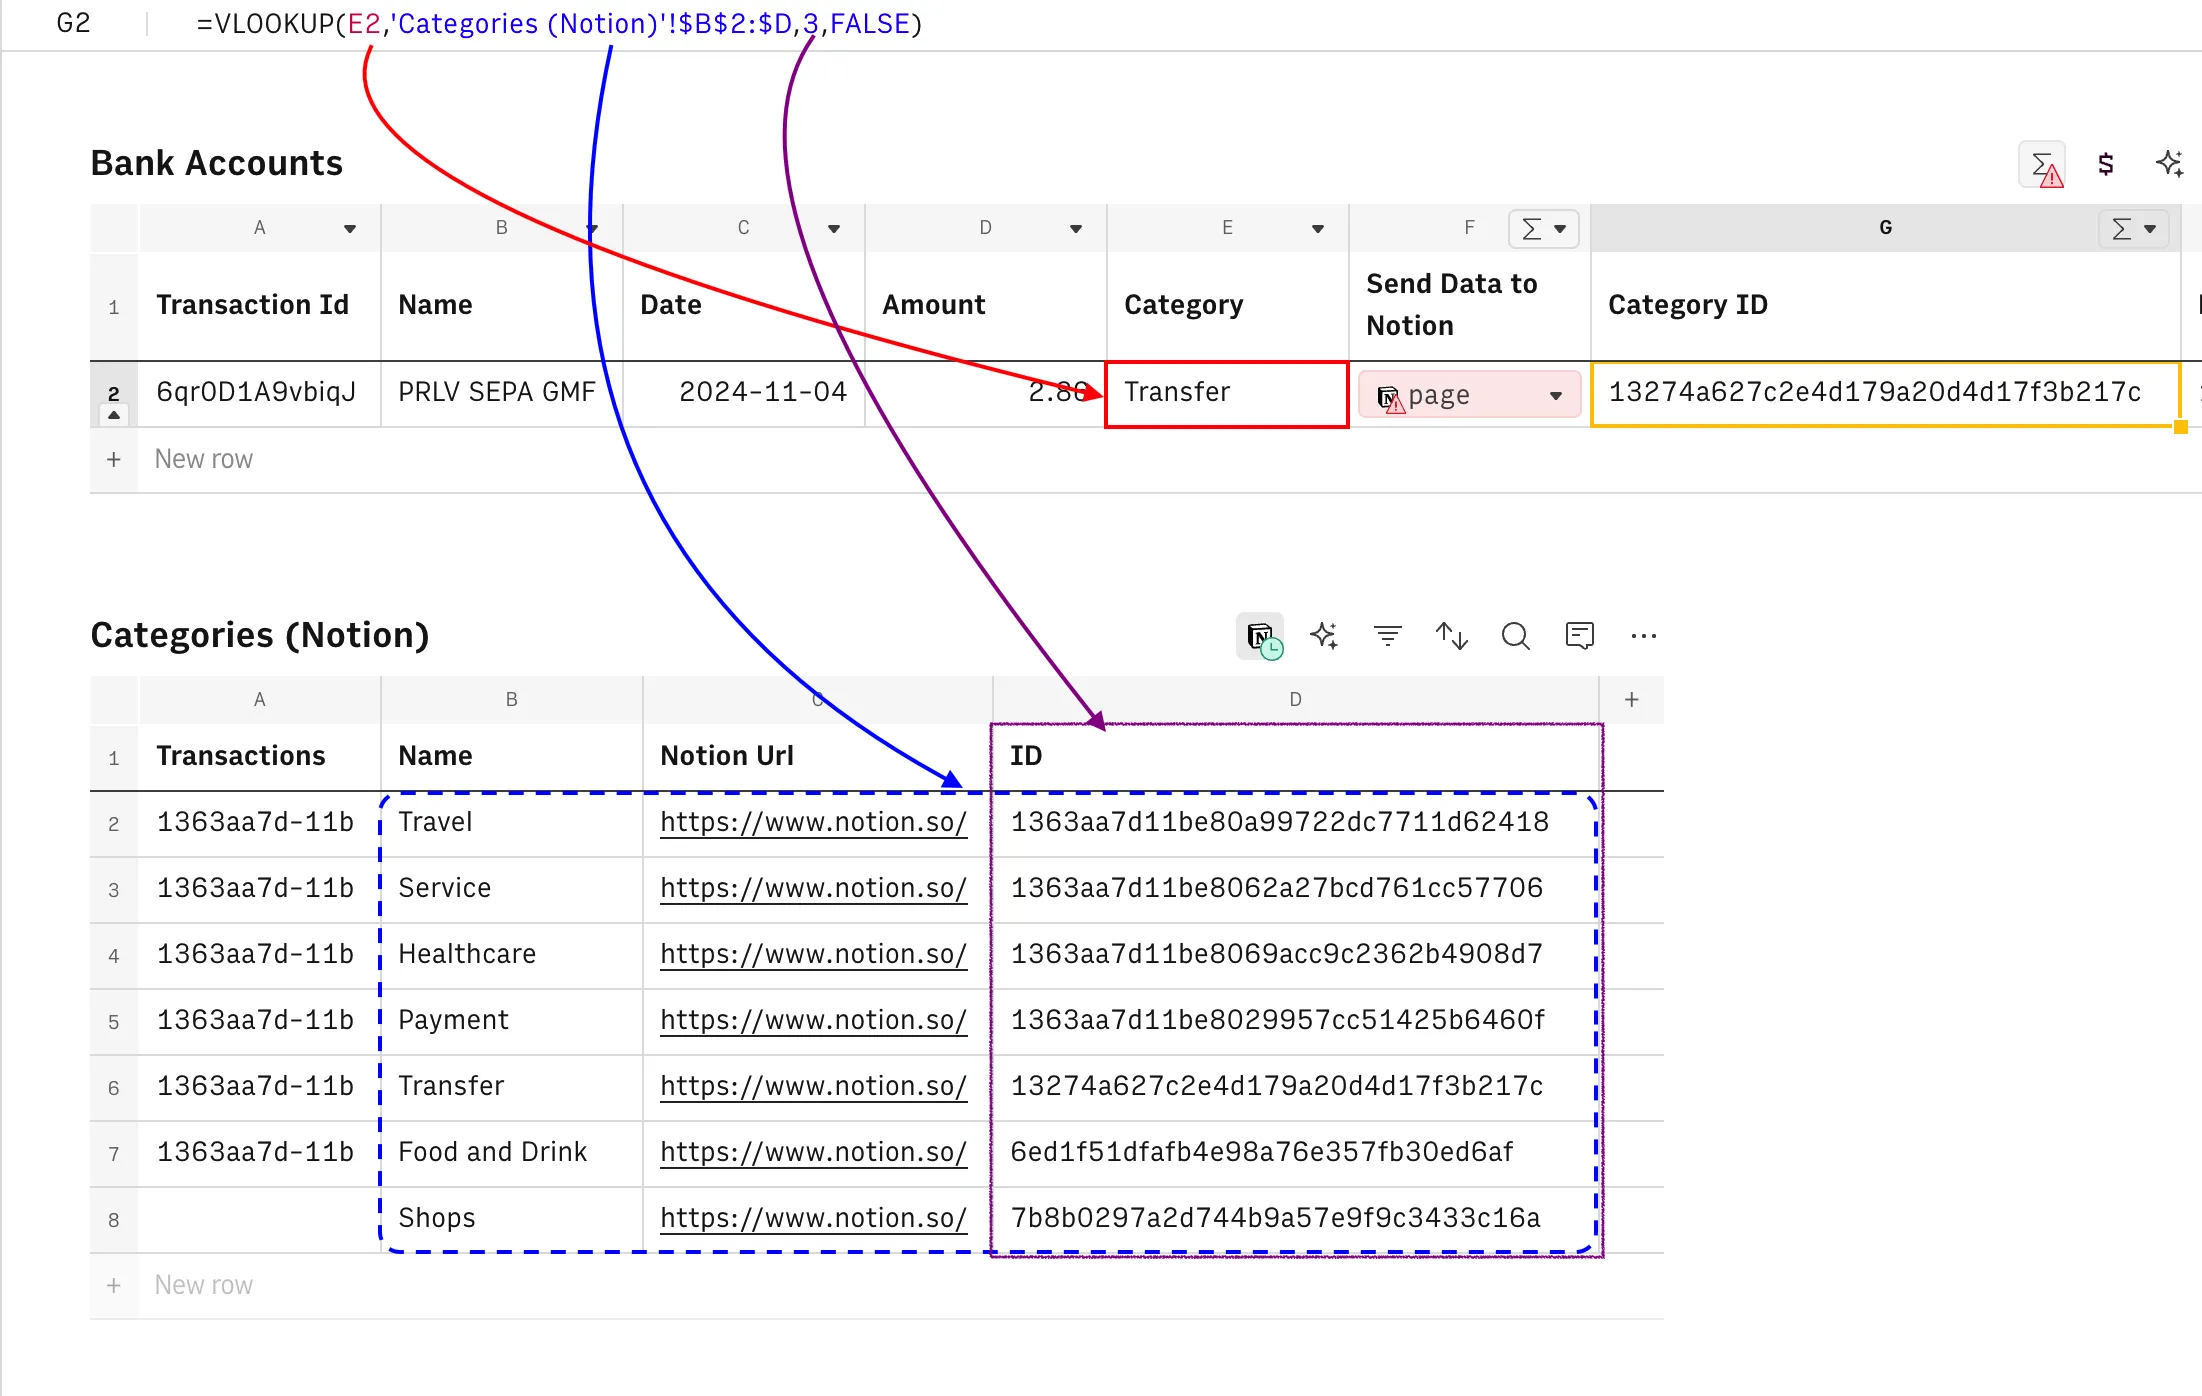
Verify that the information is correct and that the formula has been applied to all rows. You now have Notion's category relation ID added to your Rows transaction items—this is how you add relation properties through automation, using their ID rather than name.
Final step: Update the Send Data to Notion formula
Now that you have this new information, update the "Send Data to Notion" formula to include it:
ADD_DATABASE_PAGE_NOTION("[YOUR DATABASE ID / URL]","Name",B2,"Transaction ID",A2,"Date",C2,"Amount (rows)",D2,"Category (rows)",E2,"Category",G2)
*Note: G2 refers to the cell in the Category ID column.
Remember to apply the updated formula to all items. Be aware that updating the formula will add your items to your Notion database again. To avoid duplication, remove any duplicate entries—specifically, those without the Category property assigned.
To keep your table in sync with Notion’s database, add an automation by selecting ••• → Edit Data Table → Automations. Schedule this automation to run more frequently or slightly before the transaction automation to ensure that new or updated categories are applied without delay.
Advanced: Automate Months
Using the same approach, we can automate the assignment of the Month relation property.
1/ Follow the steps in Advanced: Auto-Categorization, but this time, add the Months database instead. Name this table “Months (Notion)”. Your setup should look like this:

2/ In the Rows Bank Accounts table, add a new formula column and enter the following formula:
=TEXT(MONTH(C2),"MMM")&" "&TEXT(YEAR(C2),"MMM")
This formula converts the date to match the format used in Notion’s Date (rows) property.
3/ Next, add another formula column to perform a VLOOKUP. Paste the following VLOOKUP formula (or adjust based on your own data setup):
=VLOOKUP(H2,'Months (Notion)'!$M$2:$N,2,FALSE)
4/ Update the Send Data to Notion formula to include the month relation. Add ,”Month”,I2 at the end of your existing formula. Here, Month is the name of the relation property in Notion, and I2 refers to your Month ID column in Rows. Apply this formula to all relevant rows.
Complete formula:
=ADD_DATABASE_PAGE_NOTION("[YOUR DATABASE ID]","Name",B2,"Transaction ID",A2,"Date",C2,"Amount (rows)",D2,"Category (rows)",E2,"Category",G2,"Month",I2)
5/ Set up an automation to update new/updated months. Schedule it to run on the first of each month, right after the Notion automation creates a new month item.
Automated Finance Tracker | Notion Template Instructions
If you missed it, the template can be downloaded here.
- Months: New month entries are automatically added on the first day of each month, with Name, Date, and Year properties pre-filled. For more details on recurring events, see this guide.
- Years: Since native automation of the Years database isn’t possible in Notion or Rows, I’ve pre-added the years 2025 and 2026. These are currently hidden by a filter on the Date(s) property, showing only the current year. Before 2026 ends, be sure to add future years to the database and duplicate/edit the related automations setup in the Months database.
- Automation Schedules: Coordinate your automation times to ensure smooth operation. For example, if your transaction automation runs daily at 10 AM, schedule new month entries in Notion to occur before 10 AM, and ensure that Rows automation on the Notion Months table follows this new entry. (The sequence should be: New month created in Notion → Rows automation on Months (Notion) table → Rows automation for Transactions.)
- Categories: Define all categories ahead of time, ensuring they match exactly with your bank’s category names. To allow time for category adjustments, consider adding a slight delay between each transaction automation, especially if your bank allows you to customize categories.
- If you opt for the advanced mode (auto-month/categories labeling), be sure to remove the "Category (rows)" property from the transactions database and update the Rows formula accordingly. If you prefer manual updates, retain the "Category (rows)" property and use it as a reference when assigning the appropriate Category (relation).
- Adding transactions manually: If you need to add transactions manually, ensure you input the amount in the "Amount (rows)" property. This property is hidden by default, so click 1 more property toggle to display it. Remember, for income, enter a negative value, and for expenses, enter a positive value.
⚠️ If you're on Notion's free plan, you can have only one chart on your entire workspace. This template includes 3 charts, so choose wisely.
Rows | Spreadsheets on Steroids
In this example, we used Rows as a third-party platform to access all our banking data easily. But Rows is much more than that!
Rows vs Google Sheets
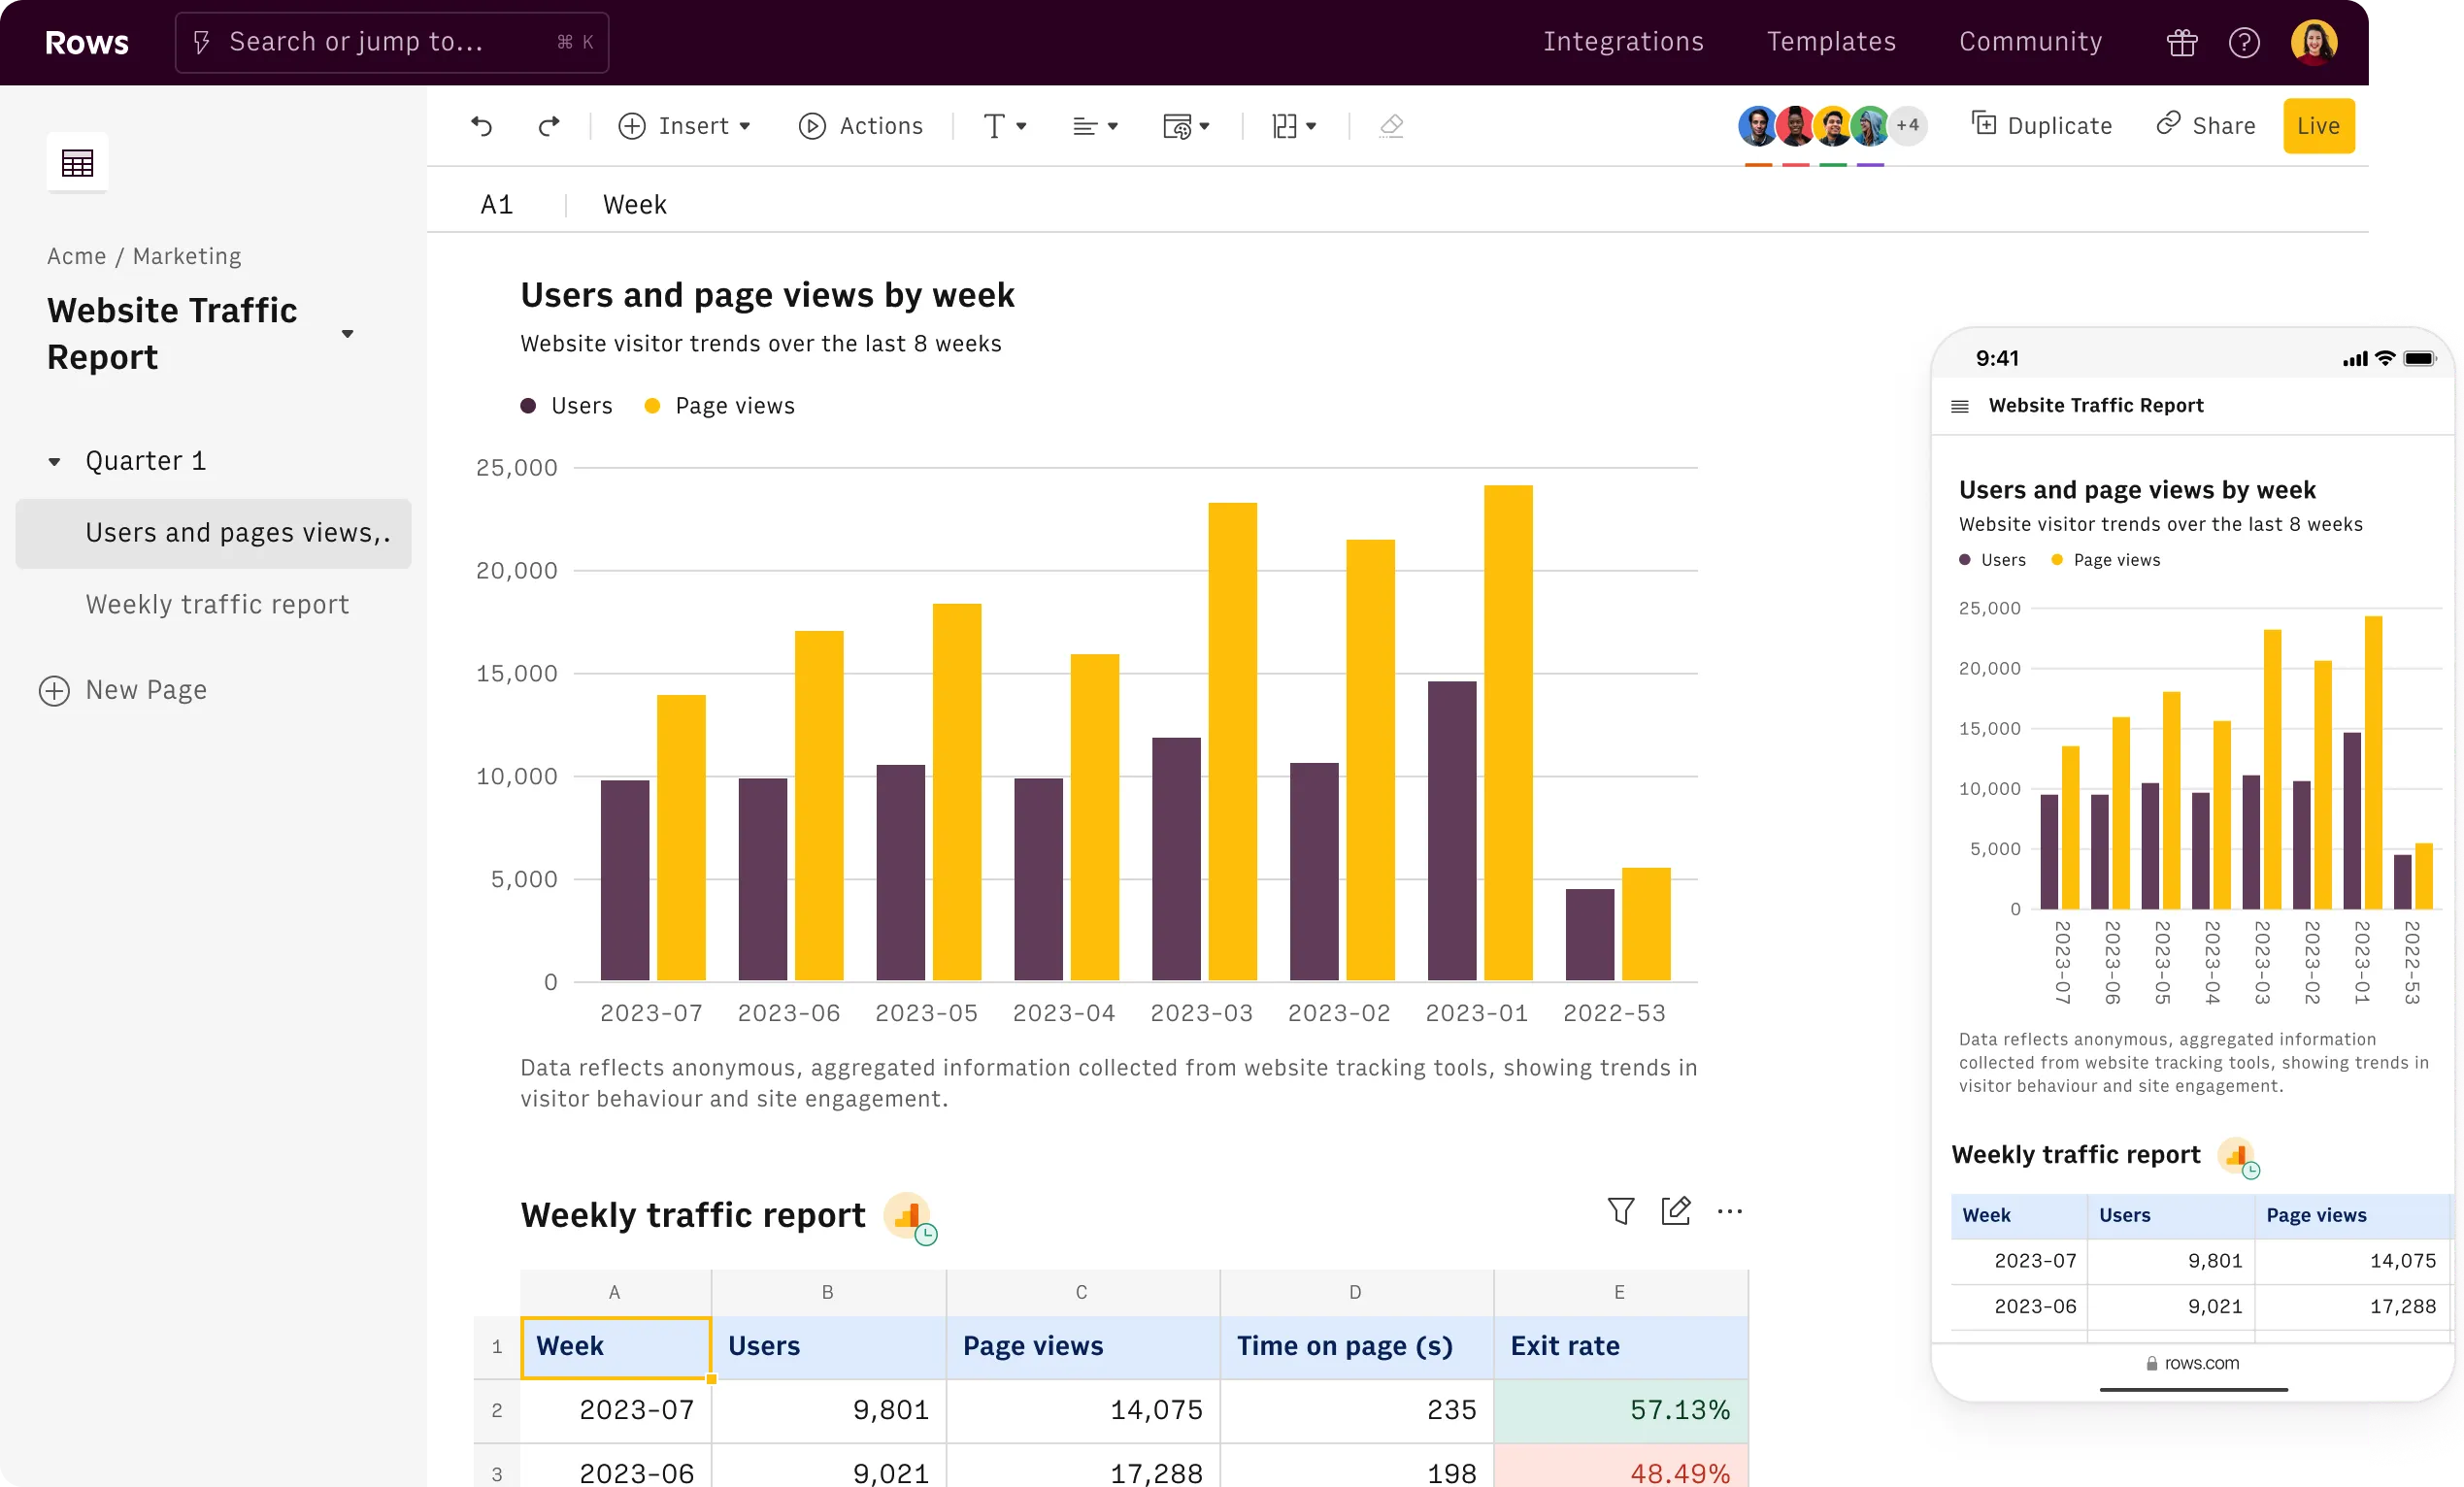
Rows is the NEW spreadsheet. Forget Google Sheets, Rows makes it easier to use, build and share — especially if you’re working as a team. Here are a few reasons why I think Rows > Google Sheets:
- Built-in Integrations: Rows offers direct integrations with business tools and APIs, simplifying data retrieval and automation without extra add-ons. There are many integrations, and I’ll soon be exploring the ones with Google Analytics, Facebook Ads, OpenAI & Stripe.
- User-Friendly Dashboards: You can create really sleek dashboards, way nicer than Google Sheets, thanks to the way Rows webapp is structured (Pages → Elements). It’s also way easier to add Charts and they just look better.
- Real-Time Collaboration: Rows is built with real-time collaboration in mind, and it has advanced features for sharing, collaborating, and embedding spreadsheets in a way that’s particularly attractive for teams.
- Efficient Data Management: It’s much easier to handle real-time data connections and large data sets in Rows than in Google Sheets.
Rows + Notion = ❤️
Rows and Notion and two completely different tools. As already mentioned, Rows is a spreadsheet tool. Notion uses databases instead.
What’s the difference?
Spreadsheets are best for data manipulation and analysis, whereas databases excel at structured data management and complex relationships. Tools like Rows enhance spreadsheet functionality with built-in integrations, while Notion combines database capabilities with project management and flexible content organization.
All of that means they complement each other perfectly. Even if you use Rows only as a data connector, it will make your life so much easier thanks to its built-in integrations. Do the heavy work in Rows, send the data, and make beautiful dashboards in Notion.
Additional Resources
- Rows' How to connect Bank Accounts tutorial
- Rows Personal Expense Tracker Template
- Rows 13-week Cash Flow Model Template
Conclusion
And there you have it! With Rows and Notion working together, you’ve set yourself up for easier, automated financial tracking. No more manual data entry or juggling between platforms. Just seamless updates, smart integrations, and more time to focus on what really matters.
Give this integration a try and see how much smoother your financial management can be! Once you get started with Rows integrations, you’ll soon be automating your entire business 🤖
Start now & create your Notion account 🙃
(#NotionPartner)
You can track your bank transactions in Notion by using a third-party tool like Rows. First, connect your bank to Rows using Plaid, import your transactions, and then use formulas in Rows to send this data directly to Notion. This method allows for real-time tracking and automatic updates.
To automate financial data in Notion, you can set up a connection between Rows and your bank account. Once your transactions are imported into Rows, you can schedule automatic data refreshes and use Rows’ formula features to send updates to Notion. This ensures your financial data stays up-to-date without manual input.
Yes, you can use Notion to categorize and organize your financial data. You can set up categories in Notion using relations between databases. For more advanced organization, you can use Rows to automate the categorization process by syncing the data with Notion, making it easier to keep track of transactions by category, month, or year.


