

Notion Mail Tutorial | Best Features, Shortcuts & Customization Tips
If you're familiar with Notion, diving into Notion Mail will feel like second nature. The interface is designed to mirror Notion's clean and intuitive layout, making email management more flexible and structured than ever.
In this guide, we’ll walk through the key aspects of Notion Mail’s display and navigation. From organizing your inbox with custom views to using hover actions, filters, and keyboard shortcuts, you’ll learn how to optimize your email workflow. Whether you prefer a minimalist setup or a fully customized command center, this post will help you tailor Notion Mail to your needs.
First, don't forget to download Notion Mail.
Key Takeaways
- Familiar Notion-Like Interface – Notion Mail is designed similarly to Notion, with a navigation bar on the left, a main email viewing area, and customizable options for filtering, grouping, and AI auto-labeling.
- Flexible Navigation & Views – The sidebar includes sections like Search, Views, Mail (All Mail, Sent, Drafts, etc.), Templates, and Trash. Users can create custom views with unique filters and grouping, similar to Notion databases.
- Multiple Display & Interaction Options – Emails can be viewed in side peek, center peek, or full-page mode. Hovering over emails reveals quick action buttons that can be customized for efficiency.
- Powerful Filtering & Organization – Users can filter emails based on various criteria (sender, subject, attachments, labels, etc.), group them by priority, status, or category, and customize displayed properties.
- Unique Features: Reminders & Snippets – Emails can be scheduled to reappear in the inbox at a later time using the reminder feature. Snippets allow users to create reusable text blocks for frequently used phrases.
- Rich Email Composition – Emails can be formatted using Notion-style blocks, including callouts, checkboxes, headings, and colors, making email writing more structured and visually appealing.
Notion Mail Display & Navigation
General Display
Notion Mail's interface mirrors Notion's design.
On the left is a navigation bar that can be either permanently visible or shown only on hover. Click the << icon at the top of the sidebar to close it (or use keyboard shortcut cmd/ctrl + \).
The main email and views area occupies about 80% of the screen in the center.
At the top-right, you'll find options to edit the current view, set up filters and grouping, and enable AI auto-labeling.
Navigation Bar
The navigation bar contains these sections:
- At the very top
- Account selection (like in Notion)
Close sidebarbuttonCompose a new emailbutton (or shortcut C)
- Search: Search all your emails. By default, this excludes trash and spam, but you can adjust these filters using the filter button at the top-right.
- Views: Similar to Notion databases, create multiple views of your emails with custom rules, filters, and grouping. More on this later.
- Mail
- All Mail: Shows all emails (excluding trash and spam), including sent items
- Sent: Shows your sent emails
- Drafts: Contains unfinished replies
- [Optional] Reminders: Available when using the remind feature
- Settings
- Templates: Access predefined views (covered later)
- Trash: Contains deleted emails (not SPAM)
- At the very bottom
- App switcher: Switch between Notion, Notion Calendar, and Notion Mail using the bottom-left switcher
- Help: Access documentation, submit feedback, and find privacy policy, terms, and keyboard shortcuts
Side/Center-Peek or Full-Page
Like in Notion, you can view emails in center peek, side peek, or full page. To change this setting, navigate to Settings → Inbox → Thread style
Take time to try each view option before settling on one. This setting will be applied to all views.
Preview
While I'm not a fan of Notion's page preview feature, it proves valuable in Notion Mail. Hovering over any email shows a preview of its contents, making it easy to quickly scan through emails and locate specific information.

The preview displays the most recent reply in the thread.
Hover actions
When you hover over an email, an action menu appears.

By default, the hover menu includes these action buttons:
- Star
- Archive / Unarchive
- Trash / Untrash
- Mark read / unread
- Set reminder (more on that later)
You can customize this menu to add more actions or simplify it with fewer options. To customize, click the ⚙️ icon at the top-right of the page to "Edit view", select "Hover actions", then use the eye or + icons to show or hide actions.

Command Menu (⌘ + P)
Like in Notion or Notion Calendar, press ⌘/Ctrl + P to open the command menu. This convenient shortcut lets you quickly:
- compose emails and create snippets
- create and modify views
- jump to specific folders
- access key features
- toggle between side peek, center peek, and full page
- view all keyboard shortcuts

Organizing your Notion Mail Inbox
Create custom views
The main power of Notion Mail lies in its custom views. Just like database views in Notion, you can create views in Notion Mail to display your emails in many different ways.
To create a new view, click the + button next to Views in the sidebar. You can also open the command menu with cmd + p and type Add a view.

When creating a new view, you'll see these options:
- Create from an auto-label
- Configure manually
- Use template
- Suggested views
For this tutorial, we'll select Configure manually (we'll explore the other options later).
Your new view will include all emails by default, except for Spam, Trash, Promotions (Gmail), and Social (Gmail), which are automatically filtered out.
Find your New view in the sidebar, where you can click then Rename to change its name, icon, and icon color.

Filtering
The first step with your new view is filtering. This defines what your view will be used for.
You can access filters in two places:
- Click the Filter icon next to Auto label at the top-right of your page
- Click the ⚙️ icon (Edit view button) at the top-right of your page, then select Filter
Available filtering options include:
- Mailbox: Add or remove Inbox, Sent, Scheduled, Spam, & Trash
- Gmail's auto-categorization: Including Promotions, Social, Forums & Updates
- Is read or unread
- Contains attachments, calendar event, date
- Sender & recipients: From, To, CC, BCC
- Subject
- Labels: The same ones you use in Gmail
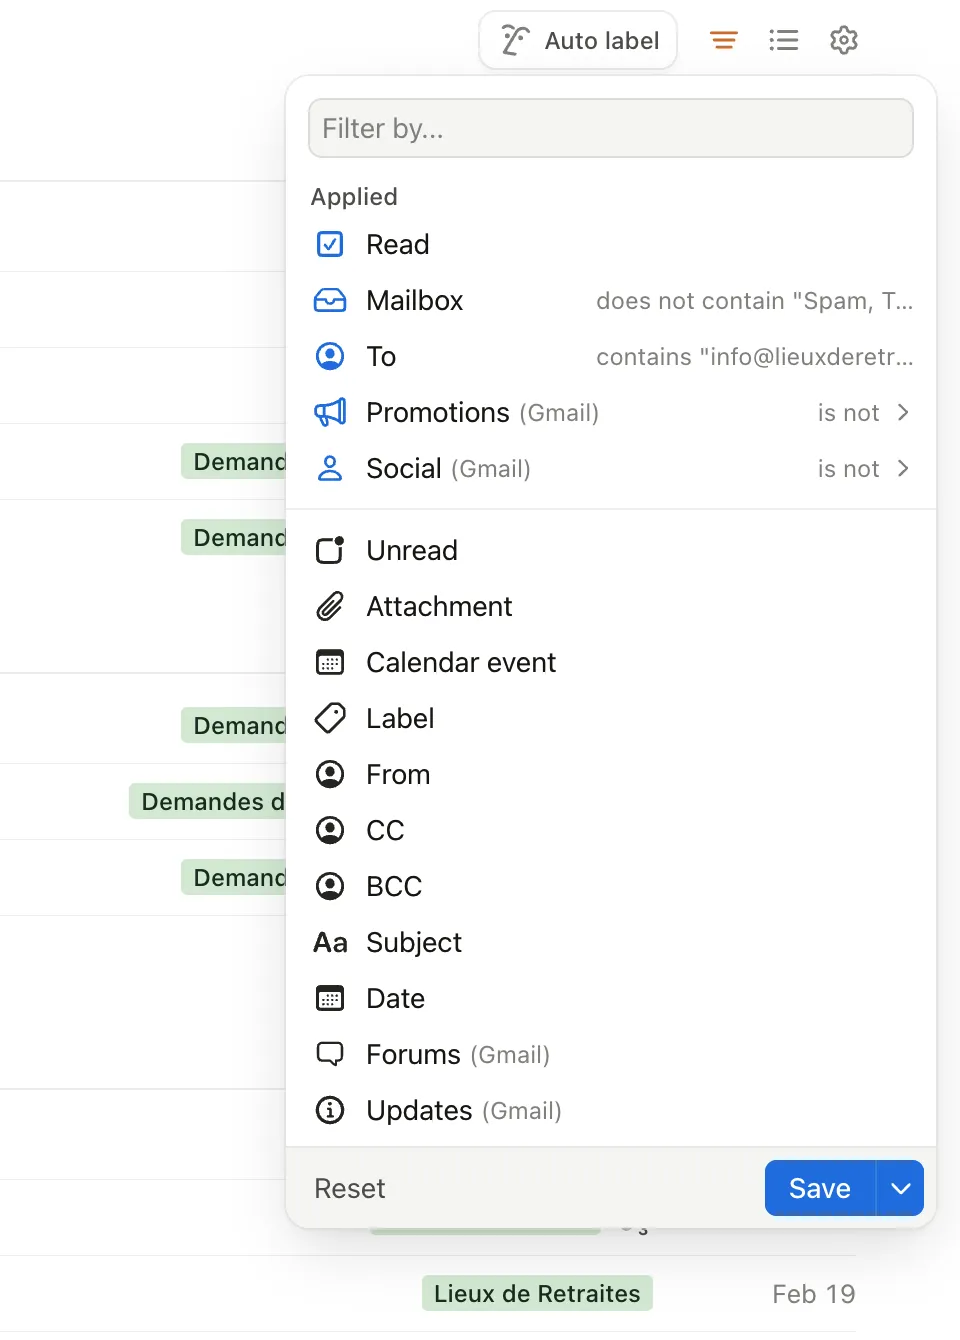
For example, I have a view called "Lieux de Retraites" that contains all emails related to my website lieuxderetraites.fr. I can filter either by including all relevant labels or by using the sender & recipients filter with "info@lieuxderetraites.fr".
Don't forget to click Save before exiting—you can also save any preset of filters as a new view.
PS: Filters are additive (using AND logic instead of OR). When multiple filters are applied, emails must meet all conditions to appear in the view.
Grouping
By default, emails are grouped chronologically. However, unlike Gmail or Outlook, Notion Mail offers several grouping options:
- Date (default): Groups emails by Today, Yesterday, Last 7 days, Last 30 days, etc.
- Starred: Creates separate groups for starred and non-starred emails
- Important: Creates separate groups for important and non-important emails
- Email or domain: Prompts you to enter keywords or select from a list. Perfect for organizing views by key contacts, customers, or team members. You can use specific email addresses or entire domains (e.g., @templates4notion.com)

- Priority: This feature lets you assign status-like properties to your emails—perfect if you use your inbox as a todo list like me. The default options are Todo, Waiting, Important, and No status, and you can easily customize their name, colors and default settings.

- Label: When grouping by Gmail labels, you can select which ones to include. This is useful for creating detailed views of specific topics. For example, my Lieux de retraites view is grouped by all labels relevant to this project, making it easier to access each sub-group. Note that Gmail's Important and Starred are also considered labels in Notion Mail, allowing you to create views that combine or exclude both.

- Unread: Separates emails into read and unread groups
Note that emails always maintain chronological sorting, regardless of grouping. Additionally, when you use grouping, it creates sub-views in your navigation bar. Clicking these sub-views automatically scrolls you to the corresponding group within the view.

Display Properties
The last bit of customization you can add to your views is selecting which properties to display. Think of items like dates, subjects, and other email elements as properties—similar to how Notion's properties work.
To manage visible properties, click the gear ⚙️ icon (edit view button) at the top-right of the page, then select Properties. Here, you can show or hide default properties like Priority, From (sender), Subject, Label, and Files.
You can also create your own custom properties! Just like in Notion, you can choose from various property types: text, number, select, multi-select, status, date, person, checkbox, URL, and files & attachments.

For example, you can use a text property to add personal notes, a select property to specify project assignments, a date property for follow-up deadlines, or a person property to tag workspace members. The possibilities are endless.
These new properties appear at the top of the window when you click any email. If a property has a value, it will be displayed; if empty, you'll see a prompt to "Add [property name]".

Unlike Notion properties, Notion Mail properties exist only within their specific views. Custom properties you create in one view won't appear in other views. While the reasoning behind this design choice isn't clear, it's worth noting this distinction.
Reminders
A standout feature of Notion Mail is email reminders. When you add a reminder to an email, it's temporarily hidden from your main inbox and moved to the Reminders section in your sidebar until your specified date and time.
To set a reminder, click the clock icon or press H while viewing an email. You can then choose when you want the email to reappear in your inbox, along with the option to Remind if no reply or Remind regardless.

This is an excellent feature that helps maintain a clean inbox by managing time-sensitive emails.
The feature has two minor drawbacks: when an email with a "Pending" priority status returns after a reminder, it defaults back to "Todo" status. Also, it doesn't send any notifications—though I actually prefer this.
Writing in Notion Mail
Notion blocks & formatting
This is my favorite aspect of Notion Mail. Writing feels identical to Notion itself. You get a clean, minimalist interface while having access to all the familiar Notion blocks and formatting options.
- Want to add a callout? Sure thing!
- A few checkboxes? Yes sir, they are even interactive for the recipient.
- Need to insert a quote? No problem at all.
- Long email that requires structure? Add headings 1, 2 and 3 as you please.
- Feels boring? Add color to text and background!

Like in Notion, simply type / to access blocks or use basic markdown shortcuts (for example, ## creates a heading 2).
I've noticed a few bugs (some elements don't display correctly, especially checkboxes and code blocks)—but everything renders perfectly on the recipient's end.
Snippets
Snippets is one of Notion Mail's key features. You can create reusable text snippets and insert them anywhere in your emails, making it convenient for content you frequently repeat.
For example, I created a snippet for my "book a call" phrase that I use over and over with clients and prospects.

To create snippets, go to Settings → Snippets or type "Snippets" in the command menu (cmd + p). You'll find several pre-configured snippets that you can use or modify. To create your own, simply click the blue Create new button.
You can apply any standard formatting to your snippets, and you can include dynamic fields using { } notation—for example, {first_name}.

The name you give your snippet is what you'll type to add it to your emails. For instance, since I named my calendar link snippet cal, I simply type /cal to insert it.
Insert availability (Notion Calendar integration)
A standout feature unique to Notion Mail is the Insert availability or Schedule function.
To use it, type /schedule or click the calendar icon at the bottom of the email editor to open this calendar popup:

Available time blocks between you and your recipient will already be displayed, but you can add more using the pen tool. Make sure to select your desired meeting duration and conferencing tool.
Once done, click outside the popup, and you'll see a simple "Schedule here" hyperlinked text in your email.
When the recipient clicks it, they'll be directed to a Notion Calendar link where they can select any available time slot.

Sharing availabilities and scheduling calls has never been simpler!
Notion Mail Settings
Here are some important settings we haven't covered yet:
Auto-advance
In the Inbox settings section, auto-advance determines where you'll go after archiving or deleting an email. You can choose from:
- Go to next thread (useful when batching emails in chronological order)
- Go to previous thread (useful when batching emails in reverse-chronological order)
- Close thread

Gmail filters
In its own section of the settings, you'll find all your current Gmail filters. If you don't have any filters, this section will be empty.

From there you can delete or edit the filters, which redirects you to the filters section in your Gmail account. You can't edit or create new filters directly in Notion Mail—perhaps this will be added in a future update?
Signatures
One of the biggest limitations of Notion Mail is that, as of March 2025, it doesn't support custom signatures. You can't even use your existing Gmail signatures.
The Signatures section of the settings only allows you to enable or disable the Sent with Notion Mail message at the bottom of your emails.
I'm not certain whether this feature is available to users on Notion's free plan.
How to create custom signatures in Notion Mail? Currently, the only workaround is to create a snippet with your signature and manually add it at the end of each email. There's no automatic solution as of March 2025.
Notion Mail AI features
To use AI features in Notion Mail, you'll need to have the Notion AI add-on activated on your Notion workspace
Auto-labels
The main AI feature in Notion Mail is auto-labels. This feature creates new labels based on which emails you want to keep, using prompts you provide. You can choose to either Split these emails into their own view or Keep in inbox to display them in your main inbox.

After prompting, it will scan your emails and ask you to verify examples of emails that should and shouldn't belong to this category. On this screen, you can modify the label's name, description, and color.
You can also enable AI for any existing label—simply select the label, click the ••• menu to its right, and enable Notion AI. The AI will then learn which types of emails should receive this label based on your existing labeled emails.
While viewing an email, you can click "Auto label similar," which applies the same principle—the AI learns from the current email and its labels to automatically categorize future similar emails.

Notion AI for Writing Emails
Just like in Notion, you can use Notion AI to rewrite, correct, and improve your writing when replying to or composing emails.

Like in Notion, I find the Improve writing button works excellently. For specific needs, you can directly prompt the AI with your request. You can even ask it to compose responses for you, such as Answer by telling them I agree with the project scope and the deadline should be pushed one week further

Notion AI suggestions
Notion AI suggests quick responses to your emails. This works especially well for simple yes/no replies or common courtesies like "thank you" and "you're welcome."

Notion Mail Templates

Just like Notion itself, Notion Mail offers templates. While simpler than Notion's templates, they help you quickly create views or find inspiration.
You can browse the collection of 15 templates by clicking Templates in your navigation bar.
Like regular Notion templates, you can customize these to match your specific needs 😊
Notion Mail Keyboard Shortcuts

Here are the essential keyboard shortcuts for Notion Mail:
- cmd + P: access command menu
- C: compose a new email
- cmd + maj + P: reply
- H: remind
- U: mark as read/unread
- E: archive
- del: delete
- ctrl + F: open view's filters
- ctrl + E: edit view
- g + [letter]: go to all mail [a], sent [s], drafts [d], spam [!], trash [#]
- cmd + shift + L: switch between dark/light mode
- cmd + enter: send email
- cmd + O: open attachments
You can also press ? to access all keyboard shortcuts (meta 🤯).
How I organize my Notion Mail inbox
As a solopreneur working on multiple projects simultaneously, here's how I set up my Notion Mail:
Inbox as a task list
Grouped by priority with options being Todo (default), Pending, Calls, & Follow-up.

One view per project
Grouped by labels and sorted chronologically.

Snippets
One snippet for sharing availabilities, one for follow-ups, and one for my custom signature.

No AI auto label
Since my inbox is my main source of work, I prefer to rely on my personal categorization rather than trusting the AI completely.
Notion Mail Current Issues
Here are the limitations I've encountered as of March 2025:
- No custom signatures
- No sorting: emails are sorted chronologically by default
- No "move to" or drag & drop option: Unlike Gmail, where I could easily move emails to labels and remove them from my inbox, Notion Mail requires two steps—assigning a label and then archiving the email.
- Inconsistent preview display: Some emails appear zoomed out
- Formatting issues
- Code blocks and their text don't display properly in the email editor
- Checkboxes are invisible in the email editor
- Hyperlinks from snippets break when used in the email editor
- Custom properties don't sync across views: Unlike standard Notion properties (see Display properties section)
- Notion AI confusion with identities: The AI frequently mixes up senders and recipients, sometimes signing off with the recipient's name or generating responses from the wrong perspective
- Gmail only
- No mobile app
Conclusion
Notion Mail redefines the email experience by bringing the flexibility and organization of Notion into your inbox. With powerful features like customizable views, advanced filtering, grouping, and inline properties, it allows you to tailor your email workflow to your specific needs. The integration of Notion-style writing blocks, hover actions, and snippets makes composing and managing emails seamless and efficient.
Whether you're looking to streamline your inbox, organize your conversations, or bring structure to your email management, Notion Mail provides the tools to do it all with ease. Take the time to experiment with different settings, views, and properties to build a system that works best for you. Once you do, email might just feel a little less like a chore and a little more like an extension of your productivity system.
Start now & create your Notion account 🙃
(#NotionPartner)
To filter emails in a specific view within Notion Mail, click the Filter icon located at the top-right corner of the page. You can also refine your filters by going to Edit View (⚙️) → Filter, where you can set conditions based on sender, subject, labels, or other email properties. This makes it easy to focus on relevant messages without distractions.
In Notion Mail, reminders function as a way to temporarily hide emails until you need them. When you set a reminder on an email, it disappears from your main inbox and moves to the Reminders section. At the scheduled time, the email reappears in your inbox, helping you stay on top of important messages without cluttering your inbox.
Snippets in Notion Mail are reusable text templates that can help speed up email replies. You can create and manage snippets by going to Settings → Snippets or by accessing them through the command menu (cmd/ctrl + P). When composing an email, you can quickly insert a snippet, saving time and ensuring consistency in responses.
Latest posts
Friends of Notion


Templates that (truly) work

