
Build Your Own Notion Invoice Template Generator
Streamline Your Process with Notion Invoice
Are you tired of manually creating invoices for your business? Consider using Notion: it’s THE tool that can simplify your invoicing process. This tutorial will be super useful to freelancers, entrepreneurs, startups, and small businesses who don't want to pay for an expensive third-party invoicing tool.

Benefits of using a Notion Invoice
Create Custom Invoice Templates
Notion makes it easy for you to create customizable invoice or quotation templates, including all the necessary information for your clients, such as payment terms and contact details. Not only that, but Notion's database feature will allow you to easily track which invoices need payment, and which ones have already been paid.
To get started, all you need to do is create an invoice template and add it to a template button. Then, you can build your database, where you'll store all your invoices. It's a simple, easy step that will save you time and streamline your invoicing process.
And the best part? You can use a free Notion template for invoicing, which includes all of the necessary details, such as payment options and item details. This template will allow you to add your own information and connect your data, so you can send invoices to your clients with ease.
Collaborate with Your Team
One of the biggest advantages of using Notion for invoicing is the ability to collaborate with your team. You can share your database with other members of your team, allowing them to view and edit invoices as needed. This can be especially helpful if you have team members who need to follow up on unpaid invoices or update client information.
Automate Your Workflow (Zapier or Make)
Notion also offers integrations with other automation tools, such as Zapier and Make. This means you can set up automations to send invoice reminders or notifications to your team or client when an invoice has been paid / not paid. You can also build an automation that will auto-generate new invoices each time you have a new client. The more you automate, the less manual tasks you’ll have to perform. If you manage your finances in Notion, you can also link your system to your Invoice database.
Stay Organized and Save Time
In addition to streamlining your invoicing process, using Notion for invoicing can also help you stay organized and save time. You can easily search and filter through your database properties to find specific invoices or clients, and you can even export your data to other formats, such as CSV or Excel.
Create your Own Invoicing System
Build your Invoice Template
Okay, let's start with what I believe is the most enjoyable part: design. An invoice (or quotation) is quite simple, but it must include some key elements:
- Invoice number
- Date
- Buyer’s details
- Seller’s details
- Items prices + quantity + total price
- Due date
- Payment details
Then you can also add a few optional things like:
- Discount
- Items details
- “Thank you” message
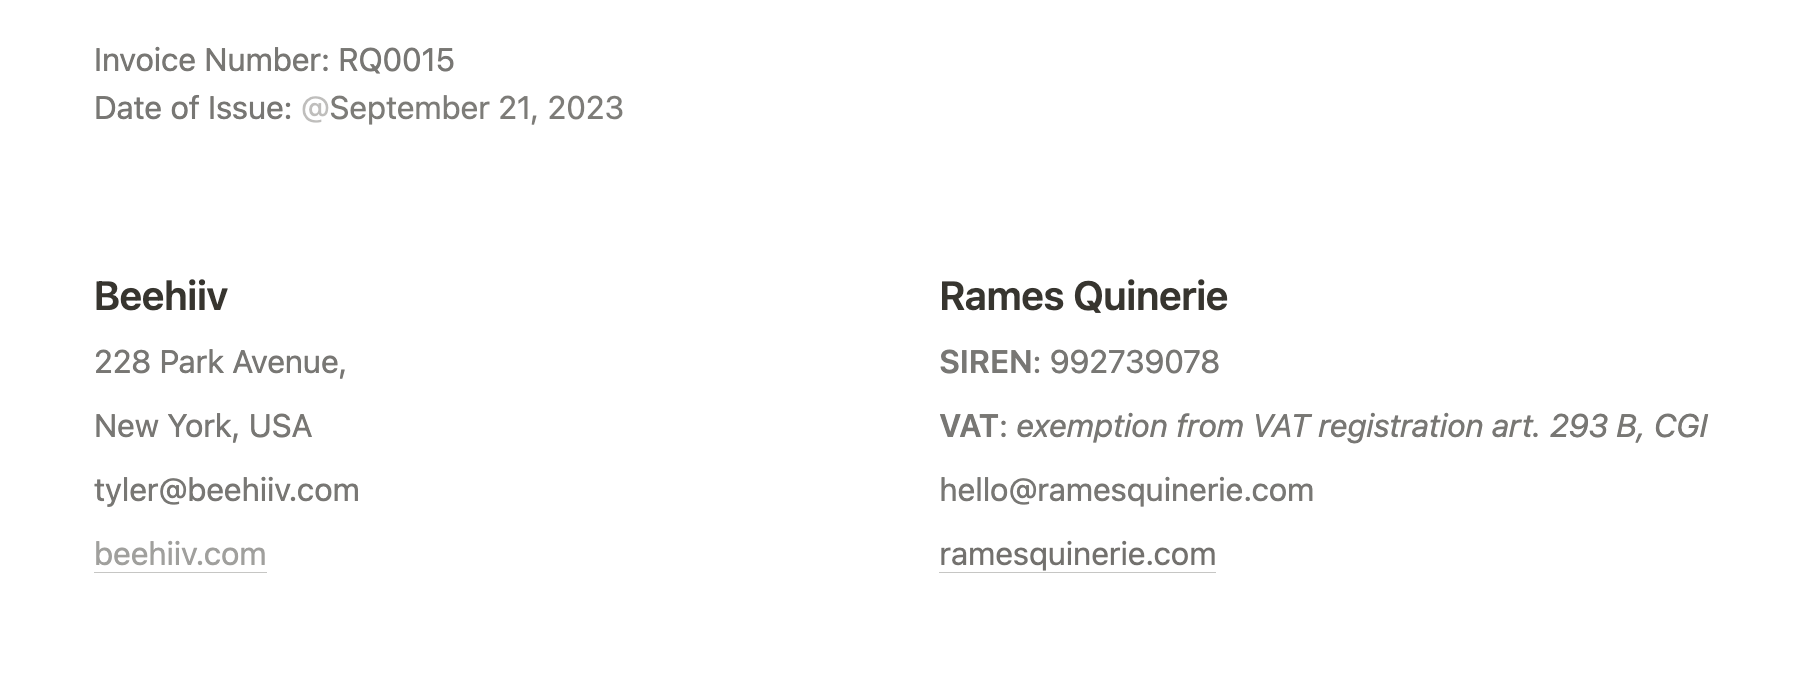
So here's an example of what our header can look like:
Now, let's talk about pricing. You want your client to easily understand the offer and the corresponding amount. To achieve this, you can utilize a simple table database that will automatically calculate the total price based on the quantity of each item.
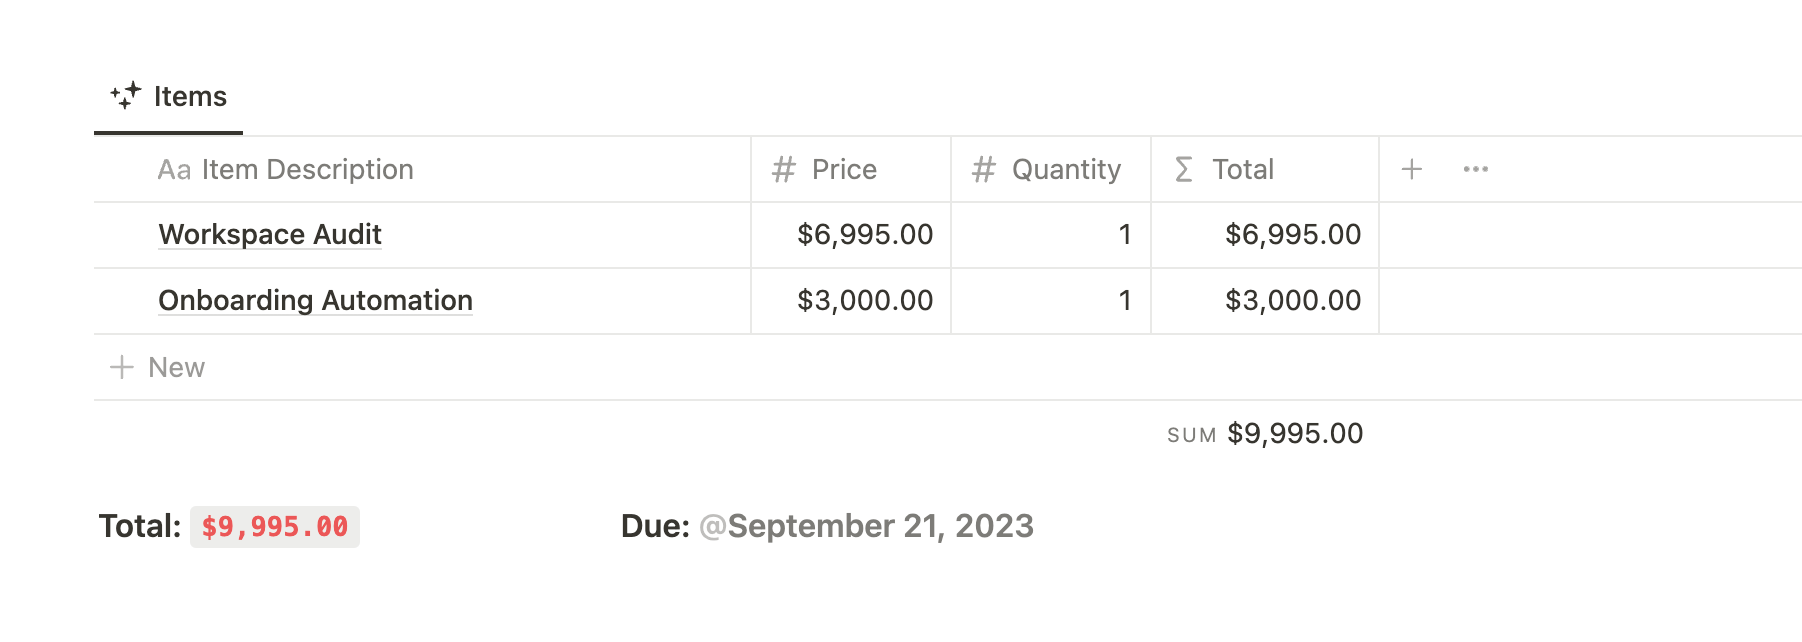
The total property is calculated using a simple formula: prop("Price") * prop("Quantity").
To find the grand total, you need to sum up all the items in the Total property. In this case, the grand total is $9,995.00.
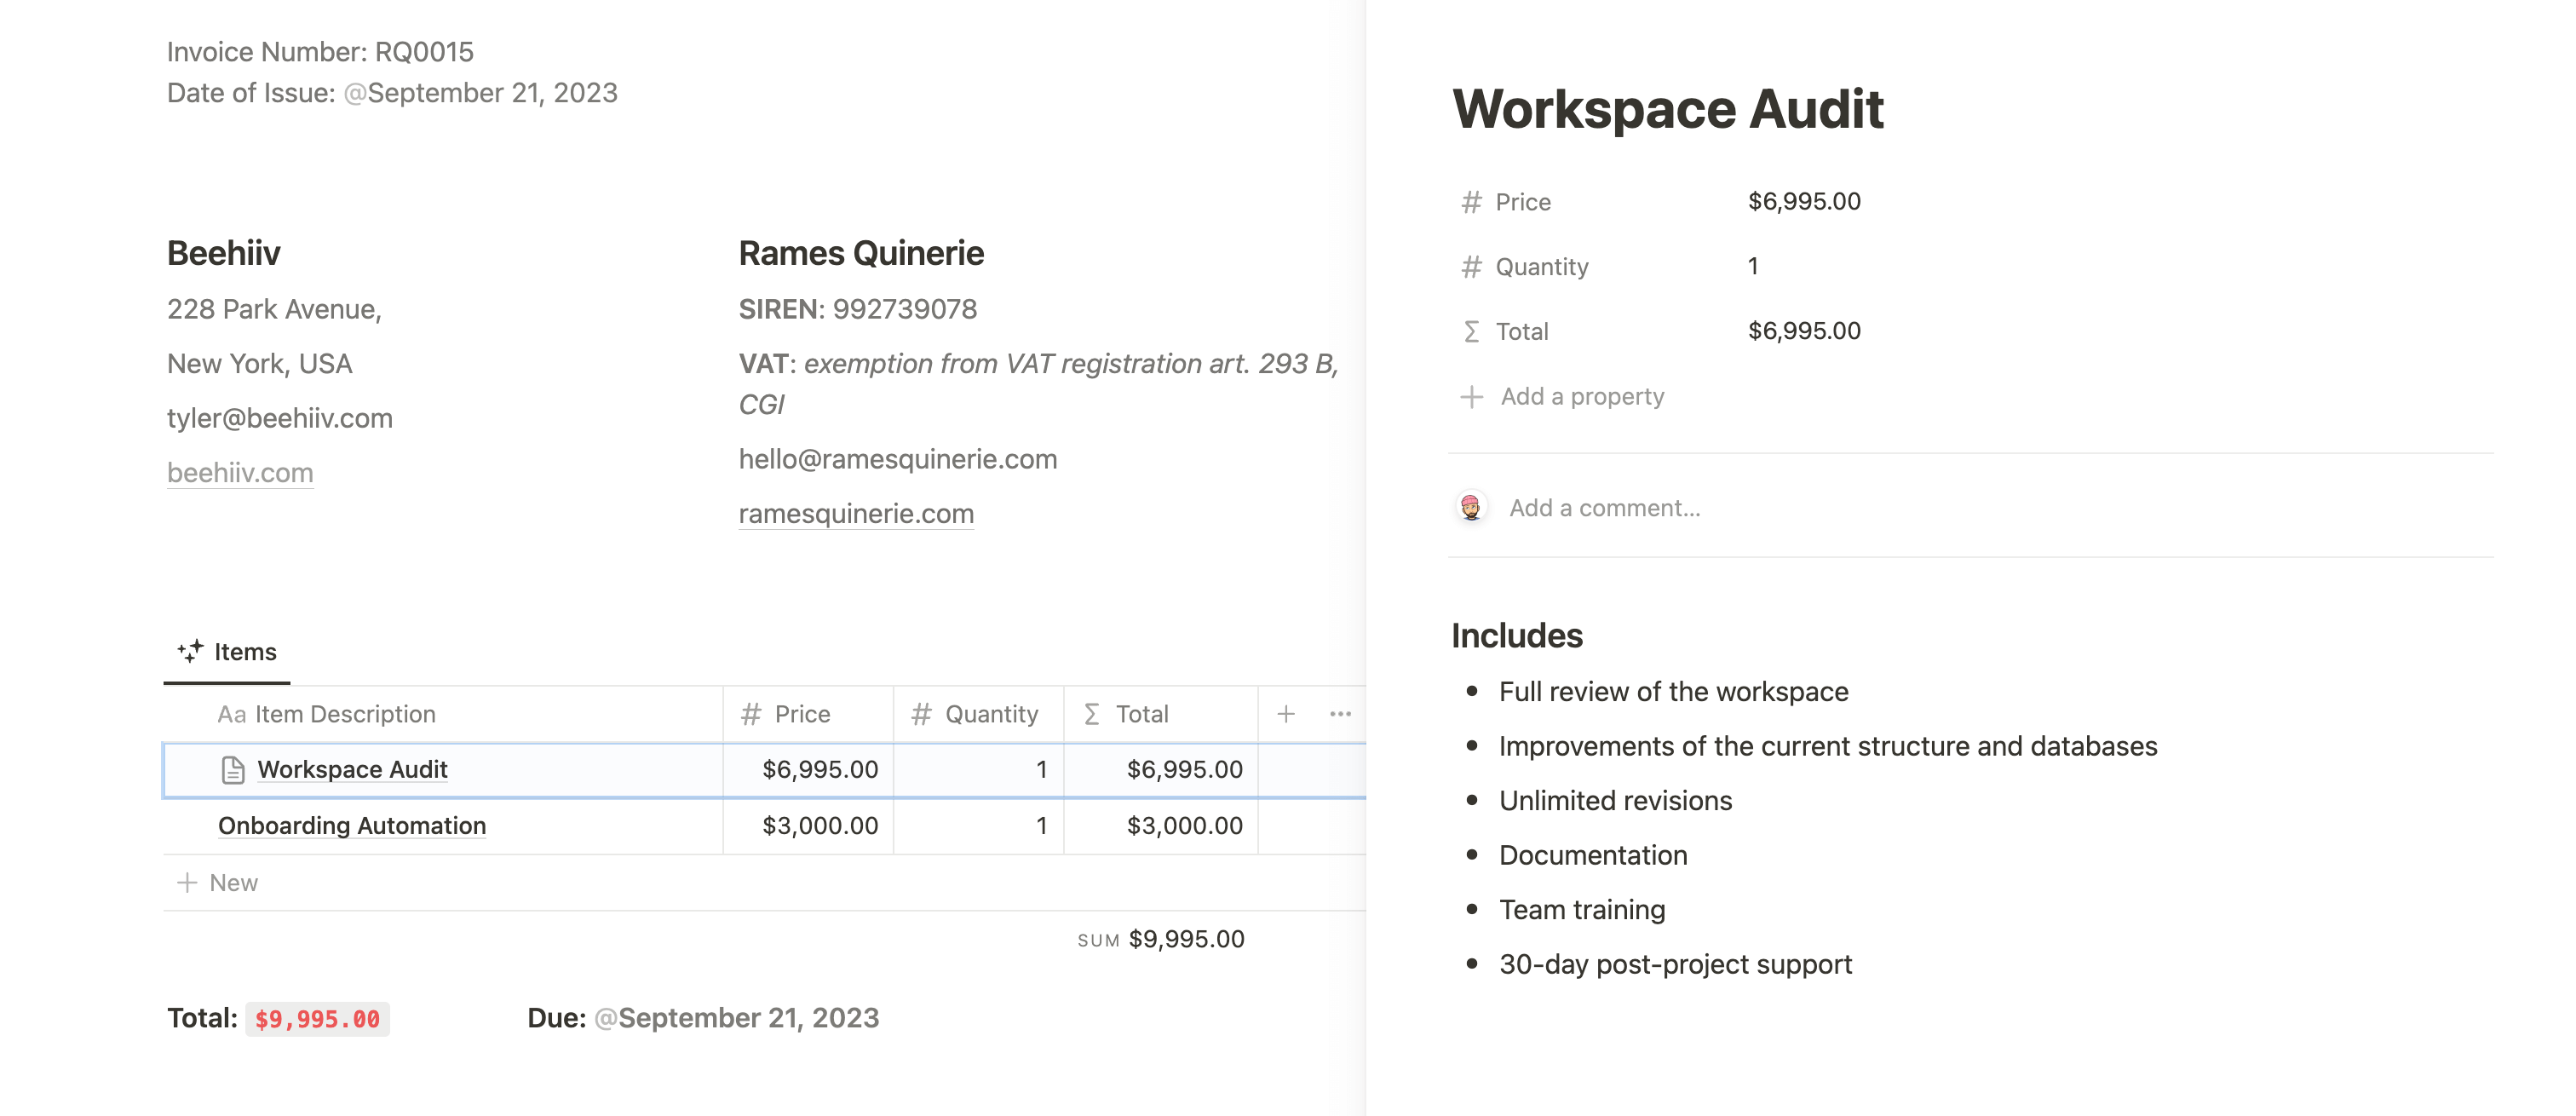
What's great about Notion is that you can provide more pricing information for each item in your table. To do so, simply click "Open" on the right side of the item's name property and explain your pricing on the blank page.
Consider creating a new block that displays the total price prominently so that the client cannot miss it. You can also adda line for discounts if needed.
Last but not least, you need to provide the client with a way to pay the invoice. This can be a link to Stripe or Paypal payment link, your bank account details, or any other acceptable form of payment. What's important is that the client understands their options clearly.

Finally, you can add a small “Thank you” note at the end of your invoice.
Overall, try to keep your content minimalistic as it’s supposed to be an official, professional document. Keep it easy to read & to find information on.
That’s it! Easy right? You’re now ready to send an invoice to your first customer.
Store & Manage your Invoices
Now that your invoice template is correctly set up, you need a place to store all of them.
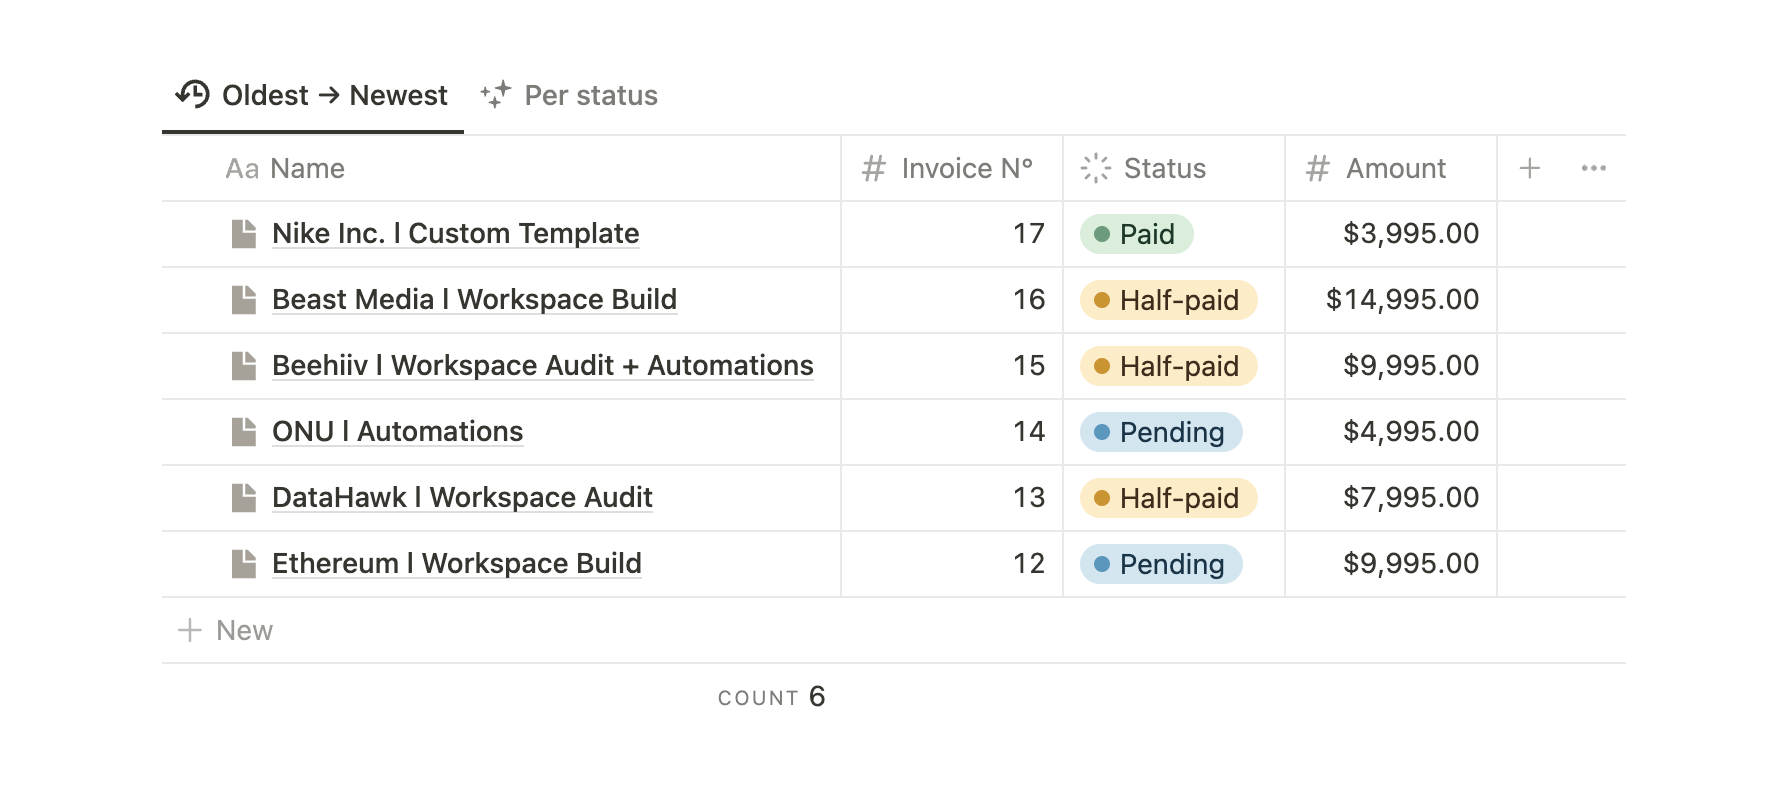
First, create a new table in the database and name it "Invoices" or "Invoice Generator". You can add the following properties to the table:
- Amount: the total amount of the invoice
- Invoice N°: I use that property to sort my database
- Status: options can be “Not sent”, “Pending”, “Half-paid”, “Paid”, and “rejected”
- Client: relation property to your clients CRM if you have one
- Created time: automatically updated by Notion
You should have something that looks like that:
Next, you can add a "Per status" view, which is essentially a board view grouped by status. This view enables you to conveniently track all your invoices and determine which stage of the process they are in.

Finally, navigate to your database templates by clicking the down arrow at the top-right of your database, and selecting "New template". If you haven't already, paste your Invoice template here. Make sure to enable the template to be used by default.
From now on, whenever you need to create a new invoice, simply create a new row/item in your database. The template will automatically populate with all the necessary information, maintaining the same layout.
Remember to customize the template with your own details such as Company Name, Registration Number, email, etc. Once you've done that, you're all set to go!
How to send Notion invoices
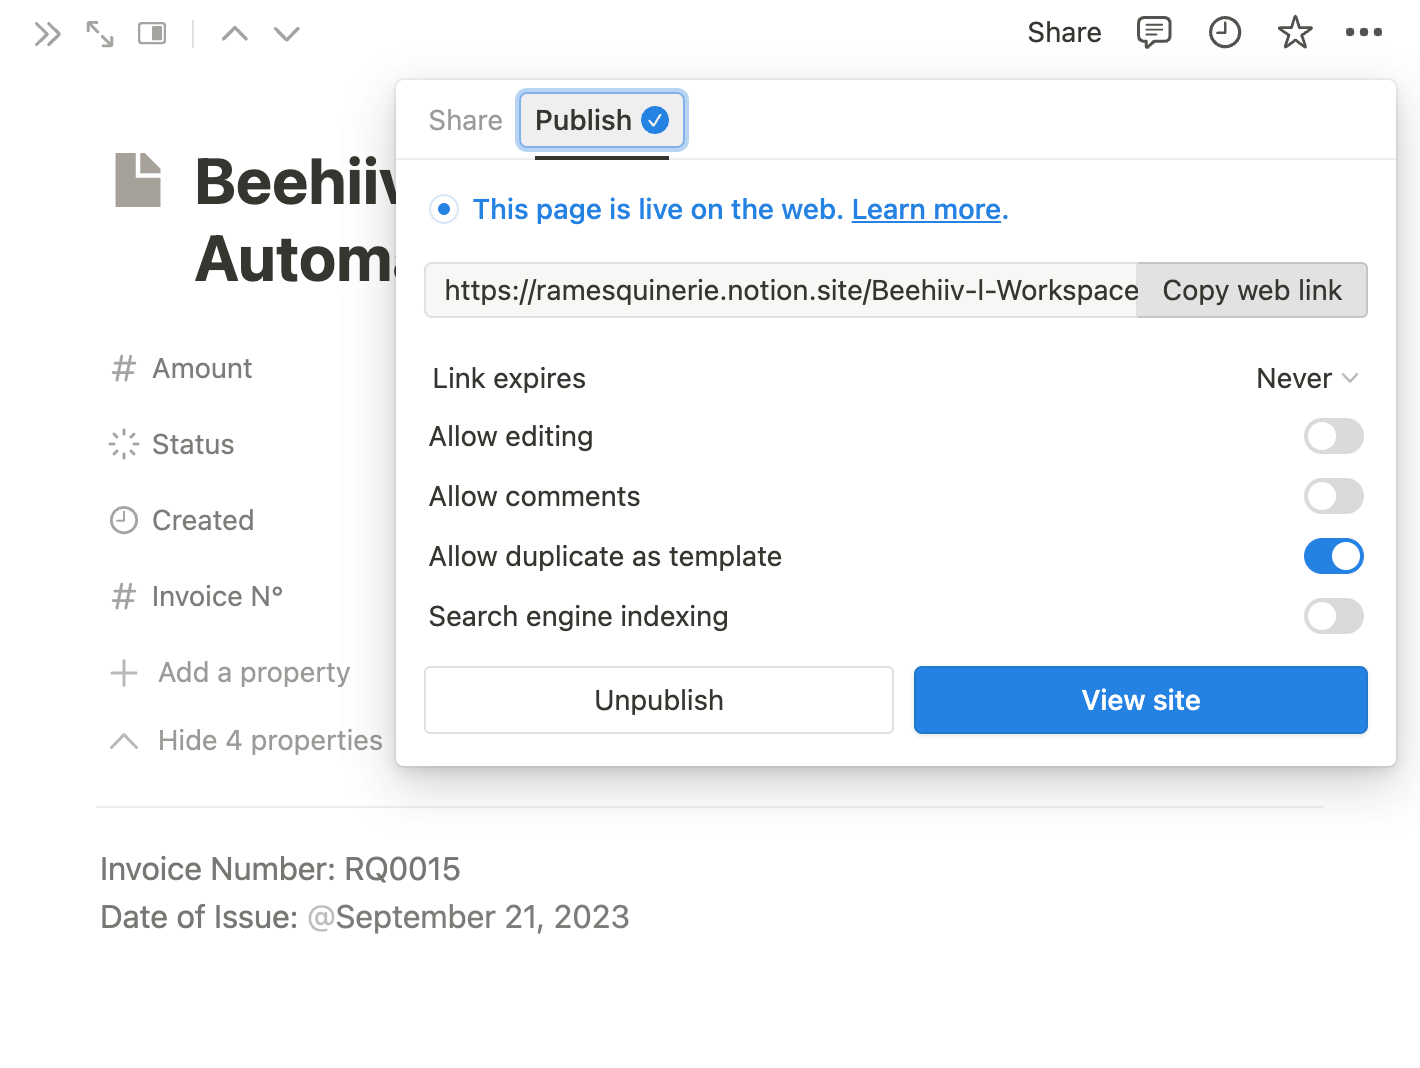
Finally, my favorite part about Notion invoices is the various ways you can share them with your clients.
The first option, which is the classic one, is to export your page as a PDF and email it to your clients. To do this, go to your page settings (click the three dots at the top-right of your page), select Export, and fill out the settings.
The second option, which I personally find much easier, is to share the public link of your invoice with your client. To do this, click the "Share" button at the top-right of your page, then select "Publish" and click the "Publish to web" button. Copy the link and send it to your client. It's as simple as that!
(And don't forget to deactivate the "Allow duplicate as template" option.)
Free Template: Notion Invoice Generator
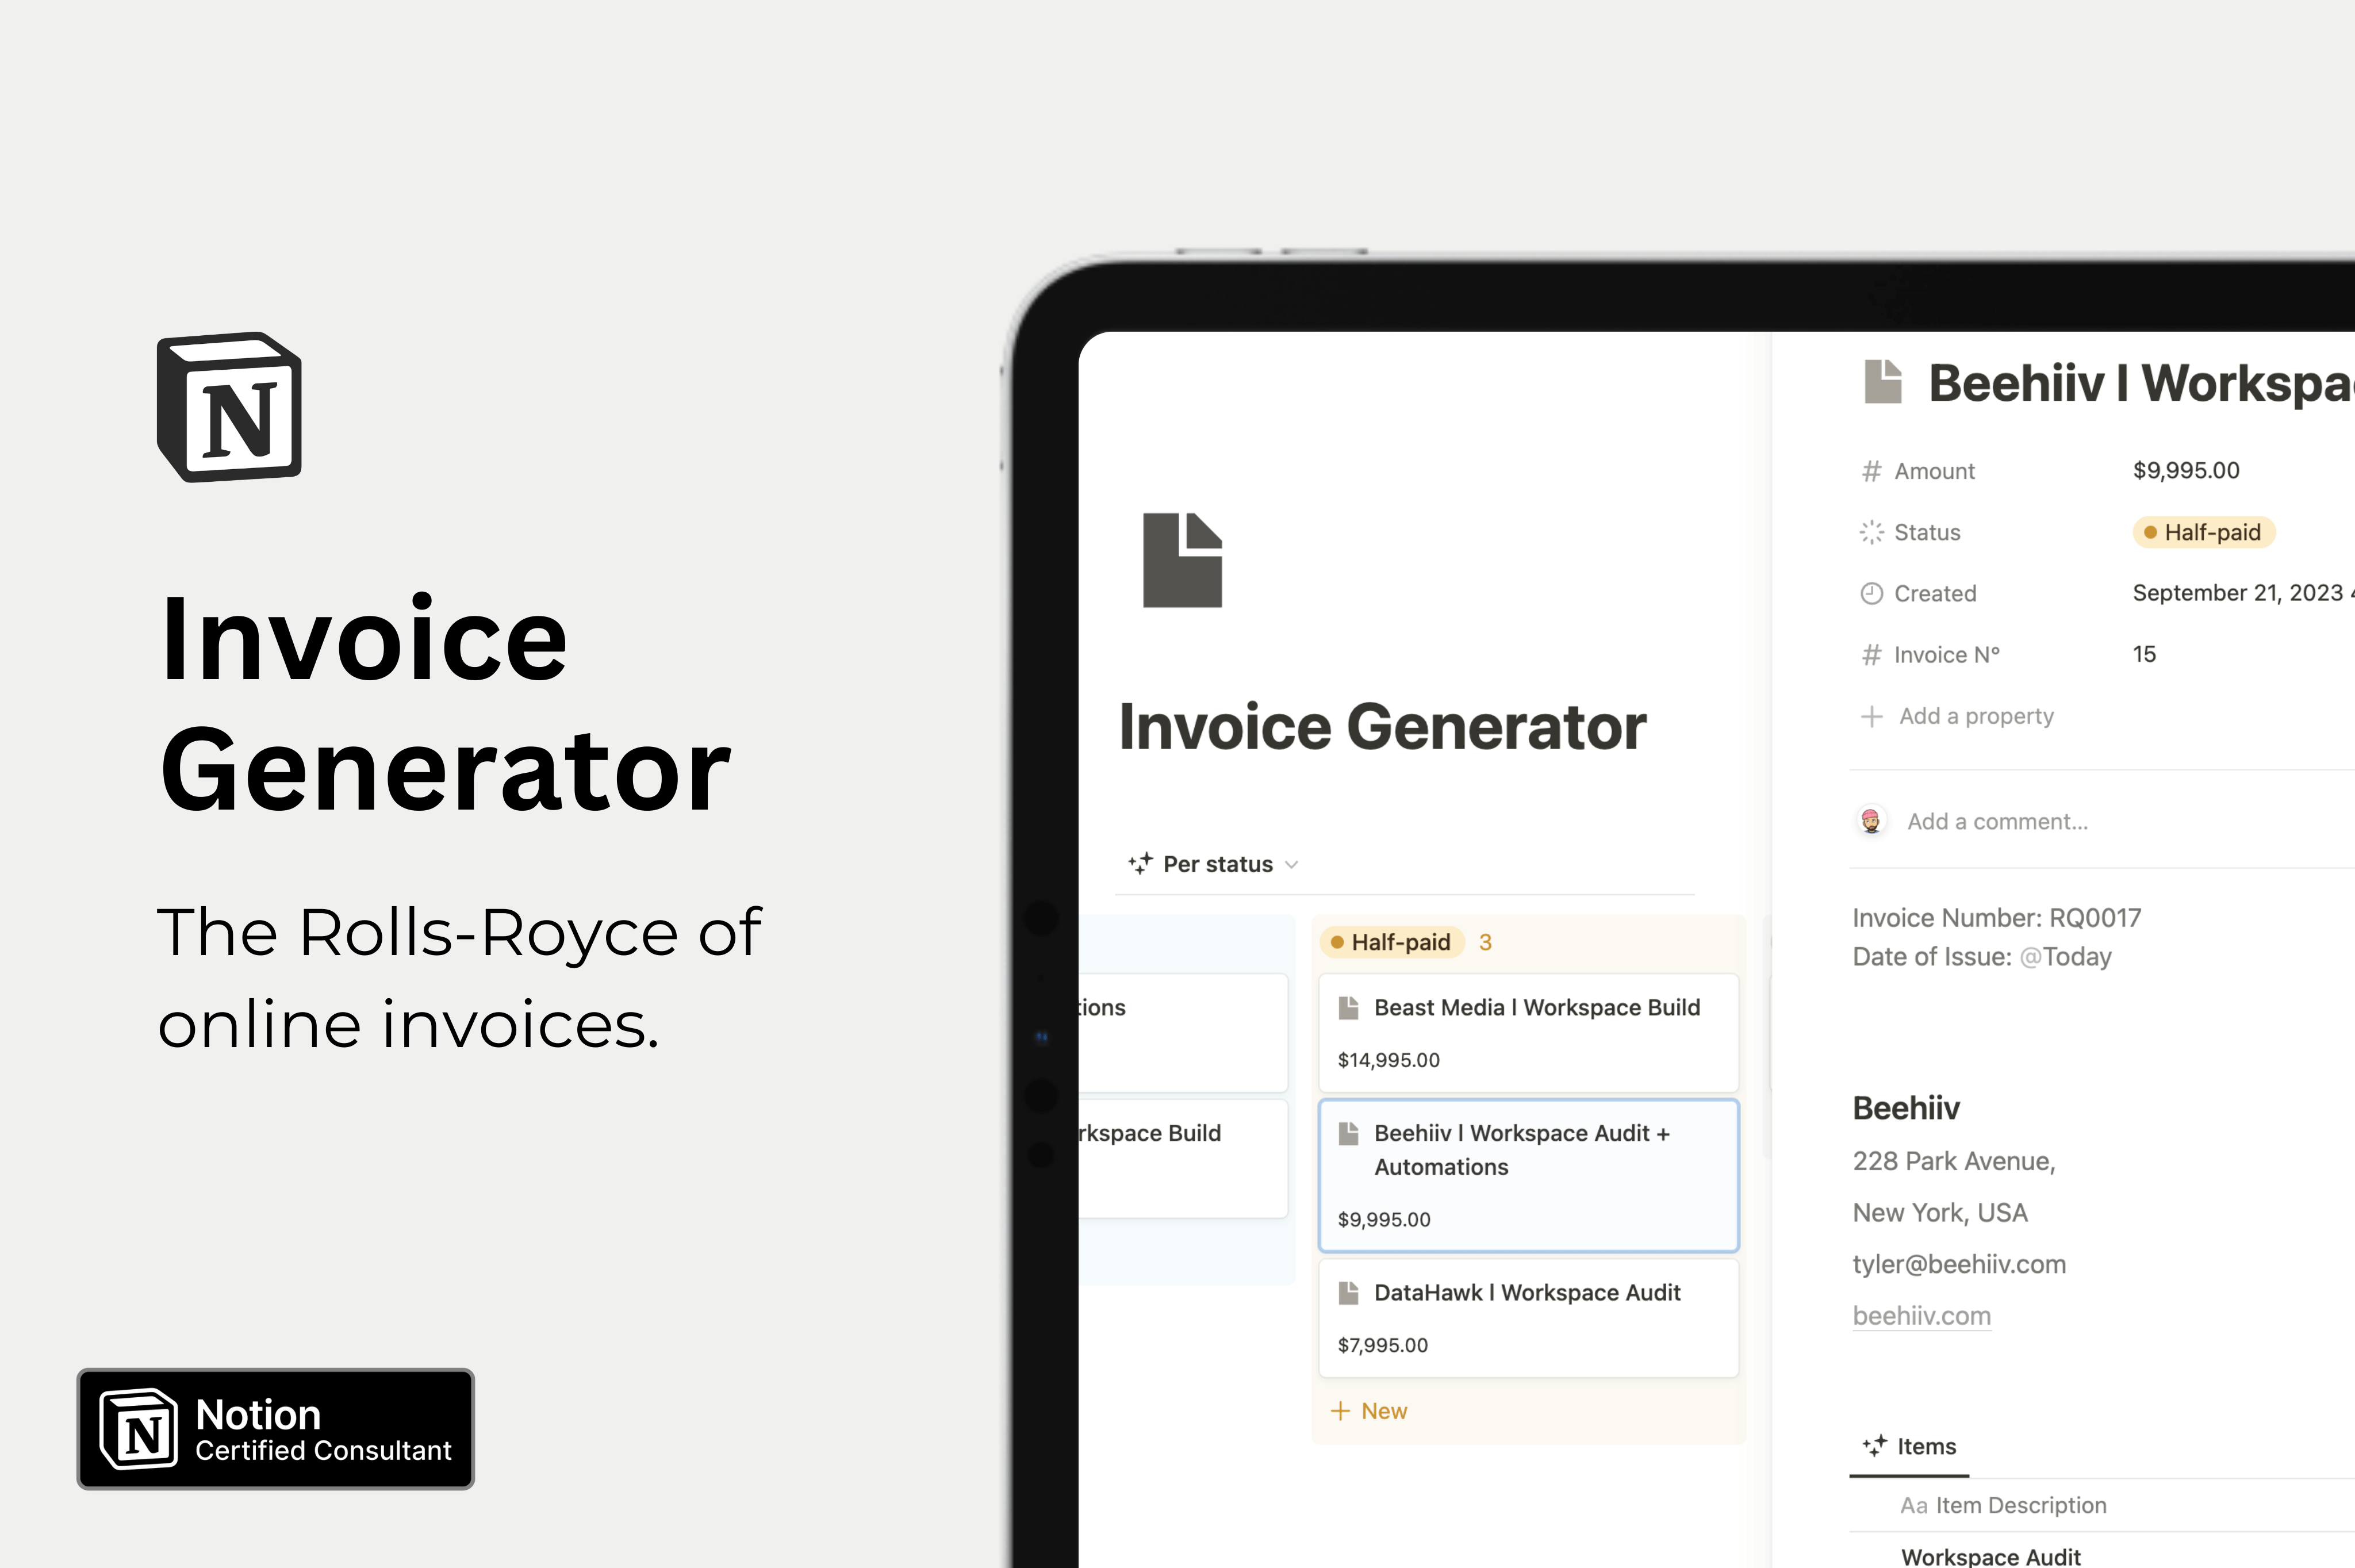
Why start from scratch when you can use my free invoice generator Notion template? The template already includes everything mentioned above, so all you need to do is input your own information, connect your data, and you're ready to go.
Download the free template
Overall, Notion is a powerful tool for creating and managing invoices. Whether you're a freelancer or a small business owner, Notion can help you save time and streamline your invoicing process. So why not give it a try and see the benefits for yourself?
Start now & create your Notion account 🙃
(#NotionPartner)
Using Notion for invoicing allows you to create custom invoice templates, collaborate with your team, automate your workflow with integrations like Zapier or Make, and stay organized while saving time. With Notion, you can keep track of which invoices need payment and have all your invoices easily accessible in a database.
With Notion, invoice or quotation templates can be created including all necessary information for clients, such as payment terms and contact details. Key elements should include invoice number, date, buyer's details, seller's details, items prices with quantity and total price, due date, and payment details. Optional elements like a discount, items details, and a “Thank you” note can also be added.
Notion invoices can be shared with clients mainly in two ways. The first option is to export your page as a PDF and email it to your clients. The second option, which is more convenient for some, is to share the public link of your invoice with your client.


